

API
In this Topic: Hide
 Click one of the links listed above
to jump to a section on this page.
The OranageCRM API Implementation Guide is available at api.orangecrm.com.
API stands for Application Program Interface. APIs allow external programs or web pages to interact with OrangeCRM. The basic function of an API is to take HTML sent to the CRM from an external source and parse it into data strings that can be read and stored by the database.
The OrangeCRM API can be used in lots of ways. Some basic examples include posting new customers, transactions or fulfillments from an online shopping cart or from your call center. API tokens are created in the CRM and then provided to the external sources who will be using them to post data to the CRM. Each API token created in OrangeCRM will have its own set of user-defined rules and parameters for how the incoming data will be handled.
To see a list of your current APIs, go to the Lists menu and click on API Interfaces.
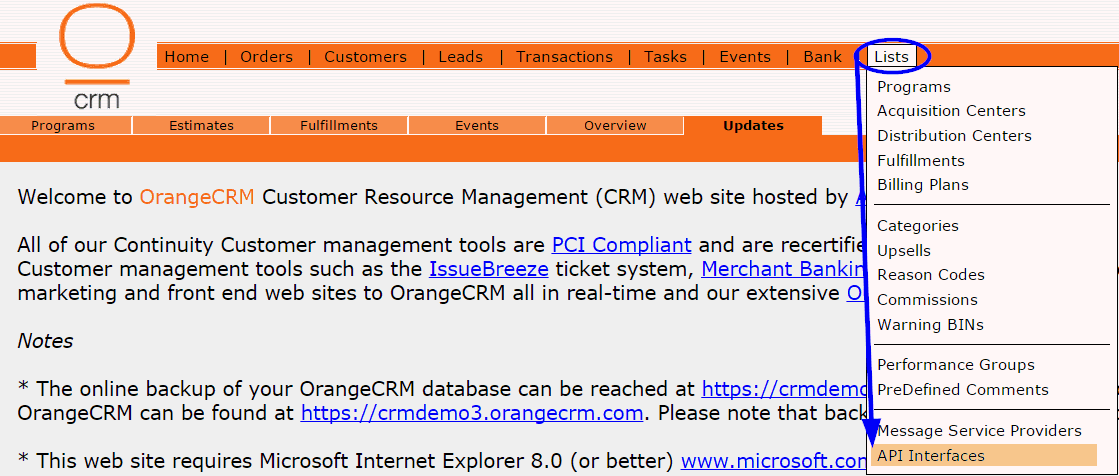
A list like the one below will appear.

To create a new API, click on the New API button in the upper right corner.

A new API Interface record will open.

Name
This is an important field. It is used to identify the API and will be referenced in other places throughout the CRM, including reports. Therefore, make sure you choose a name that is descriptive, clearly differentiates this API from other APIs and identifies which program it will be assigned to. API names can always be changed in the future, if need be.
Important: Each API, across all Programs, should have a unique name. APIs with an identical name can easily be confused in reporting and other areas in the CRM, even if they are assigned to different programs.
API Type
There are ten API Types to choose from. SOAP is an acronym for Sales Order & Acquisition Program. The Setup options will vary depending on the API Type selected. An explanation of the Setup options for each of the ten API Types are provided in this section. Look for the subheading title below that contains the API Type you are interested in.
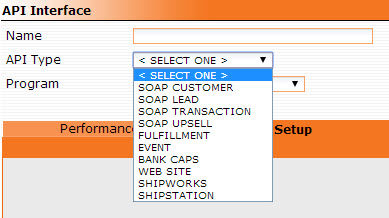
Program
Each API must be assigned to a Program.
Program GUID
The GUID of the selected Program will auto-populate.
GUID
The system generated GUID of this API.
Token
The system generated token assigned to this API. The application/web page/call center that will be posting data to OrangeCRM will need to use the API token with each post.
Debug to Log
The default for this field is set to Disable. We only recommend enabling it temporarily during times of testing or debugging, as it will result in a record of all API posts with that token being stored in the Database Log. If left enabled over a long period of time, it will slow processes and clutter your Database Log unnecessarily.
API Type: SOAP Customer
This type of API is used for posting customer data to the CRM when it is collected externally, such as by an online shopping cart or a call center.
The settings in the Setup tab are used to dictate how incoming customer data will be handled by the CRM when this specific API token is used. An explanation of each setting option is provided below.
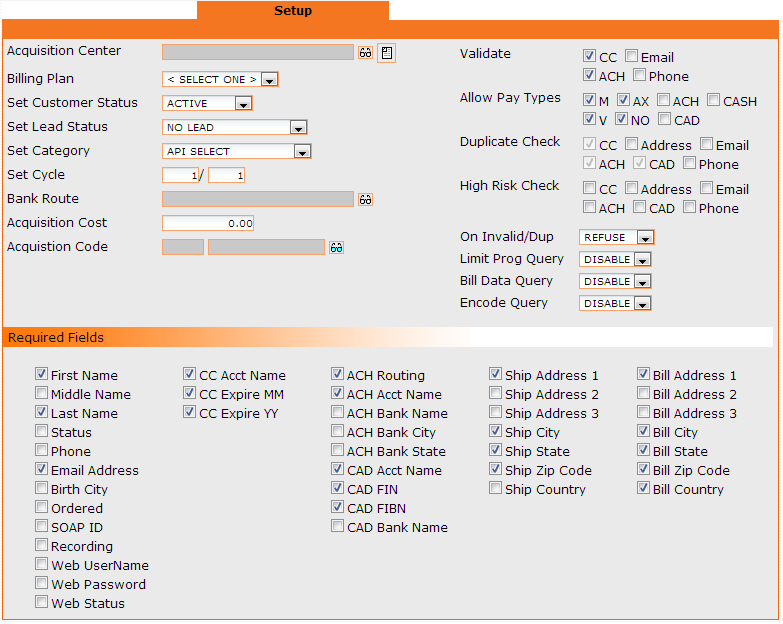
Acquisition Center
Select the Acquisition Center incoming customers will be assigned to when this API token is used.
Billing Plan
Select the Billing Plan incoming customers will be assigned to when this API token is used.
Set Customer Status
Select the status customers will automatically be set to when this API token is used. The selected customer status will override any status that is posted.
Note: The API Select option should only be used if you don't want to override posted customer statuses. In most cases, we don't recommend using API Select, as it allows room for error on the part of the external source who is posting the data.
Set Lead Status
If you are not using Leads, select No Lead. Otherwise, select the status leads will automatically be set to when this API token is used.
Set Category
Not all businesses use Categories. If you want the CRM to automatically assign a category to customers when this API token is used, make a selection from the drop down menu. The selected Category will override any Category that is posted.
Note: The API Select option should only be used if you don't want to override posted categories. In most cases, we don't recommend using API Select, as it allows room for error on the part of the external source who is posting the data.
Set Cycle
Enter the customer cycle count followed by the transaction cycle count that will automatically be assigned to customers when this API token is used.
Bank Route
Bank Routes are only used if you need to facilitate static bank routing, also known as sticky billing, or load balancing for multiple Merchant Banks (see Banks for more information). If your business uses Bank Routes, click on the eyeglasses icon to select the Bank Route that will automatically be assigned to customers when this API token is used.
Acquisition Cost
Insert the cost of acquiring each individual customer that is created with this API token.
Acquisition Code
Click on the eyeglasses icon to select the payable account code that will automatically be assigned to customers when this API token is used.
Validate
Only select the validate options that warrant a refusal of incoming customers. The CRM rejects customers who fail a validation check. Credit card and ACH account numbers are checked for accuracy, but phone numbers and email are only checked for incorrect formatting and invalid characters.
Important: If an invalid value is found, the customer won't be created in the CRM. Rather, the API will return an error message explaining why customer creation failed.
Allow Pay Types
The CRM will reject new customers who don't use one of the allowed payment types selected in this section.
 Pay Type OT = all other types of credit
cards that are not Mastercard, VISA, American Express or Discover. Examples
of OT Pay Types are JCB, Elo, Hipercard or Aura.
Duplicate Check
Only select the duplicate check options that warrant a refusal of incoming customers. The CRM will look at the selected fields on incoming customers and check to see if there is already an existing customer in the CRM with the same value in those fields. If a match is found, the CRM will reject the new customer.
Note: We recommend enabling Duplicate Check on continuity offers to prevent repeated orders, which may be fraudulent. For non-continuity offers that customers are allowed to purchase repeatedly, you should leave the Duplicate Check options disabled.
High Risk Check
Only select the high risk check options that warrant a refusal of incoming customers. The CRM will look at the selected fields on incoming customers and check to see if there is a customer on the blacklist with the same value in those fields. If a match is found, the CRM will reject the new customer.
 Leaving
the high risk options unchecked will allow blacklisted customers to place
future orders.
On Invalid/Dup
This setting tells the CRM how to handle incoming customers who fail validation or duplicate checks. In most cases, we recommend keeping the default setting, which refuses customers who fail validation or duplicate checks. If you want to allow customer records to be created for invalid and duplicate customers, choose the Archive option, which will immediately set the customer status to Archived upon customer creation.
Important: Archived customers aren't treated as real customers - their records and customer status can't be edited or updated, no billing or fulfillments will be processed and they are excluded from reporting. Archived customer records are only available for reference purposes.
Limit Prog Query
Do you wish to limit program queries? Select one of the following options:
Disable - Allows all programs to be searched when an API query is performed. This is the default setting, which is typically recommended in most cases.
Enable - Restricts API queries to only the program assigned to the API token. This option can be used when you don't want to allow access to data from other programs.
Bill Data Query
Do you wish to allow sensitive customer billing data, such as customer credit card information, to be queried? Select one of the following options:
Disable - Prevents sensitive customer billing data from being queried. This is the default setting, which is typically recommended in most cases.
Enable - Allows sensitive customer billing data to be queried. Important: This option should be used with caution and only when you can trust the external sources you are providing this API token to.
Encode Query
Do you need API query responses to be URL encoded? Select one of the following options:
Disable - Query responses aren't URL encoded. Rather, they are sent in the non-encoded ISO-8859-1 character set. This is the default setting, which is typically recommended in most cases.
UTF-8 - Query responses are URL encoded using the UTF-8 unicode character set.
Required Fields
Select the minimum required fields for incoming customers to be accepted by the CRM. Important: Incoming customers without all of the selected required fields will be refused.
 A language preference can be set for individual customers, which
can be used in connection with multilingual emails. The language field
on the Customer form supports ISO-639-3 language codes. For more details,
please download our API documentation.
API Type: SOAP Lead
This type of API is used for posting lead data to the CRM when it is collected externally, such as by an online shopping cart or a call center.
There are no settings in the Setup tab. Lead setup data is pulled from the Acquisition Center specified via the Call Center field on the record loaded.

Simply assign the Name, API Type and Program. Then save the API.

API Type: SOAP Transaction
This type of API is used for posting transaction data to the CRM when customer billing is processed externally, such as by an online shopping cart or a call center.
The settings in the Setup tab are used to dictate how incoming transaction data will be handled by the CRM when this specific API token is used. An explanation of each setting option is provided below.
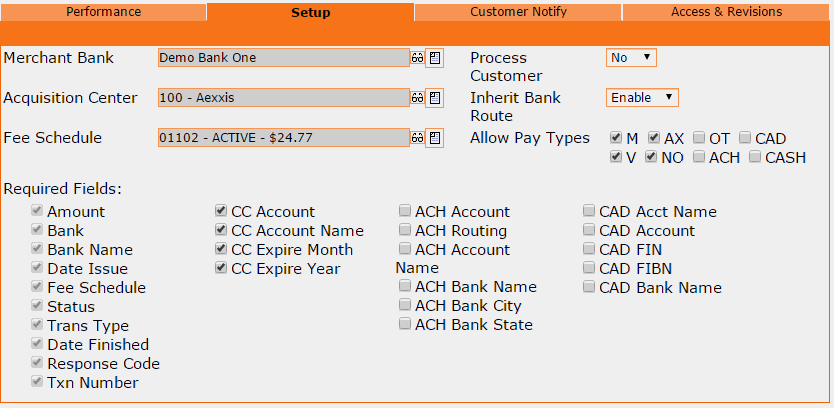
Merchant Bank
Select the Merchant Bank incoming transactions will be assigned to when this API token is used. Important: The Merchant Bank you select in this field needs to reflect the bank that will be used for transaction processing occurring outside of the CRM.
Acquisition Center
Select the Acquisition Center incoming transactions will be assigned to when this API token is used.
Fee Schedule
Select the Fee Schedule incoming transactions will be assigned to when this API token is used. Important: The Fee Schedule you select in this field needs to correspond with the charge that was processed outside of the CRM.
Process Customer
Do you want the assigned Fee Schedule to be processed, which will automatically trigger its fulfillment responses and customer status updates? Select one of the following options:
Yes - Allows the assigned Fee Schedule to process its fulfillment responses and customer status updates. Note: This option is typically recommended if fulfillments aren't being created by the API. Important: To ensure proper Fee Schedule processing, set the Customer Status on the Customer API Token to match the Customer Trigger Status of the Fee Schedule assigned to this Transaction API Token.
No - Prevents the assigned Fee Schedule from processing its fulfillment responses and customer status updates. Note: This option is typically recommended if fulfillments are being created by the API, to avoid duplicate fulfillment processing.
Inherit Bank Route
Bank Routes are only used if you need to facilitate static bank routing, also known as sticky billing, or load balancing for multiple Merchant Banks (see Banks for more information). If your business uses Bank Routes, you can allow incoming transactions to automatically inherit the Bank Route associated with the selected Merchant Bank.
Allow Pay Types
The CRM will reject incoming transactions that don't use one of the allowed payment types selected in this section.
 Pay Type
OT = all other types of credit cards that are not Mastercard, VISA, American
Express or Discover. Examples of OT Pay Types are JCB, Elo, Hipercard
or Aura.
Required Fields
Select the minimum required fields for incoming transactions to be accepted by the CRM. Important: Incoming transactions without all of the selected required fields will be refused.
API Type: SOAP Upsell
This type of API is used for posting upsell customer data to the CRM when it is collected externally, such as by an online shopping cart or a call center.
The settings in the Setup tab are used to dictate how incoming upsell customer data will be handled by the CRM when this specific API token is used. An explanation of each setting option is provided below.
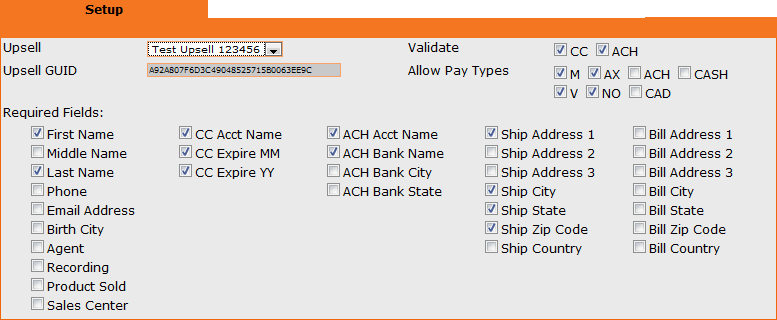
Upsell
Select the Upsell incoming upsell customers will be assigned to when this API token is used.
Upsell GUID
The GUID of the selected upsell will auto-populate.
Validate
Only select the validate options that warrant a refusal of incoming upsell customers. The CRM rejects upsell customers who fail a validation check.
Allow Pay Types
The CRM will reject incoming upsell customers who don't use one of the allowed payment types selected in this section.
 Pay Type OT = all other types of credit
cards that are not Mastercard, VISA, American Express or Discover. Examples
of OT Pay Types are JCB, Elo, Hipercard or Aura.
Required Fields
Select the minimum required fields for incoming upsell customers to be accepted by the CRM. Important: Incoming upsell customers without all of the selected required fields will be refused.
API Type: SOAP Fulfillment
This type of API is used for adding or updating Fulfillments in the CRM.
There are no settings in the Setup tab.

Simply assign the Name, API Type and Program. Then save the API.

Note: You will need to provide your front end programmer with the necessary fulfillment GUIDs, in addition to the fulfillment API token.
API Type: Event
This type of API is used for adding customer Events to the CRM.
There are no settings in the Setup tab.

Simply assign the Name, API Type and Program. Then save the API.

API Type: Bank Caps
When using Bank Routes, this type of API is used to query Merchant Banks that qualify to process the specified credit card number when customer billing will be occurring outside of the CRM. The remaining amount available of each bank's monthly cap is returned. Banks are listed in the order of highest amount available to lowest amount available.
 The
calculation that is used to determine the available amounts takes into
consideration the estimated amount of future recurring billing for the
Bank Route as well as the amount already processed.
There are no settings in the Setup tab.

Simply assign the Name, API Type and Program. Then save the API.

API Type: Web Site
This type of API is used to manage customer login access on a third party website when the customer's username and password are stored in OrangeCRM. When a customer attempts logging into an external website, it can be programmed to take the username and password that was entered and send it to the CRM for validation. The CRM will return the customer's current status, allowing you to determine wether or not you wish to allow access to the website.
There are no settings in the Setup tab.

Simply assign the Name, API Type and Program. Then save the API.

API Type: Shipworks
This type of API is used to send fulfillments from the CRM to the ShipWorks shipping software.

Fulfillment Type
Select the type of fulfillment that will be sent to ShipWorks when this API token is used. A single fulfillment is that which doesn't use a Distribution Center. For more info, please see the Fulfillments page.
In the field below that, select which specific single fulfillment or Distribution Center will be sent to ShipWorks when this API token is used.
Username and Password
Enter the username and password to your ShipWorks account.
URL to Access
This is the URL ShipWorks will need to use to retrieve fulfillments from OrangeCRM.
API Type: Shipstation
This type of API is used to send fulfillments from the CRM to the ShipStation shipping software.

Fulfillment Type
Select the type of fulfillment that will be sent to ShipStation when this API token is used. A single fulfillment is that which doesn't use a Distribution Center. For more info, please see the Fulfillments page.
In the field below that, select which specific single fulfillment or Distribution Center will be sent to ShipStation when this API token is used.
Username and Password
These fields will be auto-populated.
URL to Access
This is the URL ShipStation will need to use to retrieve fulfillments from OrangeCRM.
Customer Notify Tab
Note: Customer notify options are only available for SOAP Customer and SOAP Transaction API types.
This feature allows you to send an automated email to customers as soon as a new customer record or a new transaction record is created with this API token. There are two delivery options to choose from: batch fulfillment or instant email. Depending on your business structure, there may be pros and cons for each option, which are explained below.
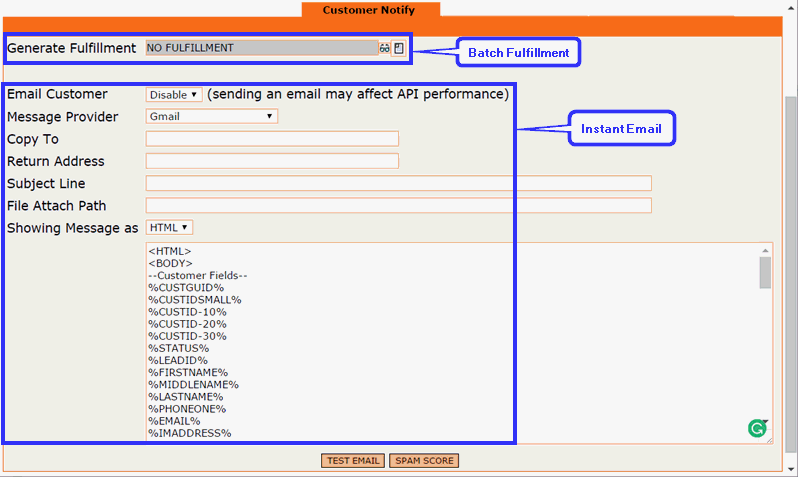
Generate Fulfillment
This option generates the selected customer email by batch fulfillment. The customer filter settings in the selected fulfillment will still apply.
Important: This option is for businesses who need the ability to track and report on customer notify emails, see a record of the sent email in the Fulfillments tab of customer records and re-send the email upon customer request. A potential downside to this option is the possibility of delayed email delivery, which will depend on how your Batch Jobs are scheduled.
Email Customer
This option omits the batch process and sends an instant email to customers. Instead of selecting an existing fulfillment, the email content is built right in the Customer Notify tab of the API. Select Enable if you wish to use this option.
Important: This option is for businesses who want to avoid any possible batch processing delays and who don't need the ability to track and report on customer notify emails, see a record of the sent email in the Fulfillments tab of customer records and re-send the email upon customer request. A potential downside to this option is the possibility of slow responses from third party email providers, which could result in slowing down the server and other processes.
Message Provider
Use the drop down selector to choose the Message Provider you want to use to send this email. Note: You must first set up your Message Provider in a separate area. For instructions, please see the section titled How To Create a New Message Service Provider on the Fulfillments page.
Copy To - Note: In most cases, this option isn't used.
Any email recipients entered in this field will receive a copy of every single email that is generated by this fulfillment. If this email is generated in large quantities - for every new customer, as an example - it will most likely fill up the copied recipients' mailbox very quickly.
Return Address
This is the email address the recipient will see as the "From" address and it is also the address replies will be sent to. Note: You can also specify an easily recognizable email display name to be shown in the "From" section, which can increase your email open rates. While browsing their inbox, customers will see your display name instead of your company's email address. To incorporate this option, simply enter your desired display name followed by your company's return email address enclosed in the less than (<) and greater than (>) signs. Example: ABC Service <support@abcdeliveryservice.com>
Subject Line
Enter the text you wish to appear in the subject line of the email.
File Attach Path
If you wish to include an attachment in the email, enter the file path here.
Showing Message As
The email format can be either HTML or text. We highly recommend using HTML to avoid inconsistent display issues that are common across multiple email platforms when the text format is used.
Email Message
The large box at the bottom of the Customer Notify tab is where the email message is entered. If using HTML format, insert the body of the email between the two body tags: <BODY> and </BODY>. If using text format, simply type the email message as you would if you were composing a new email from your mailbox. Note: With the use of merge tags, emails can be dynamically personalized with specific information from the customer record such as name, order date, product description, etc. Merge tags consist of specific key words enclosed in percent signs, which are strategically placed in the email message where you want the corresponding value to be filled in when the email is generated. Click the following link for a downloadable list of Merge Tags for Email, OrangeTask & Web Site Post Fulfillments.
HTTP Post Tab
Note: The HTTP Post option is only available for the SOAP Customer API type.
This feature allows you to post customized content to a third party URL as soon as a new customer record is created with this API token. A potential downside to using this option is the possibility of slow responses from third parties, which could result in slowing down the server and other processes.
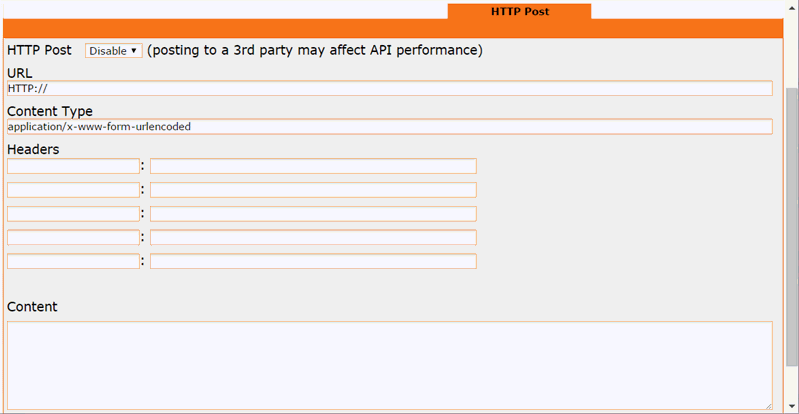
Enter the URL where the customer data is to be posted.
Enter the Content Type and Headers (if any).
Enter the XML Content to be posted in the large box labeled Content.
Note: With the use of merge tags, the post content can be dynamically personalized with specific information from the customer record such as name, order date, product description, etc. Merge tags consist of specific key words enclosed in percent signs, which are strategically placed where you want the corresponding value to be filled in when the HTTP post is generated. Click the following link for a downloadable list of Merge Tags for Email, OrangeTask & Web Site Post Fulfillments.