

Fulfillments
In this Topic: Hide
 Click one of the links listed above
to jump to a section on this page.
A Fulfillment in OrangeCRM is any interaction with the customer that is triggered by the system. Fulfillments can be used for a simple task such as the creation of a welcome email or receipt for a new customer, to the creation of a more complex letter or an order for a package that is mailed to a customer after a transaction is successfully processed.
Fulfillment files are created by running the Fulfillment Generate and Fulfillment Batch jobs. The default output format for a Fulfillment file is either .csv or .txt. Fulfillment files can be stored on the OrangeCRM FTP server for pickup, dropped to a third party FTP server and/or delivered via email.
Customer Fulfillments can be used to automate the process of transmitting orders to your fulfillment center for shipping, sending emails to customers and sending customer data files to internal business members.
Each Customer Fulfillment is generated from a Master Fulfillment Record, which is where the parameters & triggers for Customer Fulfillments are defined by the CRM administrator.
To see a list of all current fulfillments and to create new ones, go to Lists on the main navigation page, and select Fulfillments. A sample listing of Fulfillments is seen below.

Double clicking on any existing Fulfillment will allow you to view the details of the Fulfillment and make any necessary changes.
Click the New Fulfillment button in the upper right corner of the Fulfillment list page. A new Fulfillment window will open as seen below.

The first step is to fill in the fields located at the top of the form.
Status
This box will be auto-populated and set to Active when a new fulfillment is created. It can be changed to Inactive by selecting Mark Inactive from the Actions menu.
Name
This is an important field. It is used to identify the Fulfillment and will be referenced in other places throughout the CRM, including reports. Therefore, make sure you choose a name that is descriptive and that clearly identifies the purpose of the fulfillment as well as which program it will be assigned to. Example: Program A - Welcome Email for New Customers. Fulfillment names can always be changed in the future, if need be.
Important: Each Fulfillment, across all Programs, should have a unique name. Fulfillments with an identical name can easily be confused in reporting and other areas in the CRM, even if they are assigned to different programs.
Style
There are five different styles of fulfillments you can choose from. Listed below is a description of each Style option:
Chargeback Management - Generates the specified data when a transaction is marked as a Chargeback or RFI. Provides Chargeback/RFI related fields in the Setup tab. Delivery options include Build File, Orange Task or Web Site Post.
Enhanced Email - Generates customer emails in either HTML or text format. Provides several Trigger options including Fee Schedule and Refund, which can be used to notify customers of purchase and/or refund transactions.
Fulfillment House - Generates the details needed for product fulfillment. Includes numerous integrations with the most common fulfillment service providers, as well as new custom integrations as needed. Delivery options include Build File, Orange Task, Web Site Post, Distribution Center or Third Party API.
RMA Processing - Generates the specified data when a transaction is refunded. Delivery options include Build File, Orange Task or Web Site Post.
Salvage - Generates the specified data when a CSR manually requests the fulfillment for a customer they have performed a salvage on (this is in no way linked with Salvage Events). Delivery options include Customer Email, Build File, Orange Task or Web Site Post.
Program
Select the Program this fulfillment will be used in.
Performance Group
Performance
Groups are a method of grouping Fulfillments together for reporting purposes.
Performance Tab
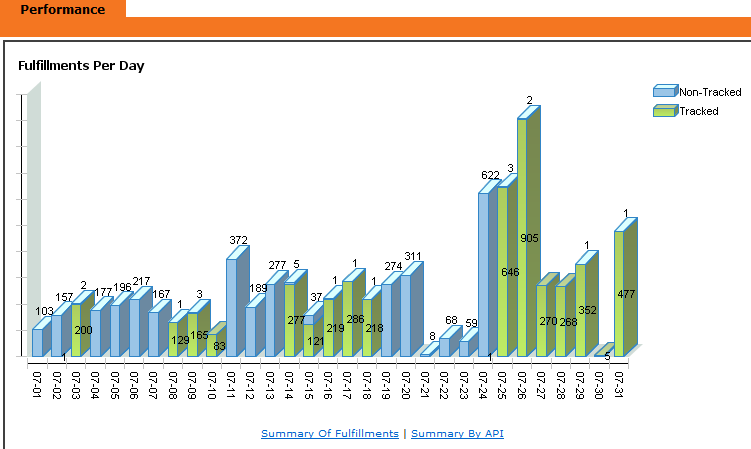
The Performance tab charts your non-tracked and tracked fulfillments per day, as shown in the example below. It also provides shortcut links to additional fulfillment reporting, which are located below the bar graph.
Trigger Tab
The Trigger tab is where you will define the conditions that are required for the fulfillment to be generated, which is broken down into a 2-step process.
Trigger Tab Step 1 of 2: Choose a Fulfillment Style and a Trigger Type
There are numerous options and settings presented in the Trigger tab, however they vary based on the selected Style and Trigger Type. We will start by explaining each of the Trigger Types that are available for each Fulfillment Style. Then we will provide descriptions of the various options and settings that are available for each Trigger Type.
Trigger Types for Fulfillment Style: Chargeback Management
There are three Trigger Type options available for the Chargeback Management fulfillment Style.
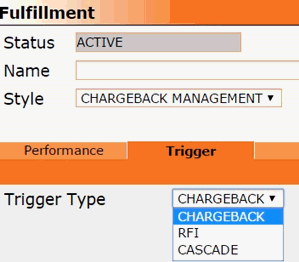
Listed below is a description of each Trigger Type option:
Chargeback - Fulfillment is triggered when a transaction is marked as a Chargeback from the transaction Actions menu.
RFI - Fulfillment is triggered when a transaction is marked as RFI from the transaction Actions menu.
Cascade - Fulfillment is triggered after some other specific fulfillment has been generated. The fulfillment to cascade from must be selected in the Trigger tab.
Trigger Types for Fulfillment Style: Enhanced Email
There are six Trigger Type options available for the Enhanced Email fulfillment Style.
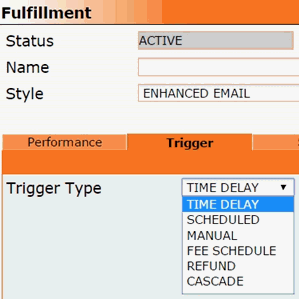
Listed below is a description of each Trigger Type option:
Time Delay - Fulfillment is triggered each time a corresponding Fulfillment Batch Job runs.
Scheduled - Fulfillment is triggered on the scheduled starting date and frequency specified in the Trigger tab.
Manual - Fulfillment is triggered when a human operator manually requests the fulfillment from the customer Actions menu.
Fee Schedule - Fulfillment is triggered by any fee schedule that has this fulfillment selected in the fee schedule Responses tab.
Refund - Fulfillment is triggered when a transaction is refunded.
Cascade - Fulfillment is triggered after some other specific fulfillment has been generated. The fulfillment to cascade from must be selected in the Trigger tab.
Trigger Types for Fulfillment Style: Fulfillment House
There are five Trigger Type options available for the Fulfillment House Style.
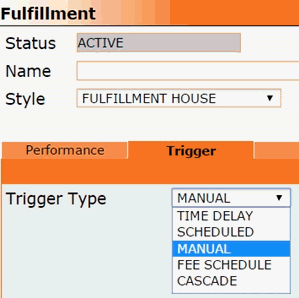
Listed below is a description of each Trigger Type option:
Time Delay - Fulfillment is triggered each time a corresponding Fulfillment Batch Job runs.
Scheduled - Fulfillment is triggered on the scheduled starting date and frequency specified in the Trigger tab.
Manual - Fulfillment is triggered when a human operator manually requests the fulfillment from the customer Actions menu.
Fee Schedule - Fulfillment is triggered by any fee schedule that has this fulfillment selected in the fee schedule Responses tab.
Cascade - Fulfillment is triggered after some other specific fulfillment has been generated. The fulfillment to cascade from must be selected in the Trigger tab.
Trigger Types for Fulfillment Style: RMA Processing
There are three Trigger Type options available for the RMA Processing fulfillment Style.
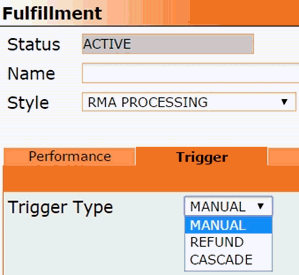
Listed below is a description of each Trigger Type option:
Manual - Fulfillment is triggered when a human operator manually requests the fulfillment from the customer Actions menu.
Refund - Fulfillment is triggered when a transaction is refunded.
Cascade - Fulfillment is triggered after some other specific fulfillment has been generated. The fulfillment to cascade from must be selected in the Trigger tab.
Trigger Types for Fulfillment Style: Salvage
There are two Trigger Type options available for the Salvage fulfillment Style.
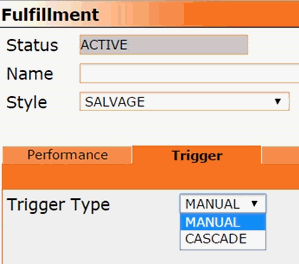
Listed below is a description of each Trigger Type option:
Manual - Fulfillment is triggered when a human operator manually requests the fulfillment from the customer Actions menu.
Cascade - Fulfillment is triggered after some other specific fulfillment has been generated. The fulfillment to cascade from must be selected in the Trigger tab.
Trigger Tab Step 2 of 2: Define the Rules and Settings for the Fulfillment Trigger
Once you have selected a Trigger Type, the corresponding options and settings will be displayed in the Trigger tab. Descriptions of the different options that are available for each Trigger Type are listed below.
Settings for Trigger Type: Time Delay
Time Delay fulfillments are triggered each time a corresponding Fulfillment Batch Job runs. The Time Delay Trigger Type is available for Fulfillment House and Enhanced Email Fulfillment Styles.
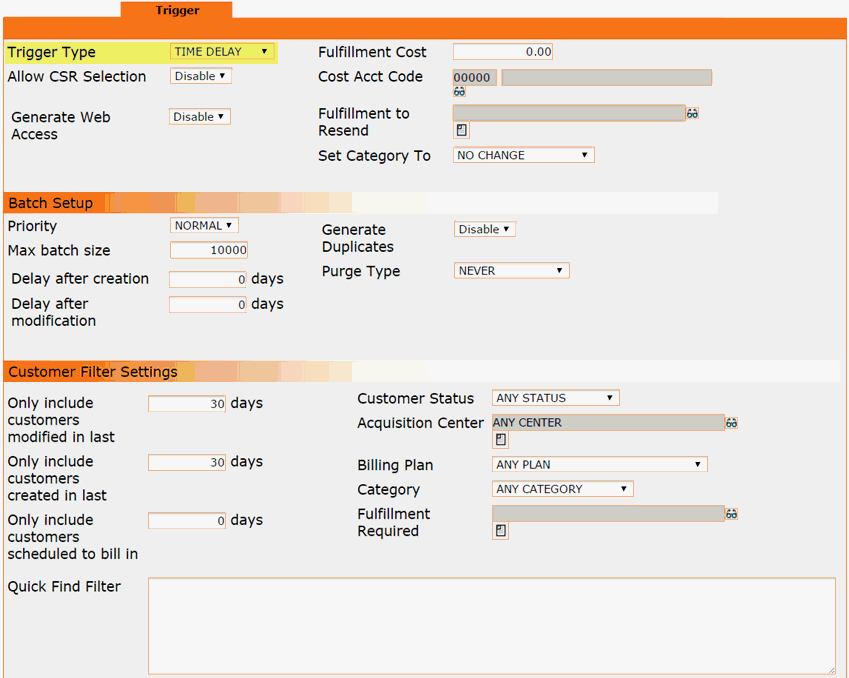
Listed below is a description of each option/setting that is available for the Time Delay Trigger Type:
Allow CSR Selection
If enabled, this fulfillment will be included in the list of fulfillments a CSR can choose from when they perform the "Request New Fulfillment" action from the customer record.
Generate Web Access
If enabled, a unique username and password will be auto-generated and stored on the customer record. Generated usernames and passwords can be included in customer email fulfillments.
Fulfillment Cost
To track the cost of this fulfillment in financial reporting, enter the dollar amount it will cost to process each request for this fulfillment.
Cost Acct Code
When tracking fulfillment costs, you must assign the cost to a payable account code for proper reporting.
Fulfillment to Resend
Choose the fulfillment the customer should get if the "Resend Fulfillment" action is performed from the customer fulfillment record. In most cases, the same fulfillment is resent.
Set Category To
This gives you the option to change the category on the customer record. The default setting is "No Change", but you can set the Category to change once the fulfillment has been processed.
Batch Setup Section in Trigger Tab
Priority
This is basically a label that is assigned to fulfillments so the batch jobs know which fulfillments to generate and/or batch. When you schedule a fulfillment batch job, you must select a priority. When the job runs, it looks for the fulfillments with a matching priority assignment and processes only those.
Max Batch Size
This is where you can set the maximum number of customer fulfillments allowed to be generated by a single batch. This is usually left at the default setting of 10,000. However, you can adjust the number as needed. An example would be if it was an email fulfillment, and your email service provider places a limit on the number of emails you are allowed to send within a given time frame.
Delay After Creation
You can choose to either generate the fulfillment as soon as a customer record is created, or you may choose to wait a certain number of days after customer creation. Product fulfillments are typically set to a zero day delay, to ensure orders are shipped in a timely manner. However, you may have a need to delay non-product fulfillments. An example would be a customer email fulfillment that needs to be sent after the trial period has ended.
Delay After Modification
Modification refers to the Last Process Date on the customer record, which changes each time a billing cycle is processed. It does not include modifications/edits made by CSRs. This option allows you to delay a fulfillment for a certain number of days after the customer's Last Process Date. An example would be a customer email fulfillment that acts as a transaction receipt for each purchase. If you do not wish to trigger the fulfillment based on the customer's Last Process Date, leave the default setting at zero days.
Generate Duplicates
This option is typically disabled, especially on product fulfillments, as it would result in duplicate shipments to each customer. But for special situations, it can be enabled if you need a non-product fulfillment to be generated repeatedly for each customer. An example of such a fulfillment would be a monthly email that is sent to all customers who are still in Active status.
Purge Type
This setting allows you to choose whether or not a record of each generated fulfillment will be stored on the customer record - not only for future reference, but also to prevent duplicate fulfillments from being generated for each customer. We strongly recommend selecting the "NEVER" option for product fulfillments, so that there will always be a record of each shipped order. However, there may be some cases in which you may not need to keep a record of a fulfillment each time it is generated. An example would be a monthly file that is sent - not to customers, but to internal staff members - containing a list of all customers who are still in Active status. A fulfillment that is generated for each Active customer over and over again each month, and that doesn't get sent to the customer, could add a large number of unnecessary records to the Fulfillments tab on the customer record - making it difficult for CSRs to sift through and find the relevant customer fulfillments. To enable the purge option, choose the "ON COMPLETION" option, which will immediately delete the fulfillment from the customer record after is has been batched out.
 Even when the Generate Duplicates option is disabled,
enabling the purge option
in itself will allow duplicate fulfillments to be generated to each customer,
as there will be no record of that fulfillment ever having been issued
to the customer before.
Customer Filter Settings in Trigger Tab
Only Include Customers Modified in the Last x Days
Modification refers to the Last Process Date on the customer record, which changes each time a billing cycle is processed. It does not include modifications/edits made by CSRs. This setting filters out/excludes customers from the fulfillment based on the customer's Last Process Date. Only customers whose Last Process Date falls within the specified number of days will qualify for the fulfillment.
 Entering zero days does NOT disable this filter
- it limits the fulfillment to only the customers whose Last Process Date
is today - today being the day the fulfillment is scheduled to be generated.
Only Include Customers Created in the Last x Days
This setting filters out/excludes customers from the fulfillment based on the date of customer creation. Only customers created within the specified number of days will qualify for the fulfillment.
 Entering zero days does NOT disable this filter
- it limits the fulfillment to only the customers who were created today
- today being the day the fulfillment is scheduled to be generated.
Only Include Customers Scheduled to Bill In x Days
This setting allows you to filter out/exclude customers from the fulfillment based on the Next Bill Date. Only customers whose Next Bill Date falls within the specified number of days will qualify for the fulfillment. If you do not wish to use this filter, entering zero days will disable this option (unlike the above two filters).
Customer Status, Acquisition Center, Billing Plan, Category
These four filters are used to specify which customers qualify for the fulfillment based on their current Customer Status, the Acquisition Center they belong to, their current Billing Plan and Category. If you do not wish to limit the fulfillment to a single Customer Status/Acquisition Center/Billing Plan/Category, select ANY STATUS/ANY CENTER/ANY PLAN/ANY CATEGORY. These four filters operate independently of each other, which means you may choose to use some, all or none of them.
 Customer status option "Canceled" includes both "CSR
Canceled" and "System Canceled" options.
Fulfillment Required
If a selection is made in this field, only customers who have previously received the specified fulfillment will qualify for this fulfillment. This option can be used to make sure the fulfillment is not sent unless some other specific fulfillment has already been generated for the customer. It can also be used to link associated fulfillments together. An example would be if different activation email messages are sent to different groups of customers and you need to make sure they receive the correct corresponding cancellation email message. When setting up the cancellation email fulfillment, you would select the matching activation email fulfillment in the Fulfillment Required field.
Quick Find Filter
This is an optional filter that allows additional search criteria to be specified for customer record selection. It works in the same manner as a customer search that is performed from the Quick Find search box on the home page. An example would be if you only wanted the fulfillment to be generated for customers who live in the state of Georgia - you would enter this into the Quick Find Filter box: [State]=Georgia
Settings for Trigger Type: Scheduled
Scheduled fulfillments are triggered according to the starting date and frequency specified in the Trigger tab. The Scheduled Trigger Type is available for Fulfillment House and Enhanced Email Fulfillment Styles.
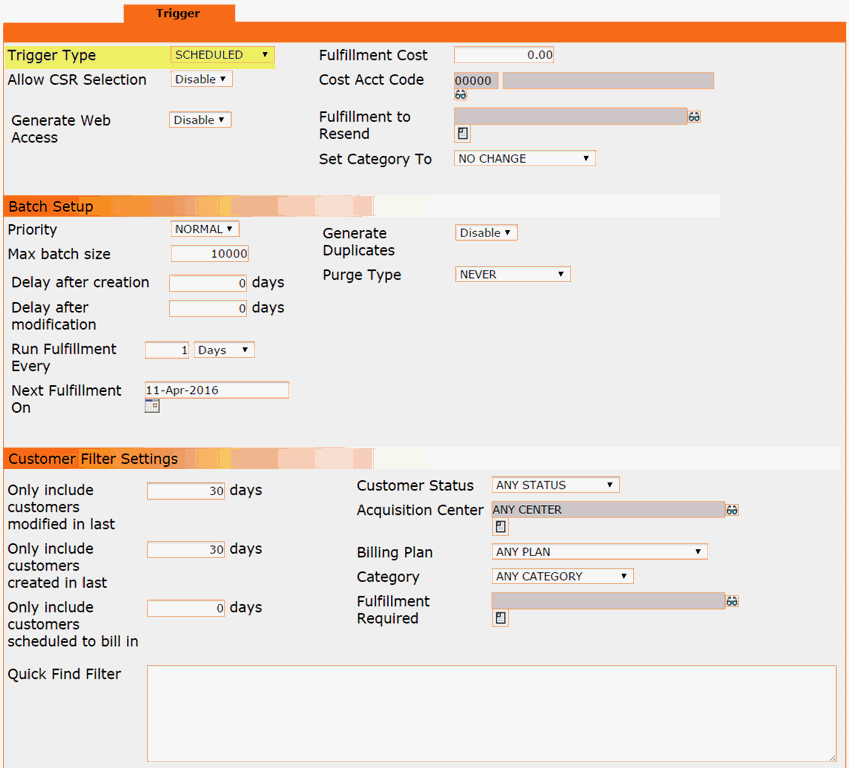
Listed below is a description of each option/setting that is available for the Scheduled Trigger Type:
Allow CSR Selection
If enabled, this fulfillment will be included in the list of fulfillments a CSR can choose from when they perform the "Request New Fulfillment" action from the customer record.
Generate Web Access
If enabled, a unique username and password will be auto-generated and stored on the customer record. Generated usernames and passwords can be included in customer email fulfillments.
Fulfillment Cost
To track the cost of this fulfillment in financial reporting, enter the dollar amount it will cost to process each request for this fulfillment.
Cost Acct Code
When tracking fulfillment costs, you must assign the cost to a payable account code for proper reporting.
Fulfillment to Resend
Choose the fulfillment the customer should get if the "Resend Fulfillment" action is performed from the customer fulfillment record. In most cases, the same fulfillment is resent.
Set Category To
This gives you the option to change the category on the customer record. The default setting is "No Change", but you can set the Category to change once the fulfillment has been processed.
Batch Setup Section in Trigger Tab
Priority
This is basically a label that is assigned to fulfillments so the batch jobs know which fulfillments to generate and/or batch. When you schedule a fulfillment batch job, you must select a priority. When the job runs, it looks for the fulfillments with a matching priority assignment and processes only those.
Max Batch Size
This is where you can set the maximum number of customer fulfillments allowed to be generated by a single batch. This is usually left at the default setting of 10,000. However, you can adjust the number as needed. An example would be if it was an email fulfillment, and your email service provider places a limit on the number of emails you are allowed to send within a given time frame.
Delay After Creation
You can choose to either generate the fulfillment as soon as a customer record is created, or you may choose to wait a certain number of days after customer creation. Product fulfillments are typically set to a zero day delay, to ensure orders are shipped in a timely manner. However, you may have a need to delay non-product fulfillments. An example would be a customer email fulfillment that needs to be sent after the trial period has ended.
Delay After Modification
Modification refers to the Last Process Date on the customer record, which changes each time a billing cycle is processed. It does not include modifications/edits made by CSRs. This option allows you to delay a fulfillment for a certain number of days after the customer's Last Process Date. An example would be a customer email fulfillment that acts as a transaction receipt for each purchase. If you do not wish to trigger the fulfillment based on the customer's Last Process Date, leave the default setting at zero days.
Run Fulfillment Every
This is where you set the frequency of how often the fulfillment is allowed to be generated for each customer that qualifies for it. You can set the frequency in days or months.
 This setting does not replace or trump fulfillment
batch jobs. You must still schedule the appropriate corresponding fulfillment
batch jobs to run at the desired time interval.
Next Fulfillment On
This is where you define the starting date for the frequency. The fulfillment will be allowed to be generated every x number of days/months starting from the specified date.
 This
setting does not replace or trump fulfillment batch jobs. You must still
schedule the appropriate corresponding fulfillment batch jobs to run at
the desired time interval.
Generate Duplicates
This option is typically disabled, especially on product fulfillments, as it would result in duplicate shipments to each customer. But for special situations, it can be enabled if you need a non-product fulfillment to be generated repeatedly for each customer. An example of such a fulfillment would be a monthly email that is sent to all customers who are still in Active status.
Purge Type
This setting allows you to choose whether or not a record of each generated fulfillment will be stored on the customer record - not only for future reference, but also to prevent duplicate fulfillments from being generated for each customer. We strongly recommend selecting the "NEVER" option for product fulfillments, so that there will always be a record of each shipped order. However, there may be some cases in which you may not need to keep a record of a fulfillment each time it is generated. An example would be a monthly file that is sent - not to customers, but to internal staff members - containing a list of all customers who are still in Active status. A fulfillment that is generated for each Active customer over and over again each month, and that doesn't get sent to the customer, could add a large number of unnecessary records to the Fulfillments tab on the customer record - making it difficult for CSRs to sift through and find the relevant customer fulfillments. To enable the purge option, choose the "ON COMPLETION" option, which will immediately delete the fulfillment from the customer record after is has been batched out.
 Even when the Generate Duplicates option is disabled,
enabling the purge option
in itself will allow duplicate fulfillments to be generated to each customer,
as there will be no record of that fulfillment ever having been issued
to the customer before.
Customer Filter Settings in Trigger Tab
Only Include Customers Modified in the Last x Days
Modification refers to the Last Process Date on the customer record, which changes each time a billing cycle is processed. It does not include modifications/edits made by CSRs. This setting filters out/excludes customers from the fulfillment based on the customer's Last Process Date. Only customers whose Last Process Date falls within the specified number of days will qualify for the fulfillment.
 Entering zero days does NOT disable this filter
- it limits the fulfillment to only the customers whose Last Process Date
is today - today being the day the fulfillment is scheduled to be generated.
Only Include Customers Created in the Last x Days
This setting filters out/excludes customers from the fulfillment based on the date of customer creation. Only customers created within the specified number of days will qualify for the fulfillment.
 Entering zero days does NOT disable this filter
- it limits the fulfillment to only the customers who were created today
- today being the day the fulfillment is scheduled to be generated.
Only Include Customers Scheduled to Bill In x Days
This setting allows you to filter out/exclude customers from the fulfillment based on the Next Bill Date. Only customers whose Next Bill Date falls within the specified number of days will qualify for the fulfillment. If you do not wish to use this filter, entering zero days will disable this option (unlike the above two filters).
Customer Status, Acquisition Center, Billing Plan, Category
These four filters are used to specify which customers qualify for the fulfillment based on their current Customer Status, the Acquisition Center they belong to, their current Billing Plan and Category. If you do not wish to limit the fulfillment to a single Customer Status/Acquisition Center/Billing Plan/Category, select ANY STATUS/ANY CENTER/ANY PLAN/ANY CATEGORY. These four filters operate independently of each other, which means you may choose to use some, all or none of them.
 Customer Status option "Canceled" includes both "CSR
Canceled" and "System Canceled" options.
Fulfillment Required
If a selection is made in this field, only customers who have previously received the specified fulfillment will qualify for this fulfillment. This option can be used to make sure the fulfillment is not sent unless some other specific fulfillment has already been generated for the customer. It can also be used to link associated fulfillments together. An example would be if different activation email messages are sent to different groups of customers and you need to make sure they receive the correct corresponding cancellation email message. When setting up the cancellation email fulfillment, you would select the matching activation email fulfillment in the Fulfillment Required field.
Quick Find Filter
This is an optional filter that allows additional search criteria to be specified for customer record selection. It works in the same manner as a customer search that is performed from the Quick Find search box on the home page. An example would be if you only wanted the fulfillment to be generated for customers who live in the state of Georgia - you would enter this into the Quick Find Filter box: [State]=Georgia
Settings for Trigger Type: Manual
Manual fulfillments are triggered when a human operator manually requests the fulfillment from the customer Actions menu. The Manual Trigger Type is available for Fulfillment House, Enhanced Email, RMA Processing and Salvage Fulfillment Styles.

Listed below is a description of each option/setting that is available for the Manual Trigger Type:
Allow CSR Selection
If enabled, this fulfillment will be included in the list of fulfillments a CSR can choose from when they perform the "Request New Fulfillment" action from the customer record.
Generate Web Access
If enabled, a unique username and password will be auto-generated and stored on the customer record. Generated usernames and passwords can be included in customer email fulfillments.
Fulfillment Cost
To track the cost of this fulfillment in financial reporting, enter the dollar amount it will cost to process each request for this fulfillment.
Cost Acct Code
When tracking fulfillment costs, you must assign the cost to a payable account code for proper reporting.
Fulfillment to Resend
Choose the fulfillment the customer should get if the "Resend Fulfillment" action is performed from the customer fulfillment record. In most cases, the same fulfillment is resent.
Set Category To
This gives you the option to change the category on the customer record. The default setting is "No Change", but you can set the Category to change once the fulfillment has been processed.
Batch Setup Section in Trigger Tab
Priority
This is basically a label that is assigned to fulfillments so the batch jobs know which fulfillments to generate and/or batch. When you schedule a fulfillment batch job, you must select a priority. When the job runs, it looks for the fulfillments with a matching priority assignment and processes only those.
Max Batch Size
This is where you can set the maximum number of customer fulfillments allowed to be generated by a single batch. This is usually left at the default setting of 10,000. However, you can adjust the number as needed. An example would be if it was an email fulfillment, and your email service provider places a limit on the number of emails you are allowed to send within a given time frame.
Settings for Trigger Type: Fee Schedule
Fee Schedule fulfillments are triggered by any fee schedule that has this fulfillment selected in the fee schedule Responses tab. The Fee Schedule Trigger Type is available for Fulfillment House and Enhanced Email Fulfillment Styles.

Listed below is a description of each option/setting that is available for the Fee Schedule Trigger Type:
Allow CSR Selection
If enabled, this fulfillment will be included in the list of fulfillments a CSR can choose from when they perform the "Request New Fulfillment" action from the customer record.
Generate Web Access
If enabled, a unique username and password will be auto-generated and stored on the customer record. Generated usernames and passwords can be included in customer email fulfillments.
Fulfillment Cost
To track the cost of this fulfillment in financial reporting, enter the dollar amount it will cost to process each request for this fulfillment.
Cost Acct Code
When tracking fulfillment costs, you must assign the cost to a payable account code for proper reporting.
Fulfillment to Resend
Choose the fulfillment the customer should get if the "Resend Fulfillment" action is performed from the customer fulfillment record. In most cases, the same fulfillment is resent.
Set Category To
This gives you the option to change the category on the customer record. The default setting is "No Change", but you can set the Category to change once the fulfillment has been processed.
Batch Setup Section in Trigger Tab
Priority
This is basically a label that is assigned to fulfillments so the batch jobs know which fulfillments to generate and/or batch. When you schedule a fulfillment batch job, you must select a priority. When the job runs, it looks for the fulfillments with a matching priority assignment and processes only those.
Max Batch Size
This is where you can set the maximum number of customer fulfillments allowed to be generated by a single batch. This is usually left at the default setting of 10,000. However, you can adjust the number as needed. An example would be if it was an email fulfillment, and your email service provider places a limit on the number of emails you are allowed to send within a given time frame.
Settings for Trigger Type: Refund
Refund fulfillments are triggered when a transaction is refunded. The Refund Trigger Type is available for Fulfillment House, Enhanced Email and RMA Processing Fulfillment Styles.

Listed below is a description of each option/setting that is available for the Refund Trigger Type:
Allow CSR Selection
If enabled, this fulfillment will be included in the list of fulfillments a CSR can choose from when they perform the "Request New Fulfillment" action from the customer record.
Fulfillment Cost
To track the cost of this fulfillment in financial reporting, enter the dollar amount it will cost to process each request for this fulfillment.
Cost Acct Code
When tracking fulfillment costs, you must assign the cost to a payable account code for proper reporting.
Fulfillment to Resend
Choose the fulfillment the customer should get if the "Resend Fulfillment" action is performed from the customer fulfillment record. In most cases, the same fulfillment is resent.
Set Category To
This gives you the option to change the category on the customer record. The default setting is "No Change", but you can set the Category to change once the fulfillment has been processed.
Batch Setup Section in Trigger Tab
Priority
This is basically a label that is assigned to fulfillments so the batch jobs know which fulfillments to generate and/or batch. When you schedule a fulfillment batch job, you must select a priority. When the job runs, it looks for the fulfillments with a matching priority assignment and processes only those.
Max Batch Size
This is where you can set the maximum number of customer fulfillments allowed to be generated by a single batch. This is usually left at the default setting of 10,000. However, you can adjust the number as needed. An example would be if it was an email fulfillment, and your email service provider places a limit on the number of emails you are allowed to send within a given time frame.
Settings for Trigger Type: Cascade
Cascade fulfillments are triggered after some other specific fulfillment has been generated. The fulfillment to cascade from must be selected in the Trigger tab. The Cascade Trigger Type is available for all Fulfillment Styles.
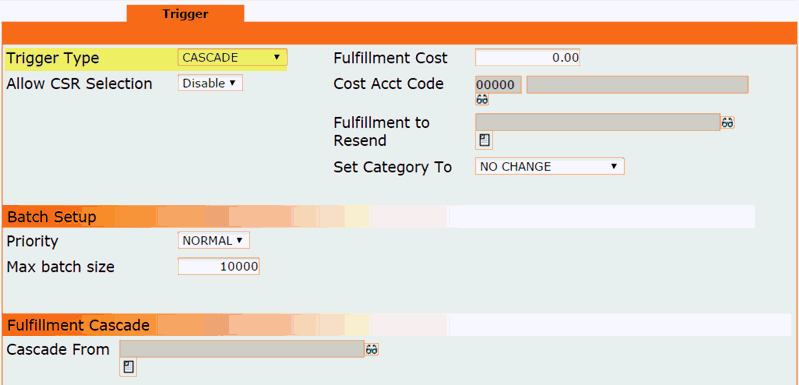
Listed below is a description of each option/setting that is available for the Cascade Trigger Type:
Allow CSR Selection
If enabled, this fulfillment will be included in the list of fulfillments a CSR can choose from when they perform the "Request New Fulfillment" action from the customer record.
Fulfillment Cost
To track the cost of this fulfillment in financial reporting, enter the dollar amount it will cost to process each request for this fulfillment.
Cost Acct Code
When tracking fulfillment costs, you must assign the cost to a payable account code for proper reporting.
Fulfillment to Resend
Choose the fulfillment the customer should get if the "Resend Fulfillment" action is performed from the customer fulfillment record. In most cases, the same fulfillment is resent.
Set Category To
This gives you the option to change the category on the customer record. The default setting is "No Change", but you can set the Category to change once the fulfillment has been processed.
Batch Setup Section in Trigger Tab
Priority
This is basically a label that is assigned to fulfillments so the batch jobs know which fulfillments to generate and/or batch. When you schedule a fulfillment batch job, you must select a priority. When the job runs, it looks for the fulfillments with a matching priority assignment and processes only those.
Max Batch Size
This is where you can set the maximum number of customer fulfillments allowed to be generated by a single batch. This is usually left at the default setting of 10,000. However, you can adjust the number as needed. An example would be if it was an email fulfillment, and your email service provider places a limit on the number of emails you are allowed to send within a given time frame.
Fulfillment Cascade Section in Trigger Tab
Select the fulfillment to cascade from. The fulfillment will automatically be triggered after the specified fulfillment has been generated.
Settings for Trigger Type: Chargeback
Chargeback fulfillments are triggered when a transaction is marked as a Chargeback from the transaction Actions menu. The Chargeback Trigger Type is only available for the Chargeback Management Fulfillment Style.

Listed below is a description of each option/setting that is available for the Chargeback Trigger Type:
Allow CSR Selection
If enabled, this fulfillment will be included in the list of fulfillments a CSR can choose from when they perform the "Request New Fulfillment" action from the customer record.
Fulfillment Cost
To track the cost of this fulfillment in financial reporting, enter the dollar amount it will cost to process each request for this fulfillment.
Cost Acct Code
When tracking fulfillment costs, you must assign the cost to a payable account code for proper reporting.
Fulfillment to Resend
Choose the fulfillment the customer should get if the "Resend Fulfillment" action is performed from the customer fulfillment record. In most cases, the same fulfillment is resent.
Set Category To
This gives you the option to change the category on the customer record. The default setting is "No Change", but you can set the Category to change once the fulfillment has been processed.
Batch Setup Section in Trigger Tab
Priority
This is basically a label that is assigned to fulfillments so the batch jobs know which fulfillments to generate and/or batch. When you schedule a fulfillment batch job, you must select a priority. When the job runs, it looks for the fulfillments with a matching priority assignment and processes only those.
Max Batch Size
This is where you can set the maximum number of customer fulfillments allowed to be generated by a single batch. This is usually left at the default setting of 10,000. However, you can adjust the number as needed. An example would be if it was an email fulfillment, and your email service provider places a limit on the number of emails you are allowed to send within a given time frame.
Settings for Trigger Type: RFI
RFI fulfillments are triggered when a transaction is marked as RFI from the transaction Actions menu. The RFI Trigger Type is only available for the Chargeback Management Fulfillment Style.

Listed below is a description of each option/setting that is available for the RFI Trigger Type:
Allow CSR Selection
If enabled, this fulfillment will be included in the list of fulfillments a CSR can choose from when they perform the "Request New Fulfillment" action from the customer record.
Fulfillment Cost
To track the cost of this fulfillment in financial reporting, enter the dollar amount it will cost to process each request for this fulfillment.
Cost Acct Code
When tracking fulfillment costs, you must assign the cost to a payable account code for proper reporting.
Fulfillment to Resend
Choose the fulfillment the customer should get if the "Resend Fulfillment" action is performed from the customer fulfillment record. In most cases, the same fulfillment is resent.
Set Category To
This gives you the option to change the category on the customer record. The default setting is "No Change", but you can set the Category to change once the fulfillment has been processed.
Batch Setup Section in Trigger Tab
Priority
This is basically a label that is assigned to fulfillments so the batch jobs know which fulfillments to generate and/or batch. When you schedule a fulfillment batch job, you must select a priority. When the job runs, it looks for the fulfillments with a matching priority assignment and processes only those.
Max Batch Size
This is where you can set the maximum number of customer fulfillments allowed to be generated by a single batch. This is usually left at the default setting of 10,000. However, you can adjust the number as needed. An example would be if it was an email fulfillment, and your email service provider places a limit on the number of emails you are allowed to send within a given time frame.
Setup Tab
When you are done with the Trigger Tab settings, click on the Setup Tab. This is where you will select the Delivery Type and where you can define custom fields (if needed) for the fulfillment. This is also where the Combine Packaging feature can be enabled and managed.
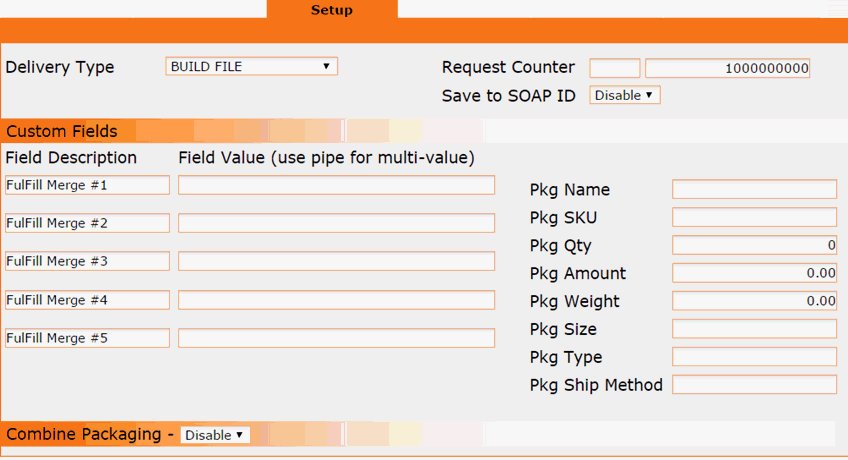
Delivery Type
Click on the drop down menu to see a list of available delivery types. The Builder tab will automatically display the appropriate builder tools based on the delivery type that is selected in the Setup tab.
Listed below is a description of each delivery option:
Build File - Allows you to build a custom CSV file that can be emailed and/or delivered to an FTP server.
Web Site Post - Allows you to build custom HTML content that is posted to the URL of your choice.
Orange Task - Allows you to build a custom ticket message that is delivered to the ticket queue of your choice.
Distribution Center - Allows you to batch multiple master fulfillments at the same time and merge them into a single file. Note: For this delivery type, the Builder tab is managed on the Distribution Center rather than on the master fulfillment.
3rd Party API - Allows you to post data to your fulfillment service provider via API. If your provider is not in the list, you can still post your fulfillment data to them using the Web Site Post option.
Request Counter
Each time a customer fulfillment is batched, the Request Counter generates a unique number up to 10 digits long. You may enter the number you would like the counter to start at or you can leave it set at the default starting number, and it will sequentially increase by an increment of one.
Save to SOAP ID
If enabled, the number generated by the Request Counter will automatically be stored in the SOAP ID field on the customer record, where it can be retrieved and populated into subsequent fulfillments as needed.
 If
you need to assign a unique number to customers - such as a customer account
number, policy number, etc. - this option can be used as an alternate
to using the customer GUID.
 Please
be aware that the number generated by the Request Counter is only unique
to the master fulfillment that created it, whereas Customer GUIDs are
unique across all programs. Also take into consideration the fact that
a customer who is issued this fulfillment more than once will have a new
number generated and stored on the customer record in each instance.
 To
get a fulfillment to retrieve and populate the Request Counter stored
in the SOAP ID field on a customer record, you would need to use the %EXTID%
field tag in the Builder tab of the fulfillment. %EXTID% = the SOAP ID
field on the customer record.
 To
ensure that the number generated by the Request Counter is available
for retrieval before your other fulfillments run, we recommend setting
the priority in the trigger tab to HIGH on the fulfillment that has the
Save to SOAP ID option enabled. Also make sure the corresponding fulfillment
batch job is also set to HIGH priority and is scheduled to run before your other fulfillment batch jobs
run. Otherwise, the Request Counter will not have been stored on the customer
record yet and therefore wouldn’t be retrievable by the other fulfillments.
Custom Fields - Fulfill Merge Options
These are optional fields that can be used to populate custom values in customer fulfillments. If you choose to use either some or all of these fields, it will require the following 2-step process:
Fill in the Field Description and Field Value in the Setup tab. Field Description is the name/label you wish to assign to the custom field. The label you enter here will be displayed in the customer record Details tab as the field name. Field Value is the data that needs to go in that field. For example, if you wanted to use a custom field to indicate the product flavor that was ordered, you would enter "Product Flavor" in the Field Description field and "Chocolate" as the Field Value.
 For Chargeback
Management and RMA Processing Fulfillment Styles, the Field Descriptions
are auto-populated with the corresponding relevant labels and the Field
Values should be left blank, as they will be captured from the transaction
record.
Custom Fields - Pkg Options
These are optional fields that can be used to populate package related details in customer fulfillments. If you choose to use either some or all of these fields, it will require the following 2-step process:
Enter a value in the Pkg fields you wish to use. Any Pkg fields that you don't need to use can be left blank.
Define where in the customer fulfillment you want the Pkg fields to appear. This is managed in the Builder tab, where you must insert the Pkg field tags in the desired positions.
Combine Packaging
This is an optional feature that can be used to make the order fulfillment process more efficient by providing a way for your shipping department to sort fulfillment files based on specific customer data. For more details on how this feature can be used, along with setup instructions, please see the section on this page titled Combined Packaging.
Builder Tab
When you are done with the Setup Tab, the next step is to click on the Builder Tab, which is where you will create the content of the Fulfillment. The settings and options that appear in the Builder tab will vary based on the Delivery Type that was selected in the Setup Tab. Descriptions of the Builder settings will be provided for each Delivery Type. For further instructions, look at the subheadings listed below to find the Delivery Type you selected.
Builder Tab Settings for Delivery Type: Customer Email
Send customized emails to customers and/or internal team members with your integrated email service provider or with OrangeCRM's email service.
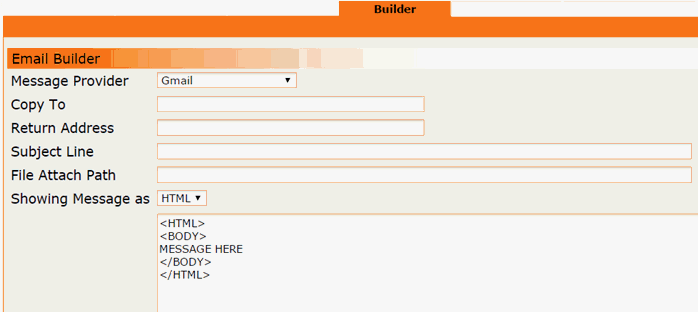
Message Provider
Use the drop down selector to choose the Message Provider you want to use to send this email. Note: You must first setup your Message Provider in a separate area. See the section on this page titled How To Create a New Message Service Provider.
Copy To - Note: In most cases, this option isn't used.
Any email recipients entered in this field will receive a copy of every single email that is generated by this fulfillment. If this email is generated in large quantities - for every new customer, as an example - it will most likely fill up the copied recipients' mailbox very quickly.
Return Address
This is the email address the recipient will see as the "From" address and it is also the address replies will be sent to. Note: You can also specify an easily recognizable email display name to be shown in the "From" section, which can increase your email open rates. While browsing their inbox, customers will see your display name instead of your company's email address. To incorporate this option, simply enter your desired display name followed by your company's return email address enclosed in the less than (<) and greater than (>) signs. Example: ABC Service <support@abcdeliveryservice.com>
Subject Line
Enter the text you wish to appear in the subject line of the email.
File Attach Path
If you wish to include an attachment in the email, enter the file path here.
Showing Message As
The email format can be either HTML or text. We highly recommend using HTML to avoid inconsistent display issues that are common across multiple email platforms when the text format is used.
Email Message
The large box at the bottom of the Builder tab is where the email message is entered. If using HTML format, insert the body of the email where it says "MESSAGE HERE." If using text format, simply type the email message as you would if you were composing a new email from your mailbox. Note: With the use of merge tags, emails can be dynamically personalized with specific information from the customer record such as name, order date, product description, etc. Merge tags consist of specific key words enclosed in percent signs, which are strategically placed in the email message where you want the corresponding value to be filled in when the email is generated. Click the following link for a downloadable list of Merge Tags for Email, OrangeTask & Web Site Post Fulfillments.
Builder Tab Settings for Delivery Type: Build File
Deliver custom delimited text files to your fulfillment center for order shipping based on their required specifications.
File Builder Section
Start by looking for your fulfillment service provider in the drop down menu labeled Field Layout. Note: If your provider isn't in the list, you can still build a custom file to their specifications by selecting the Visual Editor option from the drop down menu.

If you have selected a specific fulfillment provider, proceed by filling in the fields located in the File Builder section. Then move on to the File Delivery section, which you can find instructions for under the next subheading named File Delivery Section. Note: If you don't see the File Delivery section in the Builder tab, below the File Builder section, this is because the fulfillment provider you have selected uses HTTP direct post as the delivery method and no additional information is needed.
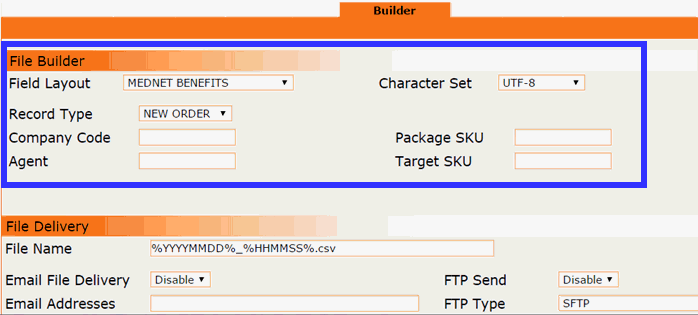
If you are using the Visual Editor option, the next step is to select the Character Set, Encapsulation and Delimiter specified in your fulfillment provider's file requirements.

If your fulfillment provider requires or allows a header row in the file, you may enable that setting. When the Header Row is enabled, a field description will automatically be added to the header row each time you add a field to the file layout.

Now you are ready to start adding the necessary fields to the file layout in the same order specified by your fulfillment provider. To do this, you will use the drop down menu labeled Chooser to select one field at a time and then click the Add Field button beside it. Each time you add a field, you should see the corresponding field merge tag appear in the box labeled Detail Rows.
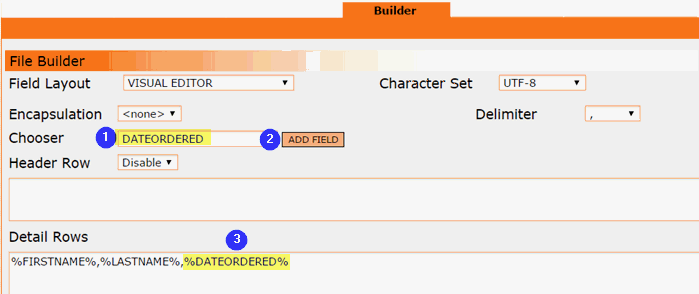
For a detailed description of each field merge tag that is available for use in Visual Editor fulfillments, including output samples as well as each field’s location in the CRM (Example: Address tab of customer record), please refer to the document titled Merge Tags for Visual Editor Fulfillments.
Once you have added all of the required fields to the Detail Rows box, you are ready to proceed to the File Delivery section in the Builder tab.
File Delivery Section
Note: If you don't see the File Delivery section in the Builder tab, below the File Builder section, this is because the fulfillment provider you have selected uses HTTP direct post as the delivery method and no additional information is needed.
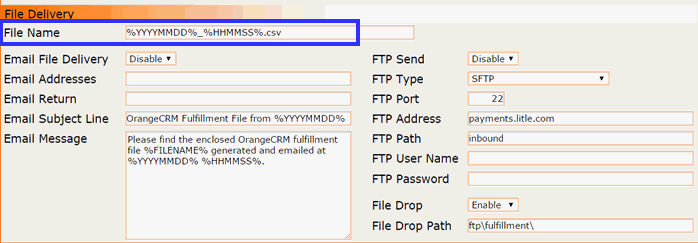
Use the File Name field to assign the desired naming convention for the output files. Your fulfillment provider may have a certain naming convention they prefer. We recommend including the date and time stamp in the file name to make it easy to differentiate between multiple files generated on the same date. Important: Always use a dash or an underscore instead of spaces in the file name.
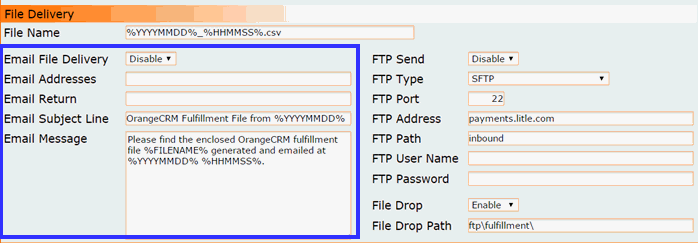
Fulfillment files can be delivered via email to your fulfillment provider and/or internal team members if desired. Simply enable the Email File Delivery setting and fill in the email fields. For multiple recipients, separate each email address with a semi colon. Example: Tom@adco.com; Pam@shipping.com; Bob@mngmnt.com
The subject line and email message fields can be edited as needed.
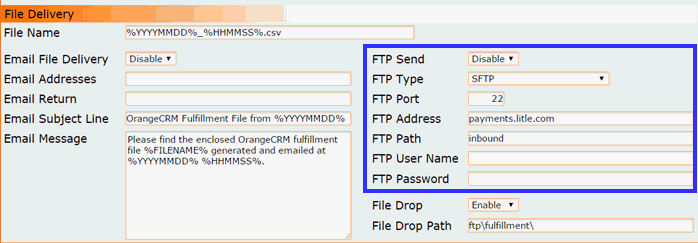
Fulfillment files can also be delivered to an FTP address. Enable the FTP Send setting and fill in the FTP fields with the credentials provided by your fulfillment house.
Important: We recommend leaving the File Drop setting, located below the FTP fields, enabled to allow a backup copy of all generated fulfillment files to be stored on OrangeCRM's FTP site.
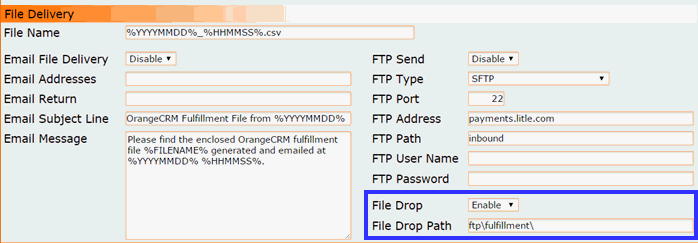
Now you are ready to move on to the Response tab. Further instructions are provided under the subheading titled Response Tab.
Builder Tab Settings for Delivery Type: Distribution Center
Combine multiple fulfillments into a single delimited text file for more efficient shipping.
If you have selected the Distribution Center delivery type, you will see a message in the Builder Tab that says, "This builder is not used for this delivery type."

The file layout for Distribution Center deliveries is built within the Distribution Center record. For instructions, please see the topic on this page titled How to Create a New Distribution Center.
Now you are ready to move on to the Response tab. Further instructions are provided under the subheading titled Response Tab.
Builder Tab Settings for Delivery Type: OrangeTask
Auto-generate OrangeTask tickets in a specific Queue.
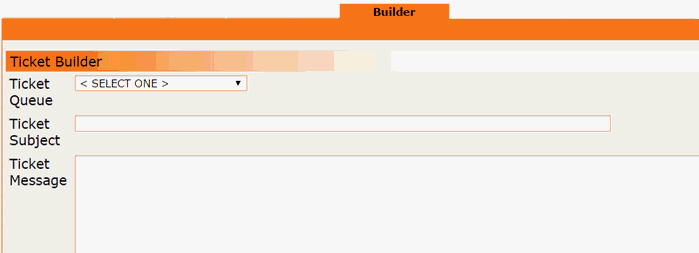
Use the drop down menu labeled Ticket Queue to select the Queue tickets will be assigned to.
Enter a brief description into the Ticket Subject field.
In the Ticket Message box, enter the details that you want to appear in the ticket body.
Note: With the use of merge tags, the ticket subject and ticket message can be dynamically personalized with specific information from the customer record such as name, order date, product description, etc. Merge tags consist of specific key words enclosed in percent signs, which are strategically placed where you want the corresponding value to be filled in when the ticket is generated. Click the following link for a downloadable list of Merge Tags for Email, OrangeTask & Web Site Post Fulfillments.
Now you are ready to move on to the Response tab. Further instructions are provided under the subheading titled Response Tab.
Builder Tab Settings for Delivery Type: Web Site Post
Send customized fulfillment content to any URL via HTTP post.
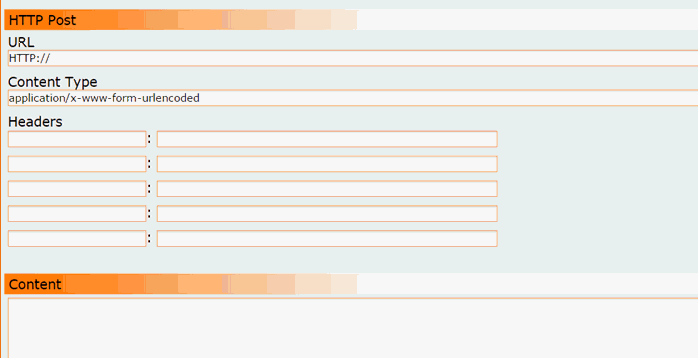
Enter the URL where the fulfillment data is to be posted.
Enter the Content Type and Headers (if any).
Enter the XML Content to be posted in the large box labeled Content.
Note: With the use of merge tags, the post content can be dynamically personalized with specific information from the customer record such as name, order date, product description, etc. Merge tags consist of specific key words enclosed in percent signs, which are strategically placed where you want the corresponding value to be filled in when the HTTP post is generated. Click the following link for a downloadable list of Merge Tags for Email, OrangeTask & Web Site Post Fulfillments.
Now you are ready to move on to the Response tab. Further instructions are provided under the subheading titled Response Tab.
Builder Tab Settings for Delivery Type: 3rd Party API
We have built custom integrations for some of the more popular fulfillment service providers. If your provider is not in the list, you can still post your fulfillment data to them using the Web Site Post option.
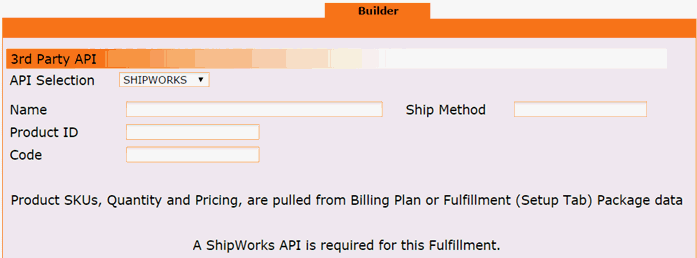
In the API Selection drop down list, select the API you wish to use.
Fill in any fields that are displayed below the API Selection (if any).
Take note of any additional instructions displayed at the bottom of the Builder Tab that may be required to complete the API setup.
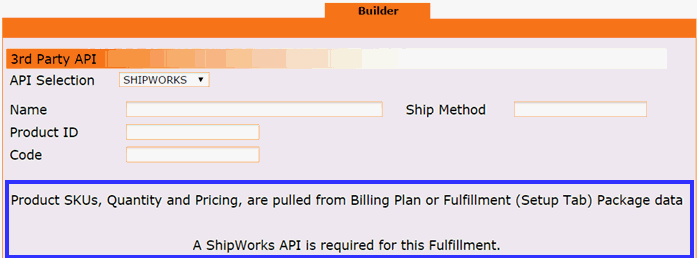
Now you are ready to move on to the Response tab. Further instructions are provided under the subheading titled Response Tab.
Response Tab
The Response tab is where you can set up follow up fulfillments based on whether or not a response to the original fulfillment is received.
Respond with a Fulfillment
This section is used to set up a follow up fulfillment that is auto-triggered when a response to the original fulfillment is received. Example: When shipping and tracking details are imported into the CRM, in response to an exported fulfillment file, a follow up email fulfillment to the customer can be auto-triggered to provide them with the shipment details.
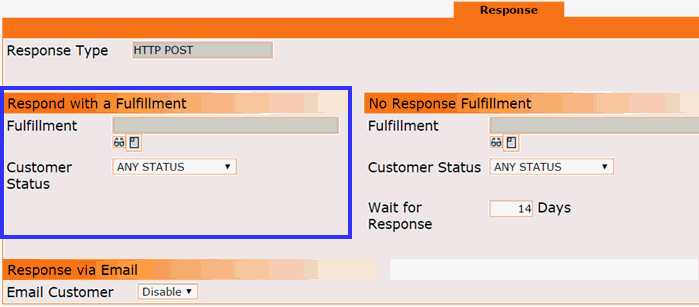
To use this feature, click on the eyeglasses icon beside the field labeled Fulfillment to select the desired follow up fulfillment. Note: The follow up fulfillment must already be created in order to select it here.
If you wish to limit the follow up fulfillment to only those customers who are in a particular status, you may use the drop down menu to select a specific Customer Status.
No Response Fulfillment
This section is used to set up a follow up fulfillment that is auto-triggered when no response to the original fulfillment has been received within the specified number of days. Example: Your fulfillment service provider typically sends a response file containing shipping and tracking details within 5 days of receiving an order fulfillment request. If their shipping response isn't received within 5 days, a follow up email to the fulfillment provider and/or to internal team members can be auto-triggered.
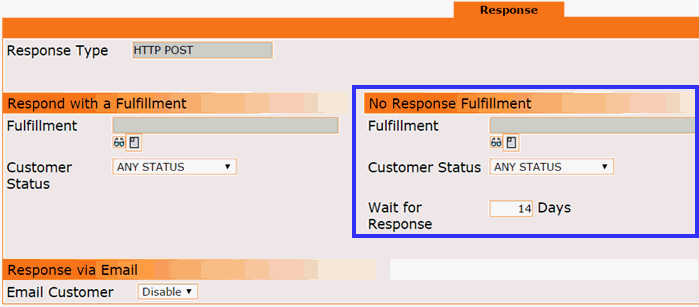
To use this feature, click on the eyeglasses icon beside the field labeled Fulfillment to select the desired follow up fulfillment. Note: The follow up fulfillment must already be created in order to select it here.
If you wish to limit the follow up fulfillment to only those customers who are in a particular status, you may use the drop down menu to select a specific Customer Status.
Enter the number of days the CRM needs to wait for a response before the follow up fulfillment is auto-triggered.
Response via Email
Proceed with caution! This option sends an instant email to customers when a response to the original fulfillment is received. Instant emails aren't recorded as sent fulfillments on the customer record, nor can they be resent if needed. We typically recommend using the Respond with a Fulfillment section as a better option because it allows you to keep a record of each follow up fulfillment that is sent and resend them as needed. In cases where those features aren't essential, you may choose to send an instant customer email rather than an email fulfillment.
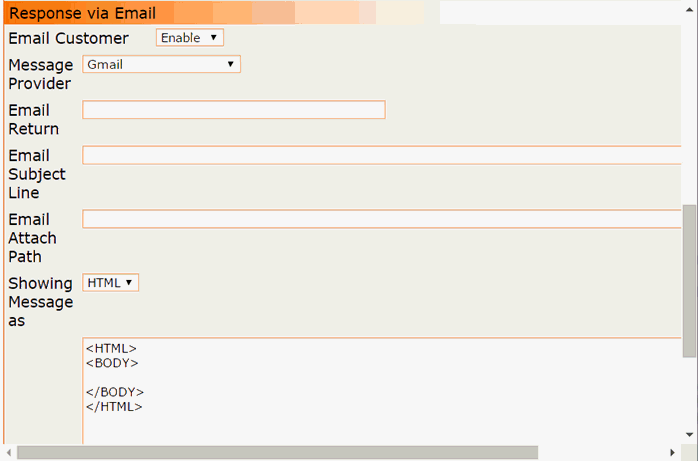
To use this feature, enable the Email Customer setting.
Message Provider
Use the drop down selector to choose the Message Provider you want to use to send this email. Note: You must first setup your Message Provider in a separate area. See the section on this page titled How To Create a New Message Service Provider.
Email Return
This is the email address the recipient will see as the "From" address and it is also the address replies will be sent to. Note: You can also specify an easily recognizable email display name to be shown in the "From" section, which can increase your email open rates. While browsing their inbox, customers will see your display name instead of your company's email address. To incorporate this option, simply enter your desired display name followed by your company's return email address enclosed in the less than (<) and greater than (>) signs. Example: ABC Service <support@abcdeliveryservice.com>
Email Subject Line
Enter the text you wish to appear in the subject line of the email.
Email Attach Path
If you wish to include an attachment in the email, enter the file path here.
Showing Message As
The email format can be either HTML or text. We highly recommend using HTML to avoid inconsistent display issues that are common across multiple email platforms when the text format is used.
Email Message
The large box at the bottom of the window is where the email message is entered. If using HTML format, insert the body of the email between the two body prompts. If using text format, simply type the email message as you would if you were composing a new email from your mailbox. Note: With the use of merge tags, emails can be dynamically personalized with specific information from the customer record such as name, order date, product description, etc. Merge tags consist of specific key words enclosed in percent signs, which are strategically placed in the email message where you want the corresponding value to be filled in when the email is generated. Click the following link for a downloadable list of Merge Tags for Email, OrangeTask & Web Site Post Fulfillments.
Batch Job
The final step in creating a fulfillment is to make sure there is a corresponding batch job scheduled to run in order to process the fulfillments. For instructions on how to check if there is already an existing batch job scheduled that will process this fulfillment and how to schedule a new batch job if needed, please see the Batch Jobs page.
The Combine Packaging feature is designed to make the order fulfillment process more efficient by providing a way for your shipping department to sort fulfillment files based on specific customer data. Fulfillments can be grouped together with the use of a Box ID, which is automatically generated based on the criteria you have defined.
There are numerous data points on which you may choose to base your Box IDs. Here are just a few examples of how Box IDs can be used:
To enable the use of Box IDs, simply go to the Fulfillment Setup Tab and enable Combine Packaging. Then select the customer data field you wish to generate a Box ID for.
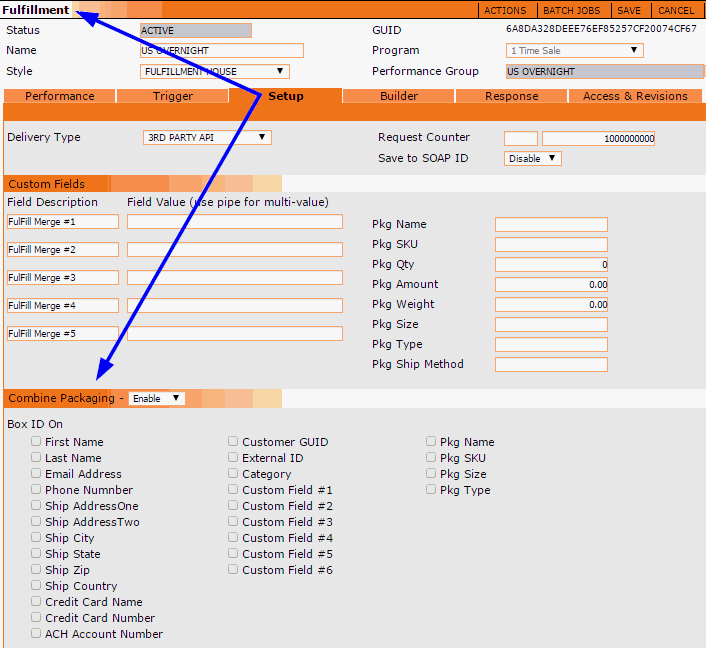
Finally, go to the Builder tab and add the Box ID field to your fulfillment file.
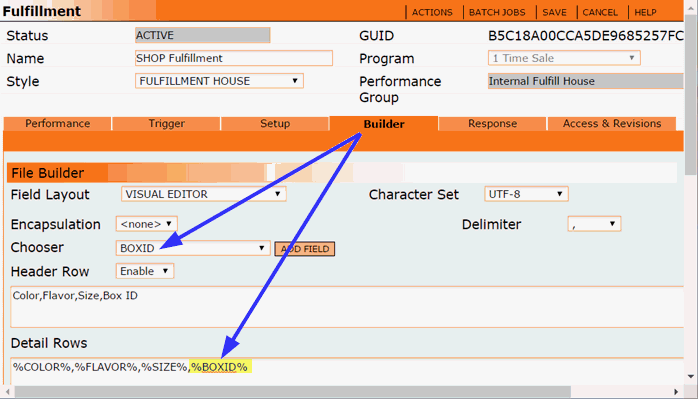
A 32 digit hash will be generated in the Box ID field, which will act as a reference number that traces back to the customer data assigned to it.
The CRM will update imported tracking numbers on fulfillments using either the Request GUID, Customer GUID or Box ID values. This means fulfillment response files may use the Box ID in place of the Request GUID or Customer GUID.
A Distribution Center allows you to batch multiple master fulfillments at the same time and merge them into a single file. OrangeCRM can be configured to deliver a Distribution Center file via a 3rd party API, build file, web site post, customer email or OrangeTask.
Go to the Lists menu and click on Distribution Centers.

A list of any existing Distribution Centers will be displayed.

To create a new Distribution Center, click on the New Distribution Center button in the upper right corner.
A new window will open for the new Distribution Center.

Enter a meaningful Name for the Distribution Center.
Select the Delivery Type from the drop down list.
If you wish to restrict this Distribution Center to a specific Program, select a Program from the Security drop down list. This is optional.
Then go to the Builder tab and follow the set of directions listed below for the Delivery Type you selected.
Delivery Type: 3rd Party API
We have built custom integrations for some of the more popular fulfillment service providers. If your provider is not in the list, you can still post your fulfillment data to them using the Web Site Post option.

In the API Selection drop down list, select the API you wish to use.
Fill in any fields that are displayed below the API Selection (if any).
Take note of any additional instructions displayed at the bottom of the Builder Tab that may be required to complete the API setup.

Then click the Save button.
You should now see the new Distribution Center in the Distribution Centers list.
Delivery Type: Build File
Deliver custom delimited text files to your fulfillment center for order shipping based on their required specifications.
File Builder Section
Start by looking for your fulfillment service provider in the drop down menu labeled Field Layout. Note: If your provider is not in the list, you can still build a custom file to their specifications by selecting the Visual Editor option from the drop down menu.

If you have selected a specific fulfillment provider, proceed by filling in the fields located in the File Builder section. Then move on to the File Delivery section, which you can find instructions for under the next subheading named File Delivery Section. Note: If you don't see the File Delivery section in the Builder tab, below the File Builder section, this is because the fulfillment provider you have selected uses HTTP direct post as the delivery method and no additional information is needed.

If you are using the Visual Editor option, the next step is to select the Character Set, Encapsulation and Delimiter specified in your fulfillment provider's file requirements.

If your fulfillment provider requires or allows a header row in the file, you may enable that setting. When the Header Row is enabled, a field description will automatically be added to the header row each time you add a field to the file layout.

Now you are ready to start adding the necessary fields to the file layout in the same order specified by your fulfillment provider. To do this, you will use the drop down menu labeled Chooser to select one field at a time and then click the Add Field button beside it. Each time you add a field, you should see the corresponding field merge tag appear in the box labeled Detail Rows.

For a detailed description of each field merge tag that is available for use in Visual Editor fulfillments, including output samples as well as each field’s location in the CRM (Example: Address tab of customer record), please refer to the document titled Merge Tags for Visual Editor Fulfillments.
Once you have added all of the required fields to the Detail Rows box, you are ready to proceed to the File Delivery section in the Builder tab.
File Delivery Section
Note: If you don't see the File Delivery section in the Builder tab, below the File Builder section, this is because the fulfillment provider you have selected uses HTTP direct post as the delivery method and no additional information is needed.
Use the File Name field to assign the desired naming convention for the output files. Your fulfillment provider may have a certain naming convention they prefer. We recommend including the date and time stamp in the file name to make it easy to differentiate between multiple files generated on the same date. Important: Always use a dash or an underscore instead of spaces in the file name.

Fulfillment files can be delivered via email to your fulfillment provider and/or internal team members if desired. Simply enable the Email File Delivery setting and fill in the email fields. For multiple recipients, separate each email address with a semi colon. Example: Tom@adco.com; Pam@shipping.com; Bob@mngmnt.com
The subject line and email message fields can be edited as needed.

Fulfillment files can also be delivered to an FTP address. Enable the FTP Send setting and fill in the FTP fields with the credentials provided by your fulfillment house.

Important: We recommend leaving the File Drop setting, located below the FTP fields, enabled to allow a backup copy of all generated fulfillment files to be stored on OrangeCRM's FTP site.

When you are finished with the File Builder and File Delivery sections, click the Save button.
You should now see the new Distribution Center in the Distribution Centers list.
Delivery Type: Web Site Post
Send customized fulfillment content to any URL via HTTP post.

Enter the URL where the fulfillment data is to be posted.
Enter the Content Type and Headers (if any).
Enter the XML Content to be posted in the large box labeled Content.
Note: With the use of merge tags, the post content can be dynamically personalized with specific information from the customer record such as name, order date, product description, etc. Merge tags consist of specific key words enclosed in percent signs, which are strategically placed where you want the corresponding value to be filled in when the HTTP post is generated. Click the following link for a downloadable list of Merge Tags for Email, OrangeTask & Web Site Post Fulfillments.
Then click the Save button.
You should now see the new Distribution Center in the Distribution Centers list.
Delivery Type: Customer Email
Send customized emails with your integrated email service provider or with OrangeCRM's email service.

Message Provider
Use the drop down selector to choose the Message Provider you want to use to send this email. Note: You must first setup your Message Provider in a separate area. See the section on this page titled How To Create a New Message Service Provider.
Copy To - Note: In most cases, this option isn't used.
Any email recipients entered in this field will receive a copy of every single email that is generated by this fulfillment. If this email is generated in large quantities - for every new customer, as an example - it will most likely fill up the copied recipients' mailbox very quickly.
Return Address
This is the email address the recipient will see as the "From" address and it is also the address replies will be sent to. Note: You can also specify an easily recognizable email display name to be shown in the "From" section, which can increase your email open rates. While browsing their inbox, customers will see your display name instead of your company's email address. To incorporate this option, simply enter your desired display name followed by your company's return email address enclosed in the less than (<) and greater than (>) signs. Example: ABC Service <support@abcdeliveryservice.com>
Subject Line
Enter the text you wish to appear in the subject line of the email.
File Attach Path
If you wish to include an attachment in the email, enter the file path here.
Showing Message As
The email format can be either HTML or text. We highly recommend using HTML to avoid inconsistent display issues that are common across multiple email platforms when the text format is used.
Email Message
The large box at the bottom of the Builder tab is where the email message is entered. If using HTML format, insert the body of the email where it says "MESSAGE HERE." If using text format, simply type the email message as you would if you were composing a new email from your mailbox. Note: With the use of merge tags, emails can be dynamically personalized with specific information from the customer record such as name, order date, product description, etc. Merge tags consist of specific key words enclosed in percent signs, which are strategically placed in the email message where you want the corresponding value to be filled in when the email is generated. Click the following link for a downloadable list of Merge Tags for Email, OrangeTask & Web Site Post Fulfillments.
Then click the Save button.
You should now see the new Distribution Center in the Distribution Centers list.
Delivery Type: Orange Task
Auto-generate OrangeTask tickets in a specific Queue.

Use the drop down menu labeled Ticket Queue to select the Queue tickets will be assigned to.
Enter a brief description into the Ticket Subject field.
In the Ticket Message box, enter the details that you want to appear in the ticket body.
Note: With the use of merge tags, the ticket subject and ticket message can be dynamically personalized with specific information from the customer record such as name, order date, product description, etc. Merge tags consist of specific key words enclosed in percent signs, which are strategically placed where you want the corresponding value to be filled in when the ticket is generated. Click the following link for a downloadable list of Merge Tags for Email, OrangeTask & Web Site Post Fulfillments.
Then click the Save button.
You should now see the new Distribution Center in the Distribution Centers list.
OrangeCRM conveniently provides packing slips, which can be printed and used by your shipping department to pick and pack the correct items for each fulfillment. This topic will cover how to access and print packing slips, how to define what is populated on the packing slip and how to grant user access to the print packing slip feature.
How to Access and Print Packing Slips
To access packing slips, go to the Summary of Fulfillments report and drill in until you get to the batch detail view (shown below).
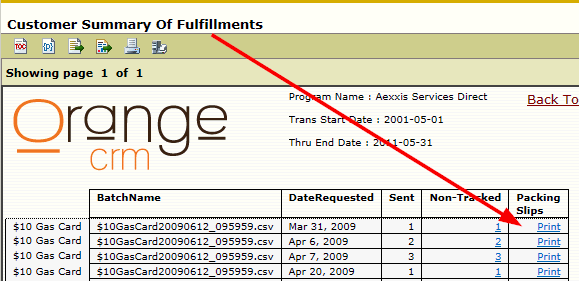
Then, simply click on the Print link and a new PDF document will open containing the packing slips for that fulfillment batch. The PDF can then be printed and saved.
A sample of what the packing slip looks like, along with definitions of the fields on the packing slip is pictured below.
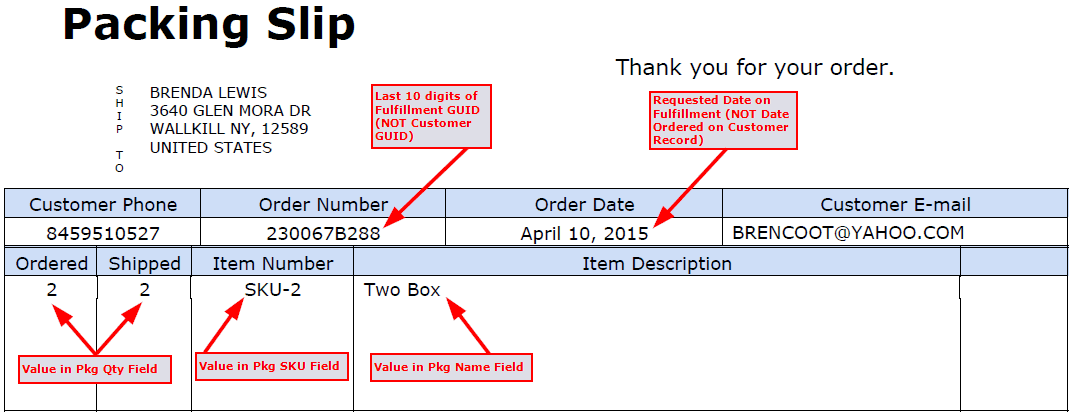
 To make it easier to match each packing slip to the
correct fulfillment, the last 10 digits of the Fulfillment GUID are automatically
populated on the packing slip. To get the full benefit of this, we recommend
that you setup your fulfillments to also include the last 10 digits of
the Fulfillment GUID. For Generic Delimited Build File fulfillments, the
field name is Request GUID – 10. For XML Build File and Web Site Post
fulfillments, the field name is %REQID-10%.
How to Define What is Populated on the Packing Slip
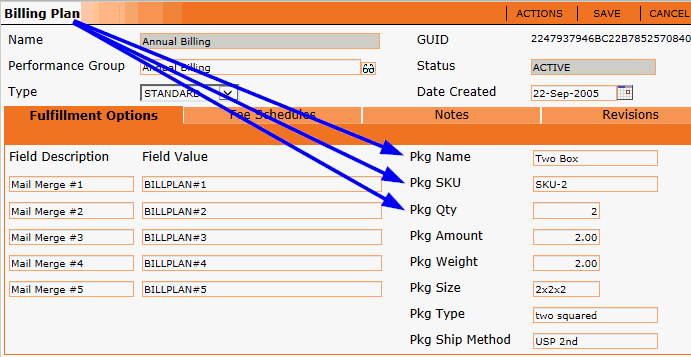
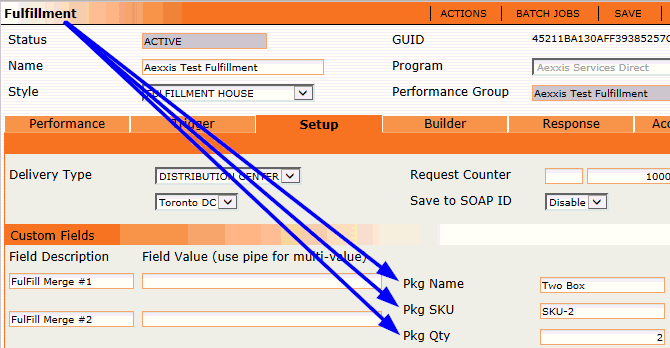
Use the Pkg fields on a Billing Plan or a Fulfillment to define what is populated in the quantity Ordered/Shipped, Item Number and Item Description fields on the Packing Slip.
How to Grant User Access to the Print Packing Slip Feature
To grant user access to the print packing slip feature, the following two security roles must be assigned to the user: MenuCustomer & BankAccess.
If you need access to the packing slips, please contact your OrangeCRM administrator to have the necessary security roles added to your profile.
A Message Service Provider is an email service provider that integrates with OrangeCRM to allow you to send customer email fulfillments. Examples of a Message Service Provider would include MailChimp, Office 365, Google Gmail and even your own custom SMTP server. OrangeCRM also has its own Message Service Provider available for purchase. For more information please see the topic titled OrangeMessage.
Go to the Lists menu and click on Message Service Providers.
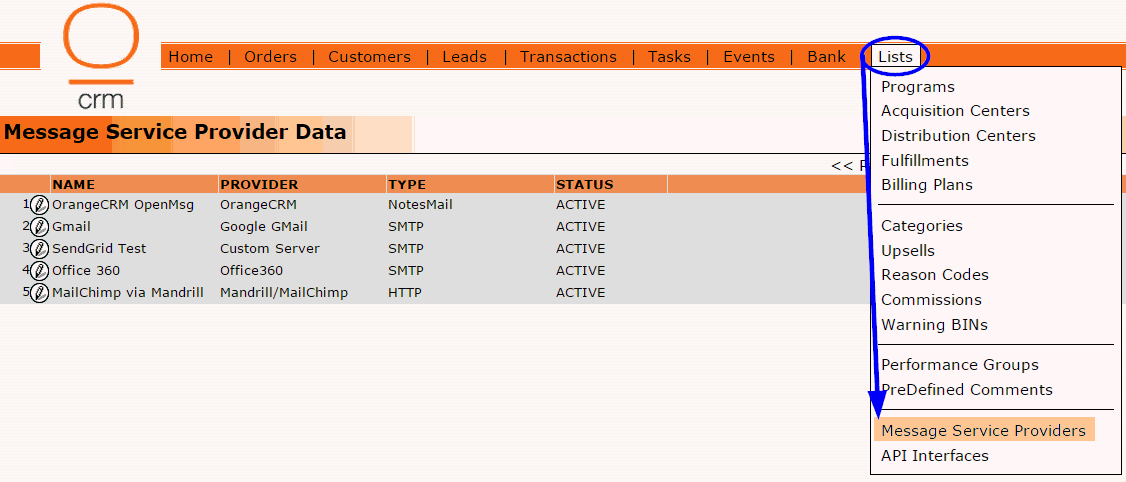
A listing of all existing Message Service Providers will be displayed (as shown in the image above).
To create a new Message Service Provider, click on the New Message Provider button in the upper right corner.

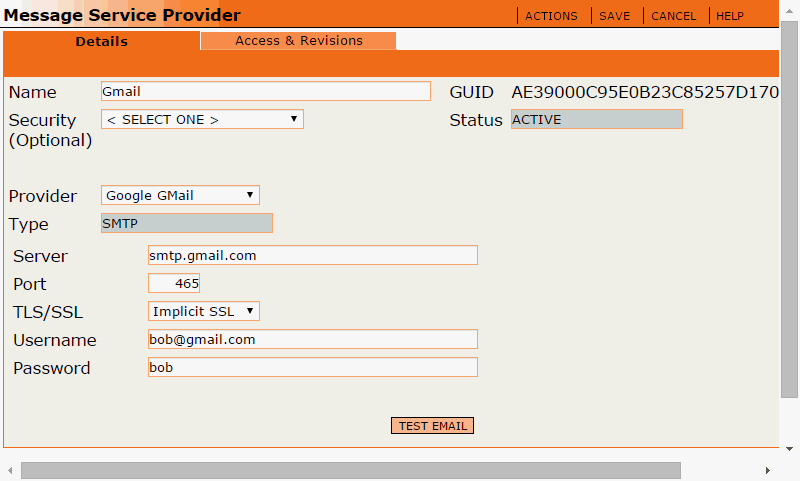
A new Message Service Provider record will open.
Name
Enter a descriptive name for this Message Service Provider. This is the name you will see listed in the Message Provider drop down selector on customer email fulfillment records.
Security (Optional)
Restricts this Message Service Provider to one single Program.
Provider
Select your email service provider from the drop down selector.
Type, Server, Port, TLS/SSL
These fields should all auto populate after a provider selection is made, with the exception of a Custom Server. If you are using a Custom Server, be sure to enter the correct values in these fields.
Username, Password
Enter the login credentials for your email account.
Click on the Test Email button to send yourself a test email.
Click the Save button when you are done.
To see a historical list of all Fulfillments that have been issued to a customer, simply go to the Fulfillments tab on the Customer Record.

To view the details of a Fulfillment, click on the pencil icon. The Customer Fulfillment will open in a new window, as shown below.

Fulfillment
The name of the fulfillment. Lists of available fulfillments are accessed by clicking on the chooser icon and specifics of the fulfillment are reviewed by clicking on the details icon.
Number
A number auto-assigned by OrangeCRM to this specific fulfillment.
Dist Center
The Distribution Center assigned to this Customer fulfillment, if any.
GUID
A unique 32 digit alpha-numeric string identifying the specific Customer Fulfillment.
Requested
Date this fulfillment was requested, i.e. generated.
Batched
Date this fulfillment was batched, i.e. sent to the designated destination.
Actions Menu
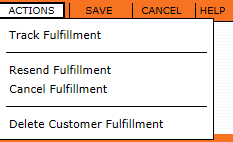
Depending on your level of access, you may not see all of the above options in the Customer Fulfillment Actions menu. If you need more permissions, please see your system administrator.
Track Fulfillment
If the URL to the shipper's website has been provided by your fulfillment center, this will open the URL in a new window.
Resend Fulfillment
Resubmits the same fulfillment to be sent to the customer again. You will see a new line item in the Fulfillments tab of the customer record.
Cancel Fulfillment
Stops the fulfillment f