
Banks
In this Topic: Hide
 Click one of the links listed above
to jump to a section on this page.
A Deposit Bank is the financial institution that holds your merchant account. It is where cleared customer payments are deposited and where refunds and chargebacks are drawn from. Examples of a Deposit Bank would include Wells Fargo, Bank of America, etc.
If your business has multiple bank accounts, Deposit Banks can be set up in OrangeCRM as a way to track and report on cash flow for each account separately.
To create a new Deposit Bank, go to the Banks menu and click on Deposit Banks.

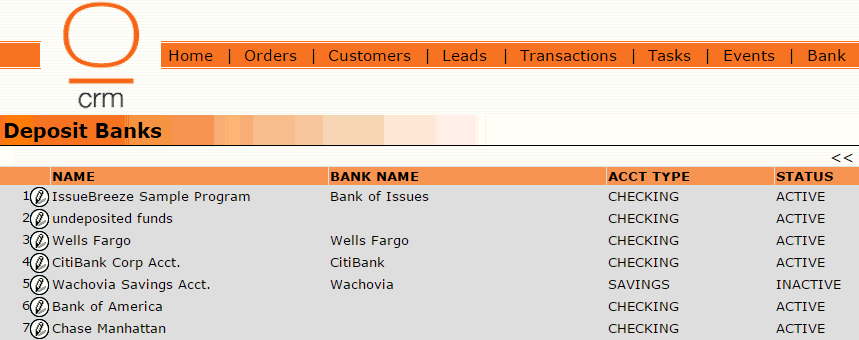
A list of all existing Deposit Banks will appear. Click on the New Deposit Bank button in the upper right corner.

A new Deposit Bank record will open.
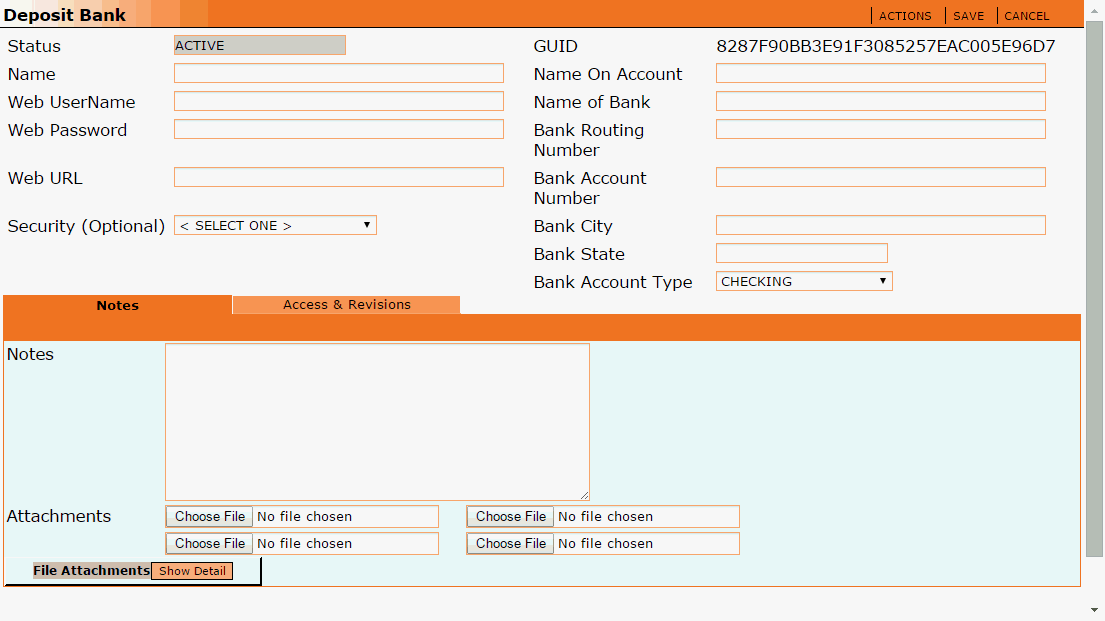
Name
Enter a descriptive name for this Deposit Bank that will allow you to distinguish it from your other Deposit Banks.
Web UserName, Password and URL
These fields are optional and are for internal reference purposes only.
The remaining open text fields are optional and are for internal reference purposes only.
Security (Optional)
Restricts this Deposit Bank to one single Program.
Name of Bank
Enter the name of the financial institution that holds your merchant account.
Bank Account Fields
The bank account fields listed below the GUID number are optional and are for internal reference purposes only. However, we do recommend filling in the Name of Bank field to assist in distinguishing your different Deposit Banks.
Bank Account Type
Use the drop down selector to choose the type of account you have with this Deposit Bank.
Notes
Enter any important details you wish to record about this Deposit Bank.
Attachments
If you want to attach any documents to this Deposit Bank record, click the Choose File button to select and upload a file from your computer.
Click the Save button when you are done editing the Deposit Bank record.
You should now see the new Deposit Bank appear in the Deposit Banks list.
Actions Menu
The Actions menu in a Deposit Bank record allows you to mark it Active or Inactive.

A Merchant Bank integrates with the gateway that processes electronic payments from your customers. Examples of a Merchant Bank would include Authorize.Net, PayPal, SecurePay, etc.
Within each Merchant Bank you will define all transaction processing rules such as what type of transactions are routed to each MID, sticky routing, load balancing, single batch limits, daily and/or monthly limits, limits per transaction type (sale/capture, auth, refund, retry), time and frequency of transaction batches and more. For instructions on how to configure a Merchant Bank, please see the next section on this page titled How To Create a New Merchant Bank.
Go to the Bank menu and click on Merchant Banks.

A list of all existing Merchant Banks in all Programs will be displayed. To view the Merchant Banks in a specific Program, use the Program drop down selector in the upper left corner to choose a Program.

To create a new Merchant Bank, click on the Add Merchant Bank button in the upper right corner.

A new Merchant Bank record will open.

Program
Use the drop down selector to assign this Merchant Bank to the appropriate Program.
Name
This is an important field. It is used to identify the Merchant Bank and will be referenced in other places throughout the CRM, including reports. Therefore, make sure you choose a name that is descriptive, clearly differentiates this Bank from other Banks and identifies which program it will be assigned to. Example: Program A - EasyPay MID 1234. Note: Merchant Bank names can't be changed in the future, so take your time when considering the naming convention you will use.
Important: Each Merchant Bank, across all Programs, should have a unique name. Merchant Banks with an identical name can easily be confused in reporting and other areas in the CRM, even if they are assigned to different programs.
Performance Group
Click on the eyeglasses icon to select the Performance Group you want to assign this Merchant Bank to. For information on Performance Groups, please see the Performance Groups topic.
Flat Fee/Escrow
Enter the flat fee and/or the escrow amount in these fields if it applies to all payment types being processed through this Merchant Bank. The escrow field is for any escrow your bank may set aside to cover any chargebacks (refer to your bank's User Agreement for more information).
Comments
Enter any important details about this Merchant Bank.
Setup Tab

Bank API
API stands for Application Program Interface. A Bank API enables OrangeCRM to "talk" to your payment processing gateway. Use the Bank API drop down selector to choose your gateway. If you are creating this Merchant Bank to process cash transactions, select Cash in the Bank API field. All cash transactions are auto-approved. If this Merchant Bank requires manual processing, select Manual Process in the Bank API field.
 If your gateway is not in the list, please
submit a service request in the Aexxis LLC ticketing system to have your
gateway integrated. We offer free gateway integrations within 72 hours.
For instructions on how to submit a service request, please see the section
titled How Do I Contact OrangeCRM Support,
on the FAQ
page.
Batch Mode
This field should auto-populate with the Batch Mode that is accepted by the gateway you have selected in the Bank API field. File Transfer sends batches of transactions to your payment gateway via FTP. Direct IP sends batches of transactions directly to your payment gateway via the internet.
Batch Name
Enter a descriptive name for the Merchant Bank batch job that will run at a scheduled time to batch all qualifying transactions and send them to your gateway. For more information, please see the topic titled Batch Jobs.
Debug to Log
This feature is typically left disabled. However, you can enable this feature when running tests on the Merchant Bank. Test results can be viewed in the Database Event Log, which is accessed from the Home menu.
Bank Token
Enter the token supplied to you by your payment gateway.
Bank Login ID and Password
Enter the Login ID and Password supplied to you by your payment gateway.
Bank Currency
Use the first drop down menu in the Bank Currency field to select the type of currency you want to assign as the default currency for this Merchant Bank. Then use the second drop down menu to select whether or not you want this Merchant Bank to send a currency identifier along with transactions sent to the payment gateway. Please see the important details listed below for each option:
Default - Select this option to disable sending a currency identifier with transactions sent to your payment gateway. This allows the payment gateway to process transactions in whatever currency has been set as the default currency within the gateway settings. This is the most commonly used option.
 If you don't
have the OrangeMoney module
installed in your OrangeCRM database and
you use Customer currency assignments (in the Account tab of the Customer
record), please be aware that the Bank Currency will override the Customer
currency, even if you have selected the Default option on the Merchant
Bank, and the currency rate will NOT
be converted. To avoid this, use static bank routing for each currency
that you process. For instructions, see the sections on this page titled
What Are Bank Routes and How To Create a New Bank Route.
Forced - Select this option to enable sending a currency identifier with transactions sent to your payment gateway. This option is only used when you process multiple currencies through the same merchant account and your gateway supports a currency identifier.
 Choosing the Forced option on a Merchant Bank
will allow transactions to qualify for processing through that bank, regardless
of the currency assigned to the transactions. In other words, it will
allow the Bank Currency to override the currency on a transaction. To
avoid this, use static bank routing for each currency that you process.
For instructions, see the sections on this page titled What
Are Bank Routes and How To Create
a New Bank Route.
 Additionally. if you do
have the OrangeMoney module
installed in your OrangeCRM database and
you use Customer currency assignments (in the Account tab of the Customer
record), please be aware that the Bank Currency will override the Customer
currency if you have selected the Forced option on the Merchant Bank.
In other words, the currency on all transactions processed through this
Merchant Bank will be forced to match the Bank Currency. To avoid this,
use static bank routing for each currency that you process. For instructions,
see the sections on this page titled What
Are Bank Routes and How To Create
a New Bank Route.
Setup Tab: Processing Options

Descriptor Text and Descriptor Phone
Some payment processors allow you to use multiple Descriptors if you sell more than one type of product in a single merchant account. Please contact your payment processor directly to find out if they support this feature. If they do, all transactions processed through this Merchant Bank will be sent to your gateway with the Descriptor entered into these fields.
CB Auto Refund
This feature is designed to help you prevent multiple chargebacks from the same customer. Enabling this feature will automatically launch the following sequence of events for all transactions that are marked as a Chargeback:
A refund will be issued for all purchase transactions that were processed after the transaction that was charged back, and
The Customer Status will be changed to Canceled, and
The Status of the Lead record that created the Customer (if any) will be changed to Out of Compliance, and
Any fulfillments configured with chargeback as the trigger will be issued.
Whether or not to enable the CB Auto Refund feature is a business decision that must be made by your company internally.
Auto Refund RFI
This feature is designed to help you prevent potential chargebacks that could result from an Inquiry Retrieval Request. Enabling this feature will automatically refund all transactions that are marked RFI. However, leaving this feature disabled will allow you to respond to the Inquiry Retrieval Request and possibly settle the investigation without the need for a refund. Whether or not to enable the Auto Refund RFI feature is a business decision that must be made by your company internally.
Refund as Credit
Typically refunds are linked to the original charge and can not be issued for an amount greater than the amount of the original transaction. Enabling the Refund as Credit feature allows you to issue refunds independent of the original charge, for a dollar amount that is higher than the amount of the original transaction. Your payment processor must support this feature. Please contact your payment processor directly to find out if they allow this function.
Process as Recurring
Some payment gateways require a flag to be sent with recurring transactions to identify them as such. If your gateway requires a recurring billing identifier, select Enable in the Process as Recurring field.
Assign Customer To
This feature enables sticky bank routing by stamping the selected bank route on all customers processed through this Merchant Bank. If you wish to enable sticky routing on this Merchant Bank, click on the eyeglasses icon to select a bank route. For further information on bank routes, see the sections on this page titled What Are Bank Routes and How To Create a New Bank Route.
AVS Send
AVS stands for Address Verification System, which is used to verify the address of a person claiming to own a credit card. This fraud prevention system will check the billing address of the credit card provided by the user with the address on file at the credit card company. Select Enable if you want to send AVS information with each transaction sent to the payment gateway.
AVS Retry Decline
When this feature is enabled, AVS information will be omitted when a retried transaction that was previously declined due to an invalid AVS response is submitted to the gateway for another billing attempt. This can potentially help you to get an approval on the retried transaction.
 Please be aware that some merchant accounts require
AVS verification on all transactions, while others do not. For this reason,
it is important that you only enable the AVS Retry Decline feature if
your merchant does NOT require
AVS verification on all transactions.
AVS Trans Filter
This feature allows you to route transactions to a Merchant Bank based on the AVS response. If you use multiple Merchant Banks, the AVS Trans Filter gives you the ability to use the bank with the lowest fee per transaction, based on the AVS response. Place a check mark beside one or more of the following options:
All Trans - Select this option if you want to allow this Merchant Bank to process all transactions regardless of the AVS response.
Verified - Select this option if you want to allow this Merchant Bank to process all transactions with a Verified/Valid AVS response.
Unknown - Select this option if you want allow this Merchant Bank to process all transactions with an Unknown AVS response.
Invalid - Select this option if you want allow this Merchant Bank to process all transactions with an Invalid AVS response.
Setup Tab: Gateway Response Codes
Each payment gateway has its own unique set of Response Codes, which are sent to OrangeCRM to communicate the result of each transaction sent to the gateway for processing. The Gateway Response Code fields in the Setup tab are where each of the Gateway's Response Codes are assigned to a corresponding transaction status in OrangeCRM.
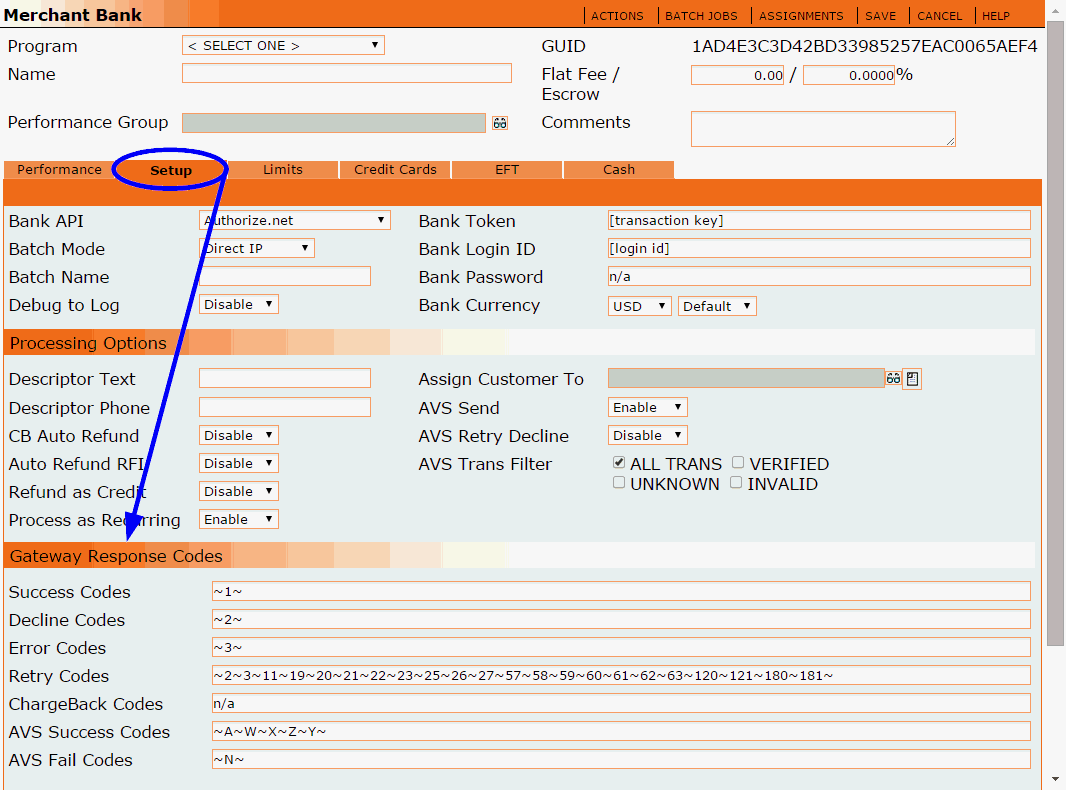
When a gateway has been selected in the Bank API field, the Gateway Response Code fields should auto-populate (if not, please contact your bank to obtain these details). You can choose to either keep the default Gateway Response Code settings or customize them as needed.
If you wish to dictate how OrangeCRM handles each Response Code from your payment gateway and which transaction status is triggered, you may edit the Gateway Response Code fields to control which transactions OrangeCRM recognizes as Approved, Declined, Error, Retried or Chargeback.

Using the transaction pictured above as an example, let’s say your gateway uses response code 258 for “invalid cards” and the CRM default transaction status is Error. Well, you may wish to treat “invalid cards” as declines instead of errors. In that case you would simply go to the Gateway Response Codes section in the Merchant Bank Setup tab, remove response code 258 from the Error Codes list and insert it in the Decline Codes list, as illustrated in the image below. You could also add it to the list of Retry Codes if you want the CRM to automatically retry all “invalid card” transactions (see image below).

This is just one example of numerous ways in which you can customize how OrangeCRM handles transactions based on your gateway’s response codes. If you need further assistance, please contact OrangeCRM support at (770) 227-0036 Ext 1.
Setup Tab: Currency Filters
The Currency Filters in the Setup tab allow you to route transactions to a Merchant Bank based on currency type. The OrangeMoney module must be installed in your OrangeCRM database to use Currency Filters.
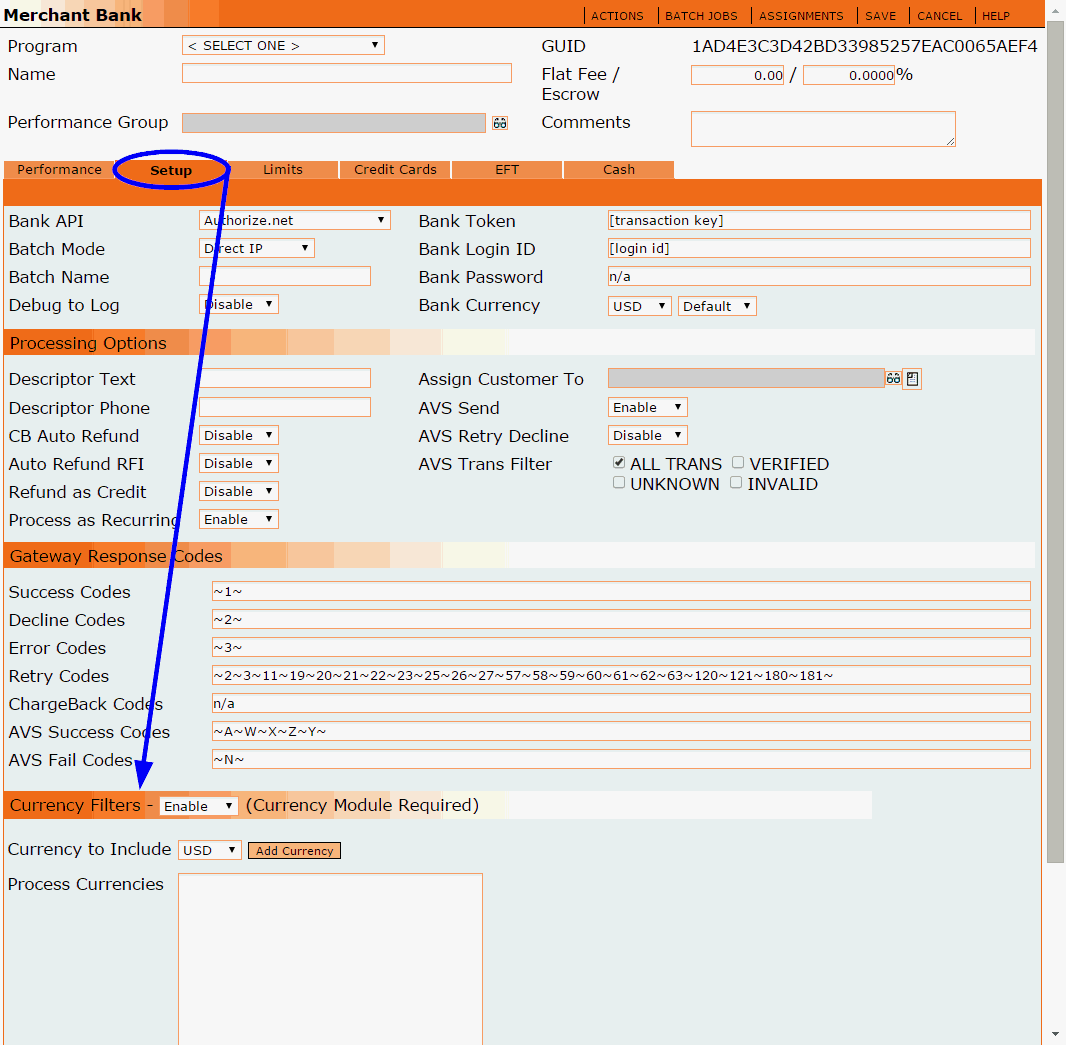
To use bank routing based on currency, use the drop down selector to Enable Currency Filters.
Then use the Currency to Include drop down selector to choose a currency and click the Add Currency button.
 Click
on the following link to view a list of all currency codes and their definitions:
International
Currency Codes and Locations

You should see the currency appear in the Process Currencies box as shown above.
 Only transactions assigned to one of the currencies
listed in the Process Currencies box will qualify to be processed through
this Merchant Bank.
Repeat the above steps for each additional currency you want to allow this Merchant Bank to process.
Setup Tab: Transaction BIN Filters
The Transaction BIN filters in the Setup tab allow you to create a whitelist and/or a blacklist of bank BIN numbers for this Merchant Bank. This feature allows you to control which BINs are/aren't allowed to be processed through this Merchant Bank.
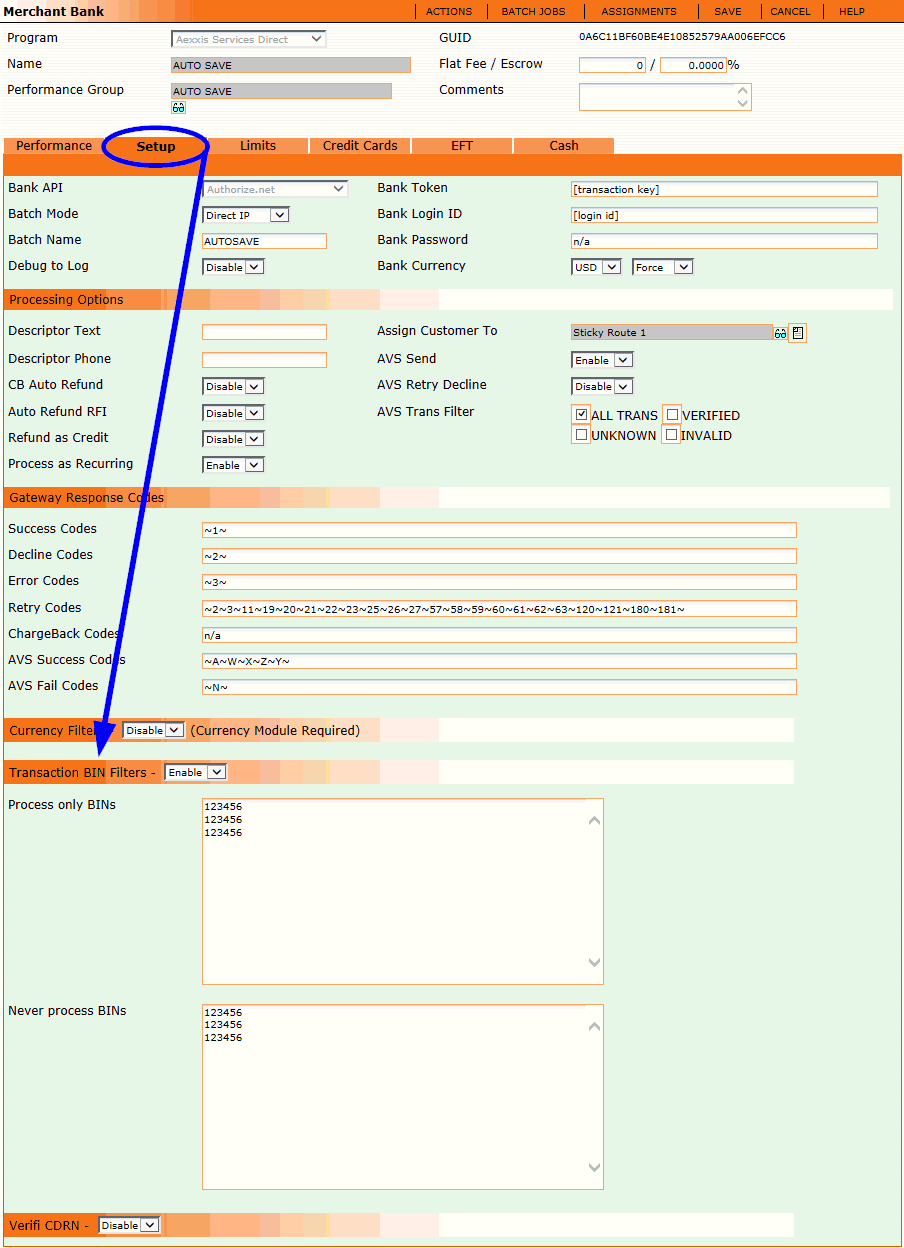
To create a whitelist and/or a blacklist of bank BIN numbers for this Merchant Bank, use the drop down selector to Enable Transaction BIN Filters.
If you want to create a BIN whitelist, enter a list of BIN numbers into the Process Only BINs field. Please note that there are no spaces and you must enter only one BIN per line.
If you want to create a BIN blacklist, enter a list of BIN numbers into the Never Process BINs field. Please note that there are no spaces and you must enter only one BIN per line.
Setup Tab: Verifi CDRN
OrangeCRM integrates with a chargeback prevention company named Verifi. Verifi provides a chargeback management program called CDRN (stands for Cardholder Dispute Resolution Network) in which they match chargeback cases and process refunds on behalf of the merchant.

If you have subscribed to Verifi's chargeback management service, use the drop down selector to Enable Verifi CDRN.
Enter your Processor ID, Descriptor Text and Descriptor Phone.
File Name, Out File Path, In File Path and In File Spec
These fields are auto-populated with the details related to the incoming and outgoing Verifi CDRN files that are stored on OrangeCRM's FTP server.
In order to send CDRN files to Verifi, you must Enable FTP Send.
FTP Type, FTP Port, FTP Address
These fields are auto-populated with Verifi's FTP server details.
FTP User Name, FTP Password, FTP Put Path and FTP Get Path
These fields must be filled in by you, as they are unique to each merchant that subscribes to Verifi's chargeback management service. Verifi will supply you with the details to be entered in these fields.
 If you have enabled the Verifi CDRN feature,
you will also need to schedule the following three Batch Jobs to run daily:
Verifi CB - Gathers Verifi Chargeback/RFI files from the Verifi queue folder and updates transactions accordingly (i.e. marks transactions in OrangeCRM as Chargeback or RFI), canceling customers in the process.
Verifi CDRN Export - Exports past transactions processed to a file for upload to Verifi for CDRN processing.
Verifi CDRN Import - Imports transaction responses from Verifi CDRN processing.
Limits Tab
The Limits tab is where you can dynamically manage the Single Batch Limits, Daily Limits and/or Monthly Limits for the Merchant Bank.
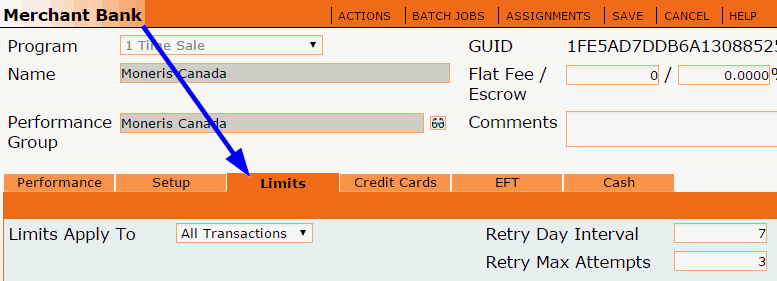
Limits Apply To
Choose if you want the limits on this Merchant Bank to apply to All Transactions (Declines and Approvals) or Approvals Only.
Retry Day Interval
Enter the number of days you want the CRM to wait between retry attempts on transactions that are declined in this Merchant Bank.
Retry Max Attempts
Enter the maximum number of retry attempts allowed on a single transaction that was declined in this Merchant Bank. Once a declined transaction has been retried the max number of times, no further billing attempts will be made.
Limits Tab: Single Batch Limits
Single Batch Limits control the maximum amount that is allowed to be processed in each transaction batch, i.e. each time the Merchant Bank's Batch Job runs.
 There are other types of limits that can also be set on a Merchant
Bank (Daily Limits, Monthly Limits, Card Type Limits) in addition to the
Single Batch Limits. Whichever limit is hit first (the lowest limit),
that is the limit that will be implemented when the Merchant Bank's Batch
Job runs.
 Single Batch Limits must be set to Enable
for a Merchant Bank to be able to process any type of transactions. If
Single Batch Limits are disabled, the Merchant Bank will not process any
transactions when its Batch Job runs. This is true even if you are using
the Daily Limits and/or Monthly Limits on a Merchant Bank.
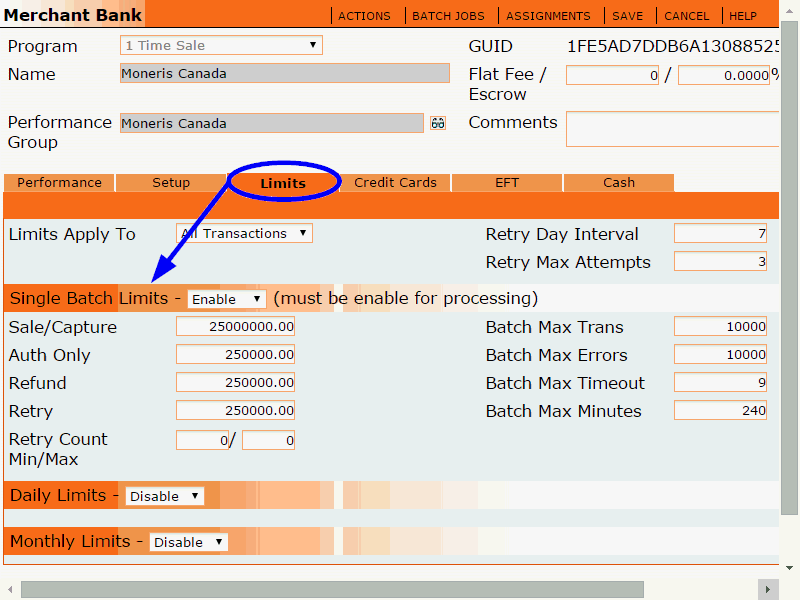
Sale/Capture
Enter the maximum dollar amount of Capture and Purchase transactions allowed per batch.
 Keep in mind that there are other types of limits that can also
be set on a Merchant Bank (Daily Limits, Monthly Limits, Card Type Limits)
in addition to the Single Batch Limits. Whichever limit is hit first (the
lowest limit), that is the limit that will be implemented when the Merchant
Bank's Batch Job runs.
Auth Only
Enter the maximum dollar amount of Preauth transactions allowed per batch.
 Keep in mind that there are other types of limits that can also
be set on a Merchant Bank (Daily Limits, Monthly Limits, Card Type Limits)
in addition to the Single Batch Limits. Whichever limit is hit first (the
lowest limit), that is the limit that will be implemented when the Merchant
Bank's Batch Job runs.
Refund
Enter the maximum dollar amount of Refund transactions allowed per batch.
 Keep in mind that there are other types of limits that can also
be set on a Merchant Bank (Daily Limits, Monthly Limits, Card Type Limits)
in addition to the Single Batch Limits. Whichever limit is hit first (the
lowest limit), that is the limit that will be implemented when the Merchant
Bank's Batch Job runs.
Retry
Enter the maximum dollar amount of Retry transactions allowed per batch.
 Keep in mind that there are other types of limits that can also
be set on a Merchant Bank (Daily Limits, Monthly Limits, Card Type Limits)
in addition to the Single Batch Limits. Whichever limit is hit first (the
lowest limit), that is the limit that will be implemented when the Merchant
Bank's Batch Job runs.
Retry Count Min/Max
The Retry Count is the number of times a previously declined transaction has been retried, i.e. resubmitted to the gateway for another billing attempt. The Retry Count Min/Max fields let you enter a range of retry counts that this Merchant Bank is allowed to process. This setting lets you specify one of the following two options:
If you want this Merchant Bank to process ALL retries for declined transactions that were originally processed in this bank, enter 0/0 into the Retry Count Min/Max fields (this is the most commonly used option), or
If you want to limit this Merchant Bank to only a specific number of retries and you want to use a different Merchant Bank to process additional billing attempts, enter the minimum and maximum retry count this Merchant Bank is allowed to process. For example, if you want all declined transactions to be retried a total of 5 times but you only want the original Merchant Bank to process the first two retries, you would enter 1/2 into the Retry Count Min/Max fields. In the other Merchant Bank that you want to use to process the remaining 3 billing attempts, you would enter 3/5.
 Using multiple Merchant Banks
to manage your retry transactions can be helpful when you have a special
bank that is known for having better retry success rates than the original
bank used when the transaction was declined.
Batch Max Trans
Enter the maximum number of transactions allowed per batch.
Batch Max Errors
Enter the maximum number of error transactions allowed per batch before the batch job is aborted.
 If you set the Batch Max Errors
to the same number as the Batch Max Trans, it will allow you to use the
Rollback Failed Batch feature, which can only be used if all transactions
in a batch have errors. For more information, please see the section titled
Deposits by Bank in the Bank Reports topic.
Batch Max Timeout
Sets how long (in seconds) OrangeCRM waits for a response from the bank.
Batch Max Minutes
Sets how long (in minutes) OrangeCRM will take to run batch jobs.
Limits Tab: Daily Limits
If a Merchant Bank's Batch Job is scheduled to run more often than once a day, you may wish to enable the Daily Limit settings on the Merchant Bank, in addition to the Single Batch Limits. This will ensure that you do not go over the daily limits enforced by your payment processor.
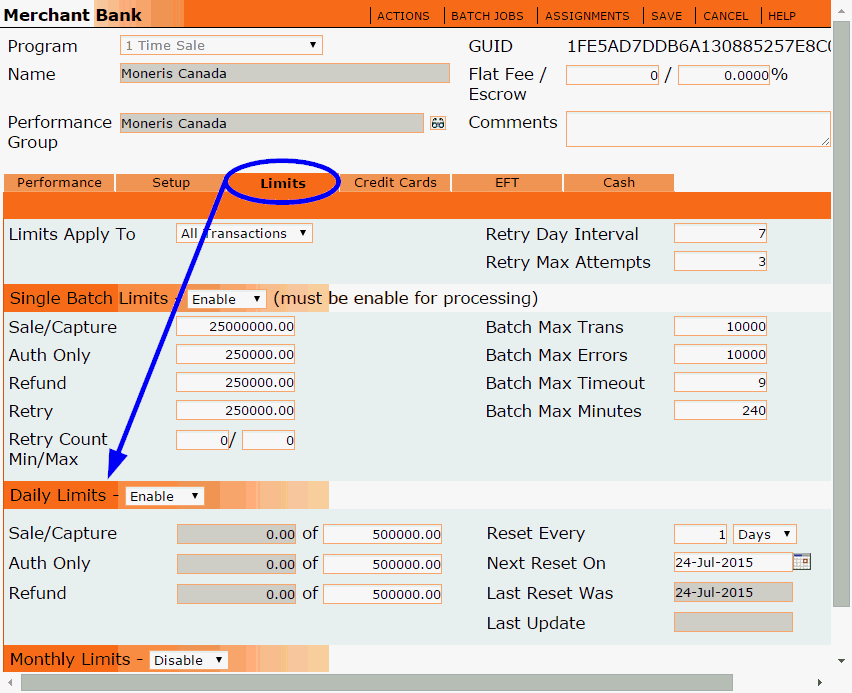
Sale/Capture
In the white field, enter the maximum dollar amount of Capture and Purchase transactions allowed per day. Each time the Merchant Bank's Batch Job runs, the gray field will auto-populate with the total dollar amount processed against your daily limit so far. Once the amount in the gray field reaches the max amount in the white field, the Merchant Bank will not process any more Capture or Purchase transactions until the daily limit interval resets.
 Keep in mind that there are other types of limits on a Merchant
Bank (Single Batch Limits, Monthly Limits, Card Type Limits) in addition
to the Daily Limits. Whichever limit is hit first (the lowest limit),
that is the limit that will be implemented when the Merchant Bank's Batch
Job runs.
Auth Only
In the white field, enter the maximum dollar amount of Preauth transactions allowed per day. Each time the Merchant Bank's Batch Job runs, the gray field will auto-populate with the total dollar amount processed against your daily limit so far. Once the amount in the gray field reaches the max amount in the white field, the Merchant Bank will not process any more Preauth transactions until the daily limit interval resets.
 Keep in mind that there are other types of limits on a Merchant
Bank (Single Batch Limits, Monthly Limits, Card Type Limits) in addition
to the Daily Limits. Whichever limit is hit first (the lowest limit),
that is the limit that will be implemented when the Merchant Bank's Batch
Job runs.
Refund
In the white field, enter the maximum dollar amount of Refund transactions allowed per day. Each time the Merchant Bank's Batch Job runs, the gray field will auto-populate with the total dollar amount processed against your daily limit so far. Once the amount in the gray field reaches the max amount in the white field, the Merchant Bank will not process any more Refund transactions until the daily limit interval resets.
 Keep in mind that there are other types of limits on a Merchant
Bank (Single Batch Limits, Monthly Limits, Card Type Limits) in addition
to the Daily Limits. Whichever limit is hit first (the lowest limit),
that is the limit that will be implemented when the Merchant Bank's Batch
Job runs.
Reset Every
Enter the number of days you want the CRM to wait before it resets your daily limit interval. This is typically sent to every 1 day.
Next Reset On
Allows you to set the date of when you want to start implementing the Daily Limits for this Merchant Bank. Once you have selected either today's date or a date in the future, your Daily Limits will reset according to the value you have entered in the Reset Every field.
Last Reset Was
This field is auto-populated by the CRM each time the Daily Limit interval is reset. It displays the date of the last reset.
Last Update
This field is auto-populated by the CRM each time the Daily Limit usage is updated. It displays the date of the last update, which occurs each time the Merchant Bank's Batch Job runs.
Limits Tab: Monthly Limits
Monthly Limits can also be enabled, in addition to Single Batch Limits and Daily Limits. While Single Batch Limits must stay enabled in order for the Merchant Bank to be able to process transactions, Daily Limits can be either enabled or disabled when using Monthly Limits.
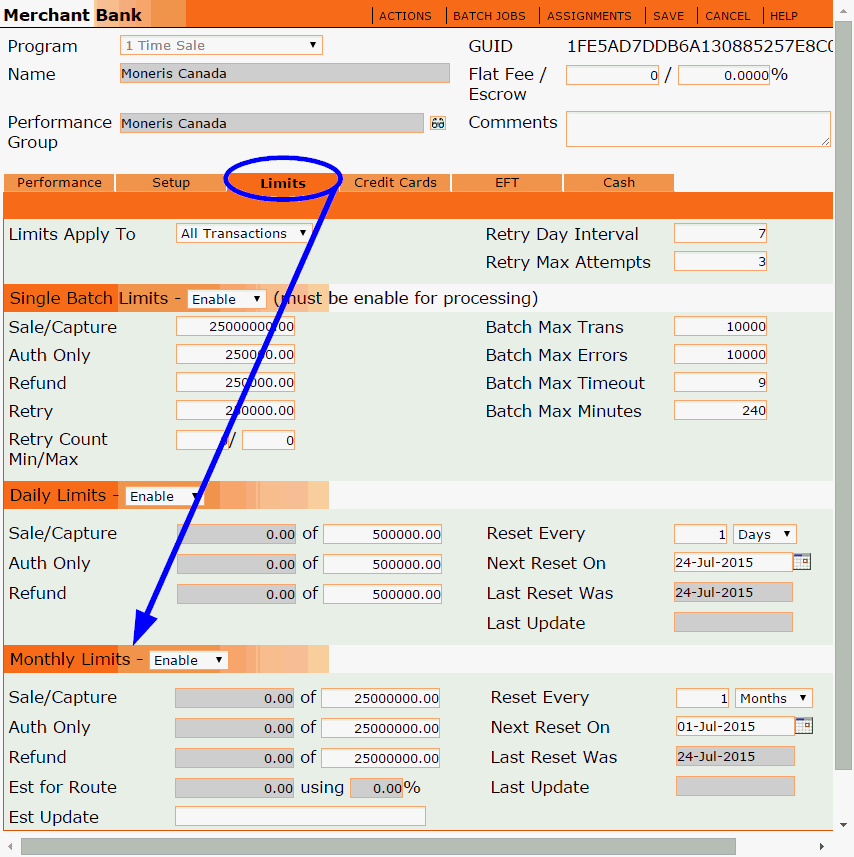
Sale/Capture
In the white field, enter the maximum dollar amount of Capture and Purchase transactions allowed per month. Each time the Merchant Bank's Batch Job runs, the gray field will auto-populate with the total dollar amount processed against your monthly limit so far. Once the amount in the gray field reaches the max amount in the white field, the Merchant Bank will not process any more Capture or Purchase transactions until the monthly limit interval resets.
 Keep in mind that there are other types of limits on a Merchant
Bank (Single Batch Limits, Daily Limits, Card Type Limits) in addition
to the Monthly Limits. Whichever limit is hit first (the lowest limit),
that is the limit that will be implemented when the Merchant Bank's Batch
Job runs.
Auth Only
In the white field, enter the maximum dollar amount of Preauth transactions allowed per month. Each time the Merchant Bank's Batch Job runs, the gray field will auto-populate with the total dollar amount processed against your monthly limit so far. Once the amount in the gray field reaches the max amount in the white field, the Merchant Bank will not process any more Preauth transactions until the monthly limit interval resets.
 Keep in mind that there are other types of limits on a Merchant
Bank (Single Batch Limits, Daily Limits, Card Type Limits) in addition
to the Monthly Limits. Whichever limit is hit first (the lowest limit),
that is the limit that will be implemented when the Merchant Bank's Batch
Job runs.
Refund
In the white field, enter the maximum dollar amount of Refund transactions allowed per month. Each time the Merchant Bank's Batch Job runs, the gray field will auto-populate with the total dollar amount processed against your monthly limit so far. Once the amount in the gray field reaches the max amount in the white field, the Merchant Bank will not process any more Refund transactions until the monthly limit interval resets.
 Keep in mind that there are other types of limits on a Merchant
Bank (Single Batch Limits, Daily Limits, Card Type Limits) in addition
to the Monthly Limits. Whichever limit is hit first (the lowest limit),
that is the limit that will be implemented when the Merchant Bank's Batch
Job runs.
Est for Route
If you are load balancing merchant banks, the CRM will auto-populate these fields to show you the estimated dollar amount and percentage of future transactions that are expected to be routed to this Merchant Bank during the current Monthly Limit interval. The future estimated billings are based on your current customers and their current fee schedules. It is a snapshot in time, therefore it is only an estimate.
Est Update
This field is auto-populated by the CRM each time the Est for Route fields are updated. It displays the date of the last update, which occurs each time the Figure Billing Estimates Batch Job runs.
Reset Every
Enter the number of days you want the CRM to wait before it resets your monthly limit interval. This is typically sent to every 1 month.
Next Reset On
Allows you to select the specific date you want to start your resets on. Once selected, your resets will occur according to what is entered in the Reset Every field.
Last Reset Was
This field is auto-populated by the CRM each time the Monthly Limit interval is reset.
Last Update
This field is auto-populated by the CRM each time the Monthly Limit usage is updated. It displays the date of the last update, which occurs each time the Merchant Bank's Batch Job runs.
Credit Cards Tab
The Credit Cards tab is where you can dynamically manage which credit card types are accepted by this Merchant Bank, as well as the batch limits for each card type.
Start by enabling the credit card types you want to allow this Merchant Bank to process. If you do not want to allow this Merchant Bank to process credit card payments, leave all options in the Credit Cards tab disabled.
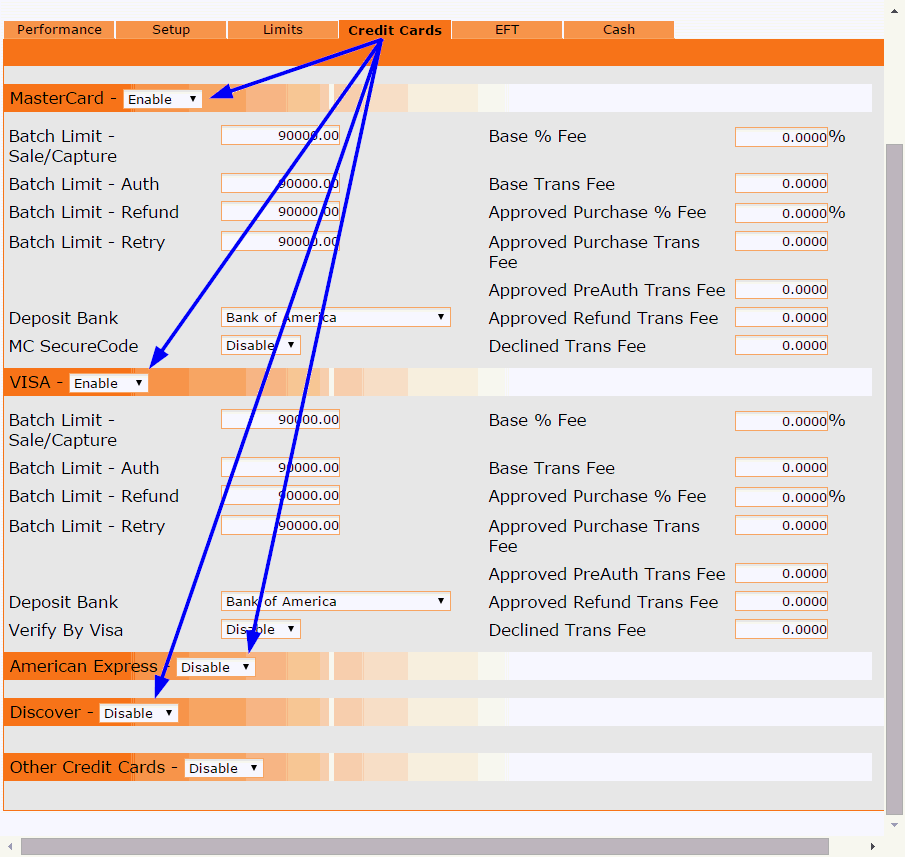
 The Other Credit Cards
category includes all other types of
credit cards that are not Mastercard, VISA, American Express or Discover.
Examples of Other Credit Cards are JCB, Elo, Hipercard or Aura.
For each enabled card type, fill in the following fields:
Batch Limit - Count
Enter the maximum number of transactions allowed per batch for each enabled card type. If the transaction count limit is met, any transactions left over will remain in queue until they are processed by a subsequent bank batch.
Note: These limits apply to each batch that is processed. If you have a daily max you do not wish to exceed and you process a particular Merchant Bank Batch Job more than once per day, you will need to divide the Batch Limit Count accordingly.
Batch Limit - Sale/Capture
Enter the maximum dollar amount of Capture and Purchase transactions allowed per batch for each enabled card type.
 Keep in mind that there are other types
of limits on a Merchant Bank (Single Batch Limits, Daily Limits and/or
Monthly Limits) in addition to the Card Type Limits. Whichever limit is
hit first (the lowest limit), that is the limit that will be implemented
when the Merchant Bank's Batch Job runs.
Batch Limit - Auth
Enter the maximum dollar amount of Preauth transactions allowed per batch for each enabled card type.
 Keep in mind that there are other types of limits on a Merchant
Bank (Single Batch Limits, Daily Limits and/or Monthly Limits) in addition
to the Card Type Limits. Whichever limit is hit first (the lowest limit),
that is the limit that will be implemented when the Merchant Bank's Batch
Job runs.
Batch Limit - Refund
Enter the maximum dollar amount of Refund transactions allowed per batch for each enabled card type.
 Keep in mind that there are other types of limits on a Merchant
Bank (Single Batch Limits, Daily Limits and/or Monthly Limits) in addition
to the Card Type Limits. Whichever limit is hit first (the lowest limit),
that is the limit that will be implemented when the Merchant Bank's Batch
Job runs.
Batch Limit - Retry
Enter the maximum dollar amount of Retry transactions allowed per batch for each enabled card type.
 Keep in mind that there are other types of limits on a Merchant
Bank (Single Batch Limits, Daily Limits and/or Monthly Limits) in addition
to the Card Type Limits. Whichever limit is hit first (the lowest limit),
that is the limit that will be implemented when the Merchant Bank's Batch
Job runs.
Deposit Bank
Select a Deposit Bank for each enabled credit card type. The Deposit Bank represents the merchant account where cleared funds are deposited and where customer refunds are drawn from for the specified card type.
MC SecureCode and Verify By Visa
If you have signed up for either of these services with your payment processor, you can enable these features in the Credit Cards tab.
Base % Fee
Enter the percentage your merchant account charges on each credit card transaction you process. This can vary for each card type.
Base Trans Fee
Enter the dollar amount of the fee your merchant account charges for each credit card transaction you process. This can vary for each card type.
Approved Purchase % Fee, Approved Purchase Trans Fee, Approved PreAuth Trans Fee, Approved Refund Trans Fee, Decline Trans Fee
These are various types of fees your merchant account may or may not charge depending on their policies. Fill in these fields as needed.
EFT Tab
EFT stands for Electronic Funds Transfer. The EFT tab is where you can dynamically manage e-check payments, also known as ACH payments.
Start by enabling the EFT Types you want to allow this Merchant Bank to process. If you do not want to allow this Merchant Bank to process ACH payments, leave all options in the EFT tab disabled.
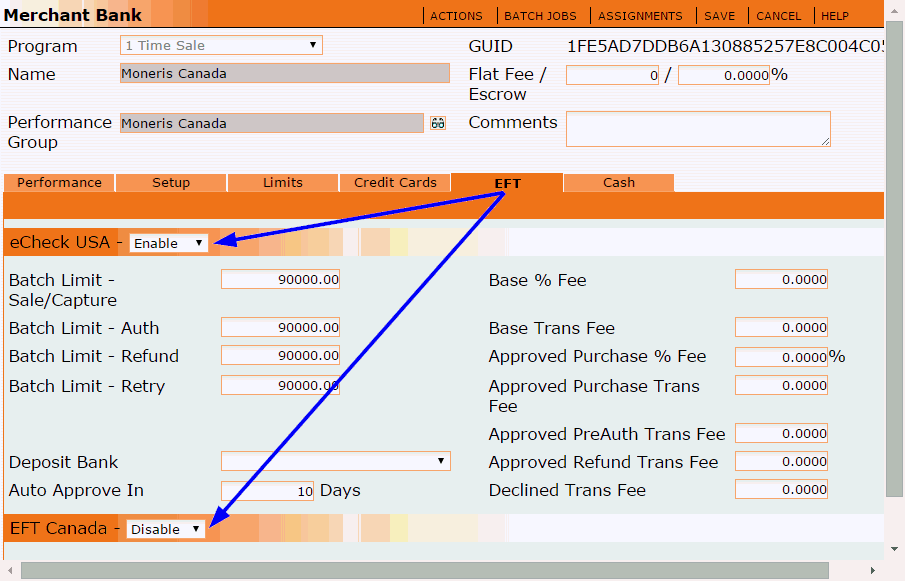
For each enabled EFT type, fill in the following fields:
Batch Limit - Sale/Capture
Enter the maximum dollar amount of Capture and Purchase transactions allowed per batch for each enabled EFT type.
 Keep in mind that there are other types of limits that can also
be set on a Merchant Bank (Single Batch Limits, Daily Limits, Monthly
Limits) in addition to the EFT Limits. Whichever limit is hit first (the
lowest limit), that is the limit that will be implemented when the Merchant
Bank's Batch Job runs.
Batch Limit - Auth
Enter the maximum dollar amount of Preauth transactions allowed per batch for each enabled EFT type.
 Keep in mind that there are other types of limits that can also
be set on a Merchant Bank (Single Batch Limits, Daily Limits, Monthly
Limits) in addition to the EFT Limits. Whichever limit is hit first (the
lowest limit), that is the limit that will be implemented when the Merchant
Bank's Batch Job runs.
Batch Limit - Refund
Enter the maximum dollar amount of Refund transactions allowed per batch for each enabled EFT type.
 Keep in mind that there are other types of limits that can also
be set on a Merchant Bank (Single Batch Limits, Daily Limits, Monthly
Limits) in addition to the EFT Limits. Whichever limit is hit first (the
lowest limit), that is the limit that will be implemented when the Merchant
Bank's Batch Job runs.
Batch Limit - Retry
Enter the maximum dollar amount of Retry transactions allowed per batch for each enabled EFT type.
 Keep in mind that there are other types of limits that can also
be set on a Merchant Bank (Single Batch Limits, Daily Limits, Monthly
Limits) in addition to the EFT Limits. Whichever limit is hit first (the
lowest limit), that is the limit that will be implemented when the Merchant
Bank's Batch Job runs.
Deposit Bank
Select a Deposit Bank for each enabled EFT type. The Deposit Bank represents the merchant account where cleared funds are deposited and where customer refunds are drawn from for the specified EFT type.
Auto Approve In - Only available for E-Check USA
Enter the number of days you want the CRM to wait before it auto approves ACH transactions processed in this Merchant Bank. The auto approve feature is provided for ACH transactions because an immediate response is not provided by the bank, as it is for credit card transactions. In fact, some processors don’t provide any response at all unless payment wasn’t successful.
 Since response protocols vary between processors, please contact
your processor to find out what their typical response time is and under
what conditions they do/don’t provide a response.
Once an ACH transaction has been sent to the bank for processing, the transaction status automatically changes to Pending. It will stay in Pending Status until one of two things happen - until a response is received from the processor or until the CRM auto-approves the transaction.
NOTE: If the processor sends a decline/error response after the CRM has auto approved the transaction, the transaction will be updated with the processor’s response.
Base % Fee
Enter the percentage your merchant account charges on each EFT transaction you process.
Base Trans Fee
Enter the dollar amount of the fee your merchant account charges for each EFT transaction you process.
Approved Purchase % Fee, Approved Purchase Trans Fee, Approved PreAuth Trans Fee, Approved Refund Trans Fee, Decline Trans Fee
These are various types of fees your merchant account may or may not charge depending on their policies. Fill in these fields as needed.
Cash Tab
The Cash tab is where you can dynamically manage cash payments and/or paper check payments. All cash transactions are auto-approved.
Start by enabling the Cash option. If you do not want to allow this Merchant Bank to process cash payments, leave all options in the Cash tab disabled.
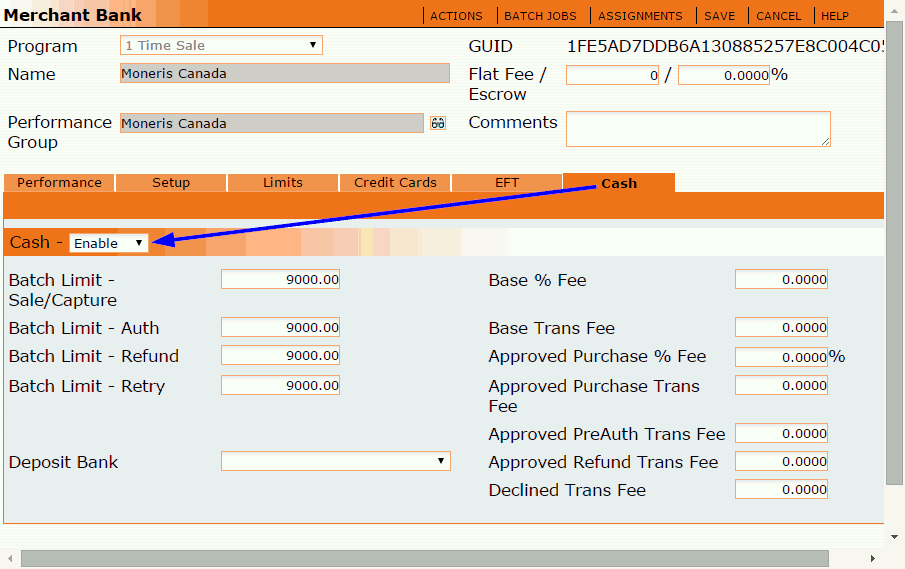
Fill in the following Cash fields:
Batch Limit - Sale/Capture
Enter the maximum dollar amount of Capture and Purchase transactions allowed per batch for cash transactions.
 Keep in mind that there are other types of limits that can also
be set on a Merchant Bank (Single Batch Limits, Daily Limits, Monthly
Limits) in addition to the Cash Limits. Whichever limit is hit first (the
lowest limit), that is the limit that will be implemented when the Merchant
Bank's Batch Job runs.
Batch Limit - Auth
Enter the maximum dollar amount of Preauth transactions allowed per batch for cash transactions.
 Keep in mind that there are other types of limits that can also
be set on a Merchant Bank (Single Batch Limits, Daily Limits, Monthly
Limits) in addition to the Cash Limits. Whichever limit is hit first (the
lowest limit), that is the limit that will be implemented when the Merchant
Bank's Batch Job runs.
Batch Limit - Refund
Enter the maximum dollar amount of Refund transactions allowed per batch for cash transactions.
 Keep in mind that there are other types of limits that can also
be set on a Merchant Bank (Single Batch Limits, Daily Limits, Monthly
Limits) in addition to the Cash Limits. Whichever limit is hit first (the
lowest limit), that is the limit that will be implemented when the Merchant
Bank's Batch Job runs.
Batch Limit - Retry
Enter the maximum dollar amount of Retry transactions allowed per batch for cash transactions.
 Keep in mind that there are other types of limits that can also
be set on a Merchant Bank (Single Batch Limits, Daily Limits, Monthly
Limits) in addition to the Cash Limits. Whichever limit is hit first (the
lowest limit), that is the limit that will be implemented when the Merchant
Bank's Batch Job runs.
Deposit Bank
Select a Deposit Bank for all cash transactions. The Deposit Bank represents the bank account where cleared funds are deposited and where customer refunds are drawn from for all cash transactions.
Base % Fee
Enter the percentage your merchant account charges on each cash transaction you process.
Base Trans Fee
Enter the dollar amount of the fee your merchant account charges for each cash transaction you process.
Approved Purchase % Fee, Approved Purchase Trans Fee, Approved PreAuth Trans Fee, Approved Refund Trans Fee, Decline Trans Fee
These are various types of fees your merchant account may or may not charge depending on their policies. Fill in these fields as needed.
Batch Jobs Menu
For each new Merchant Bank you create, you must also create a Merchant Bank Batch Job, which is an automated process that will run at a scheduled time to batch all qualifying transactions and send them to your payment gateway. The Batch Jobs menu is a time saving shortcut which allows you to create and manage a Merchant Bank's Batch Jobs directly from the Merchant Bank record. For more information, please see the topic titled Batch Jobs.

Show Batch Jobs
Displays a list of all Batch Jobs currently scheduled to run for this Merchant Bank.
New Batch Job
Opens a new Batch Job record, allowing you to schedule a new Batch Job for this Merchant Bank.
Assignments Menu
Acquisition Centers and Fee Schedule have the ability to be restricted to one single Merchant Bank. This is called a Bank Assignment. The Assignments menu in the Merchant Bank record is a time saving shortcut which allows you to create and manage Bank Assignments tied to that Merchant Bank.

Show Bank Assignments
Displays a list of all Acquisition Centers and/or Fee Schedules that have been assigned to this Merchant Bank.
New Bank Assignment
Opens a new Bank Assignment record, allowing you to create a new Bank Assignment which will restrict a specific Acquisition Center or Fee Schedule to only this Merchant Bank.
To manage your Merchant Banks, go to the Bank menu and click on Merchant Banks.

A list of all existing Merchant Banks in all Programs will be displayed. To view the Merchant Banks in a specific Program, use the Program drop down selector in the upper left corner to choose a Program.

To narrow your search results, click the arrows beside the Program selector. Then select a Bank API and/or Performance Group by clicking on the plus sign.
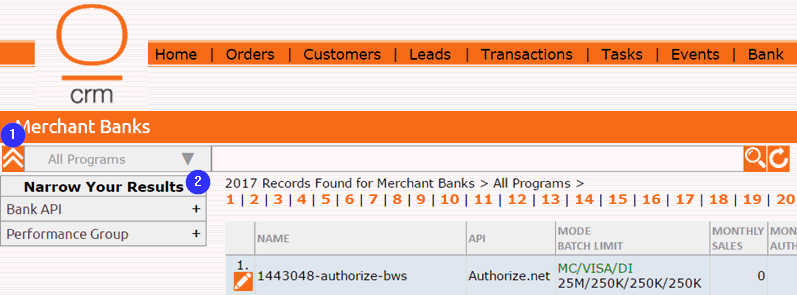
To view or edit a Merchant Bank record, click on the pencil icon beside it.
Actions Menu

Enable All Processing
Enables the Single Batch Limits in the Limits tab. This is required for the Merchant Bank to be able to process any type of transactions. Each allowed payment type will still need a subset of batch limits set in their respective tabs.
Disable Processing
Disables the Single Batch Limits in the Limits tab. This will prevent the Merchant Bank from being able to process any type of transactions. Even if the Merchant Bank's Batch Jobs are still scheduled to run, they will fail because transaction processing has been disabled for this Merchant Bank.
Refund Only Mode
Sets the maximum dollar amount to zero for all transaction types except Refunds in the Single Batch Limits section of the Limits tab. This will prevent any transactions other than refunds from being processed by this Merchant Bank.
Show Deposits
Displays a list of deposits make to this Merchant Bank.
Access & Revisions
Displays the Access & Revisions log for this Merchant Bank record.
Batch Jobs Menu
For each new Merchant Bank you create, you must also create a Merchant Bank Batch Job, which is an automated process that will run at a scheduled time to batch all qualifying transactions and send them to your payment gateway. The Batch Jobs menu is a time saving shortcut which allows you to create and manage a Merchant Bank's Batch Jobs directly from the Merchant Bank record. For more information, please see the topic titled Batch Jobs.

Show Batch Jobs
Displays a list of all Batch Jobs currently scheduled to run for this Merchant Bank.
New Batch Job
Opens a new Batch Job record, allowing you to schedule a new Batch Job for this Merchant Bank.
Assignments Menu
Acquisition Centers and Fee Schedule have the ability to be restricted to one single Merchant Bank. This is called a Bank Assignment. The Assignments menu in the Merchant Bank record is a time saving shortcut which allows you to create and manage Bank Assignments tied to this Merchant Bank.

Show Bank Assignments
Displays a list of all Acquisition Centers and/or Fee Schedules that have been assigned to this Merchant Bank.
New Bank Assignment
Opens a new Bank Assignment record, allowing you to create a new Bank Assignment which will restrict a specific Acquisition Center or Fee Schedule to only this Merchant Bank.
Bank Routes are primarily used to facilitate static bank routing, also known as sticky billing, in OrangeCRM. In which case, each Bank Route would consist of a single Merchant Bank. After a static/sticky Bank Route is created, an additional step must be taken to link the Bank Route to the corresponding Merchant Bank, which will stamp the static/sticky Bank Route on all customers processed through that Merchant Bank. Further instructions are provided in the next section on this page titled How To Create a New Bank Route.
Bank Routes can also be used for load balancing multiple Merchant Banks. In this case, a Bank Route would consist of one or more Merchant Banks. The order in which the Merchant Banks are used is determined by the order in which each of their respective Merchant Bank Batch Jobs are scheduled to run. Each time a Merchant Bank's Batch Job runs, it will process as many transactions as it can, until it hits the limits configured in the Single Batch Limits, Daily Limits and/or Monthly Limits. Further instructions are provided in the next section on this page titled How To Create a New Bank Route.
To create a new Bank Route, go to the Bank menu and click on Bank Routes.

A list of all existing Bank Routes in the selected Program will be displayed. Use the Program drop down selector in the upper left corner to view the Bank Routes in a different Program.

To create a new Bank Route, click on the New Bank Route button in the upper right corner.

A new Bank Route record will open.

Select the Program and enter a descriptive name for this Bank Route in the Name field.
Then go to the Actions menu and click on New Bank Assignment.

A new Bank Assignment record will open.

There are two types of Bank Assignments that can be created, either Bank Route or Acq Center. Both options are covered below.
Creating a Bank Route Type Bank Assignment
Select Bank Route in the Type drop down menu.

Click on the eyeglasses icon beside the Bank Name field to select a Merchant Bank.
The Bank API and Bank Route fields should auto-populate after a Merchant Bank is selected in the Bank Name field.
Then click the Save button.
To confirm that the new Bank Assignment was created successfully, click Refresh in the Assigned Banks tab of the Bank Route record.

You should now see the new Bank Assignment listed.
If you want to add another Bank Route type Bank Assignment to this Bank Route, repeat the above steps. Click the Save button when you have finished adding Bank Assignments to this Bank Route.
If you want to add an Acq Center type Bank Assignment to this Bank Route, follow the steps listed below.
Creating an Acq Center Type Bank Assignment
Select Acq Center in the Type drop down menu.

Click on the eyeglasses icon beside the Bank Name field to select a Merchant Bank.
The Bank API field should auto-populate after a Merchant Bank is selected in the Bank Name field.
Click on the eyeglasses icon beside the Acq Center field to select an Acquisition Center. This will limit that Acquisition Center to only the Merchant Bank on this Bank Assignment.
Click on the eyeglasses icon beside the Fee Schedule field to select a Fee Schedule. This will limit that Fee Schedule to only the Merchant Bank on this Bank Assignment.
Click the Save button when you are done editing the Bank Assignment record.
To confirm that the new Bank Assignment was created successfully, click Refresh in the Assigned Banks tab of the Bank Route record.

You should now see the new Bank Assignment listed.
If you want to add another Acq Center type Bank Assignment to this Bank Route, repeat the above steps. Click the Save button when you have finished adding Bank Assignments to this Bank Route.
If you want to add a Bank Route type Bank Assignment to this Bank Route, follow the steps listed under the subheading Creating a Bank Route Type Bank Assignment (located above).
Account Codes are used to track your payables and receivables for reporting purposes. Payable Account Codes can be assigned to Lead records and Customer records to track acquisition costs, and to Fulfillment records to track fulfillment costs. Receivable Account Codes can be assigned to Transaction records to track revenue, and are typically configured to coordinate with the Fee Schedules in your Billing Plans (see the section titled What Is a Fee Schedule in the Billing Plans topic).
OrangeCRM comes pre-installed with a set of default Account Codes, which can be customized as needed.

When Receivable Account Codes have been configured to coordinate with your Fee Schedules, you will be able to view a breakout of Purchases and Refunds for each Fee Schedule/billing cycle. To illustrate this point, please see the sample Account Code Report shown below.

This section covers how to create new Account Codes, how to assign Account Codes and how to manage Account Codes.
 Creating
a list of Account Codes is only the first step in enabling the tracking
of Payables and Receivables. The next step is to "tell" the
CRM which Account Code to assign to each record (Leads, Customers, Fulfillments,
Transactions). Further instructions are provided in the subheading titled
Assigning Account Codes.
Creating New Account Codes
The first step in enabling the tracking of Payables and Receivables is to create a list of Account Codes.
Go to the Bank menu and click on Account Codes.

A list of all existing Account Codes will be displayed. Use the Filter drop down selector in the upper left corner to switch your view between All Acct Codes, Payables only or Receivables only.

You may choose to use only the default Account Codes that come pre-installed or you may choose to create new Account Codes.
To create a new Account Code, click the New Account Code button in the upper right corner.

A new Account Code record will open.

Account Type
Use the drop down selector to choose one of the following Account Code Types:
Payable - Used for tracking costs such as an acquisition cost or fulfillment cost.
Receivable - Used for tracking revenue. Receivable Account Codes are typically setup to coordinate with your Fee Schedules (see the section titled What Is a Fee Schedule in the Billing Plans topic).
Master Code
The Master Code is used in reporting as a top level grouping mechanism for related Account Codes. For example, you may wish to group five related Account Codes together under a single Master Code. In that case, each of the five related Account Codes would need to be assigned to the same Master Code. Master Codes can contain up to five digits. No letters are allowed.
Account Code
Enter the Account Code you want to use. Account codes can contain up to five digits. No letters are allowed.
 Note that any leading zeros will be eliminated
after the Account Code record is saved. We recommend using a different
leading number that is greater than zero for each unique product line.
Description Here...
Enter a brief description of the Account Code for easy recognition. The description field allows up to 40 characters.
Security (Optional)
Restricts this Account Code to one single Program.
Notes
Enter any important details you want to record about this Account Code. If you are assigning multiple Account Codes to the Master Code assigned to this Account Code, you may wish to enter an explanation of the Master Code grouping for future reference purposes.
Click the Save button when you are done editing the Account Code record.
You should now see the new Account Code listed in the Account Codes list.

 Creating a list of Account Codes is only the
first step in enabling the tracking of Payables and Receivables. The next
step is to "tell" the CRM which Account Code to assign to each
type of record (Leads, Customers, Fulfillments, Transactions). Further
instructions are provided in the next subheading titled Assigning Account
Codes.
Assigning Account Codes
In order to enable the tracking of Payables and Receivables, Account Codes must be assigned to a Lead, Customer, Fulfillment or Transaction record. OrangeCRM must be configured to know which Account Code you want it to assign to each record. The type of Payable/Receivable determines where the Account Code must be assigned. Listed below are different sets of instructions for each type of Payable/Receivable.
Acquisition Cost Payables
Acquisition costs can be tracked on Leads and/or Customers. Both options are covered below.
Acquisition Cost: Leads
To track acquisition costs on Leads, open the Acquisition Center that will contain the Leads you want to track acquisition costs for.
Go to the Lead Scrub tab and enter the dollar amount of the Acquisition Cost for all future Leads inserted into this Acquisition Center.
Then click on the eyeglasses icon beside the Account Code field to select the Acquisition Cost Account Code you want the CRM to automatically assign to all future Leads inserted into this Acquisition Center.

Click the Save button when you are done editing the Acquisition Center record.
Repeat the above steps in any other Acquisition Centers that will contain Leads that you want to track acquisition costs for.
 Customer
records that are created from an Accepted Lead will automatically inherit
the Acquisition Cost and Account Code from the Lead Scrub tab.
Acquisition Cost: Customers
A Customer can be created in one of two ways, from a Lead record or from an API.
Customers that are created from an Accepted Lead record will automatically inherit the Acquisition Cost and Account Code from the Lead Scrub tab of the Acquisition Center they reside in (see the previous subheading titled Acquisition Cost: Leads).
To track acquisition costs on Customers that will be created via an API, open the SOAP Customer API that will be used to insert Customer records into OrangeCRM.
Go to the Setup tab and enter the dollar amount of the Acquisition Cost for all future Customers inserted with this API Token.
Then click on the eyeglasses icon beside the Acquisition Code field to select the Acquisition Cost Account Code you want the CRM to automatically assign to all future Customers inserted with this API Token.
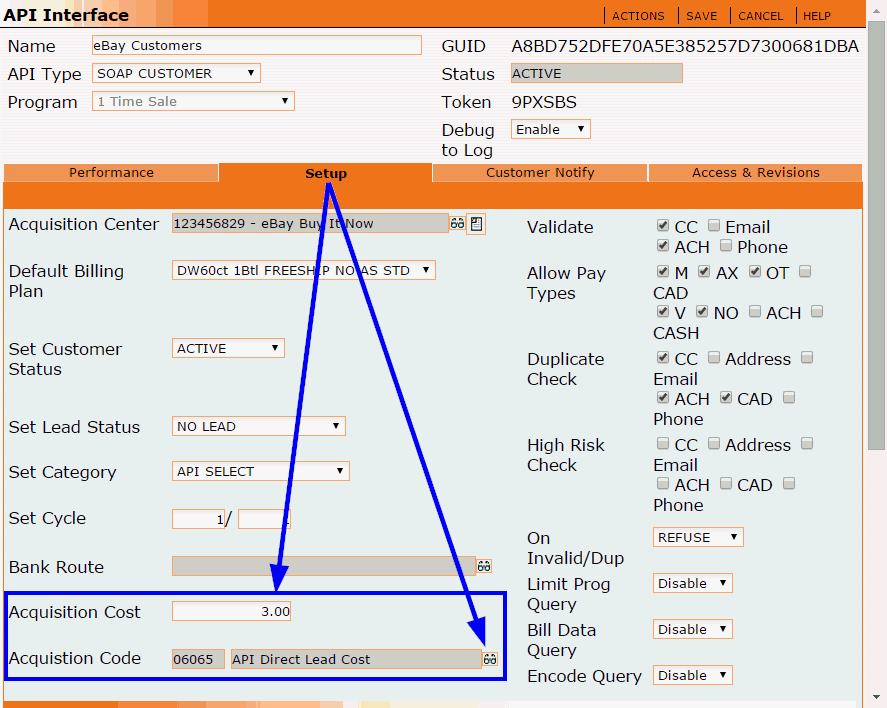
Click the Save button when you are done editing the API record.
Repeat the above steps in any other SOAP Customer APIs that will be used to insert Customers that you want to track acquisition costs for.
Fulfillment Cost Payables
To track fulfillment costs, open a Master Fulfillment and go to the Trigger tab.
Enter the dollar amount of the Fulfillment Cost for all future Customer Fulfillments created by this Master Fulfillment.
Then click on the eyeglasses icon beside the Cost Acct Code field to select the Fulfillment Cost Account Code you want the CRM to automatically assign to all future Customer Fulfillments created by this Master Fulfillment.
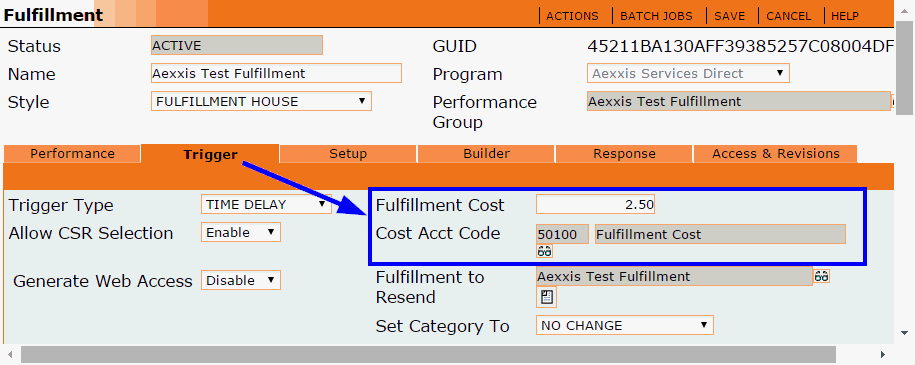
Click the Save button when you are done editing the Master Fulfillment record.
Repeat the above steps in any other Master Fulfillments that you want to track fulfillment costs for.
Revenue Receivables
Since Receivable Account Codes are used to track revenue, they are typically configured to coordinate with the Fee Schedules in your Billing Plans. To illustrate this point, please see the example pictured below.
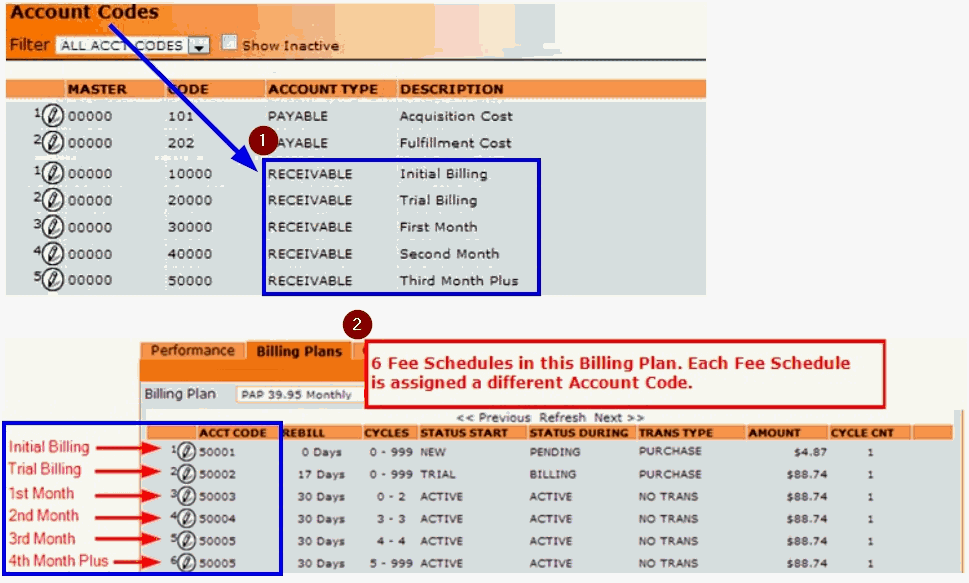
To track Receivables, open the first Fee Schedule in a Billing Plan.
Click on the eyeglasses icon beside the Acct Code field to select the Payable Account Code that corresponds to this Fee Schedule.

Click the Save button when you are done editing the Fee Schedule record.
Repeat the above steps for each remaining Fee Schedule in the Billing Plan.
You must repeat this process for each Billing Plan you want to track Receivables for.
 It
is recommended that you assign a different Account Code to each Fee Schedule.
Doing this will allow you to view a breakout of Purchases and Refunds
for each Fee Schedule/billing cycle, as illustrated in the sample Account
Code Report shown below.

Managing Account Codes
To manage your Account Codes, go to the Bank menu and click on Account Codes.

A list of all existing Account Codes will be displayed. Use the Filter drop down selector in the upper left corner to switch your view between All Acct Codes, Payables only or Receivables only.

Click on the pencil icon beside the Account Code you want to view or edit.
Viewing Fee Schedules Assigned to an Account Code
All Fee Schedules that have been assigned to an Account Code can be accessed and viewed directly from the Account Code record. This is a helpful shortcut for times when you may need to reassign a group of Fee Schedules to a different Account Code.
To see a list of all Active or Inactive Fee Schedules that have been assigned to an Account Code, go to the Actions menu and click on Show Active Fee Schedules or Show Inactive Fee Schedules.

To view or edit any of the Fee Schedules in the list, click on the pencil icon beside it.

The selected Fee Schedule record will open. Make any necessary edits and click the Save button.
If you reassigned the Fee Schedule to a different Account Code, click Refresh in the previous Account Code's list of Fee Schedules. The reassigned Fee Schedule should no longer appear in the list.

Marking an Account Code Active or Inactive
To mark an Account Code Active or Inactive, go to the Actions menu and click on Mark Active or Mark Inactive.

Click the Save button when you are done editing the Account Code record.
Currency Conversion is a feature that is only available in OrangeCRM databases that have the OrangeMoney module installed. Currency Conversion provides standardized reporting by displaying financial figures in a currency that is different than the currency a transaction was processed in. For example, a US based business may process transactions in multiple foreign currencies, however the currency conversion feature allows them to view all transaction reporting in USD.
In order to use the currency conversion feature you must create a list of Currency Conversions in OrangeCRM. The Currency Conversion record allows you to specify the currency you want to convert each processed currency into for reporting purposes.
Currency rates can be updated using an automated Forex hourly conversion update, which is performed by the Update Currency Rates Batch Job. If you wish to use a currency rate source other than Forex, you may update your currency conversion rates manually, as often as you wish.
To create a list of Currency Conversions in OrangeCRM, go to the Bank menu and click on Currency Conversions.

A list of all existing Currency Conversions will be displayed. To create a new Currency Conversion, click on the New Conversion button.

A new Currency Conversion record will open.

In the Details tab, fill in the following fields:
Original Currency
Use the drop down selector to choose the currency you are processing transactions in.
 Click
on the following link to view a list of all currency codes and their definitions:
International
Currency Codes and Locations
Destination Currency
Use the drop down selector to choose the currency you want to convert the original currency into, i.e. select the currency you want to see in reporting.
 Click
on the following link to view a list of all currency codes and their definitions:
International
Currency Codes and Locations
Destination Amount
Enter the current rate of the Destination Currency, i.e. the rate you want to convert to.
 Currency rates can be updated using an automated Forex hourly conversion
update, which is performed by the Update
Currency Rates Batch Job. If you wish to use a currency rate source
other than Forex, you may update your Currency Conversion rates manually,
as often as you wish.
Click the Save button when you are done.
You should now see the new Currency Conversion displayed in the Currency Conversion list.

Repeat the above steps for each currency you process.
BIN stands for Bank Identification Number. BIN numbers are the first six digits of a credit card number, which identify the institution that issued the card to the card holder. BIN Warnings can be created in OrangeCRM to flag customers with a potentially risky BIN as either a High Risk or a Low Risk customer. A BIN Warning will not block a customer or a transaction from being created. It is simply a way of placing a risk label on a customer, for reference purposes. This serves as an alert to customer service representatives, so they can be aware of the fact that a particular customer or their credit card company may be prone to initiating chargebacks, and can handle such customers in a way that will avoid potential chargebacks (e.g. issue an immediate full refund to appease an upset customer).
Customers with a BIN Warning will display either HIGH RISK or LOW RISK beside the customer Status field in the Customer Record, as shown below.

BIN Warnings can be created individually or from a BIN list. Both options are covered below.
Creating BIN Warnings Individually
To create a new BIN Warning, go to the Lists menu and click on Warning BINs.

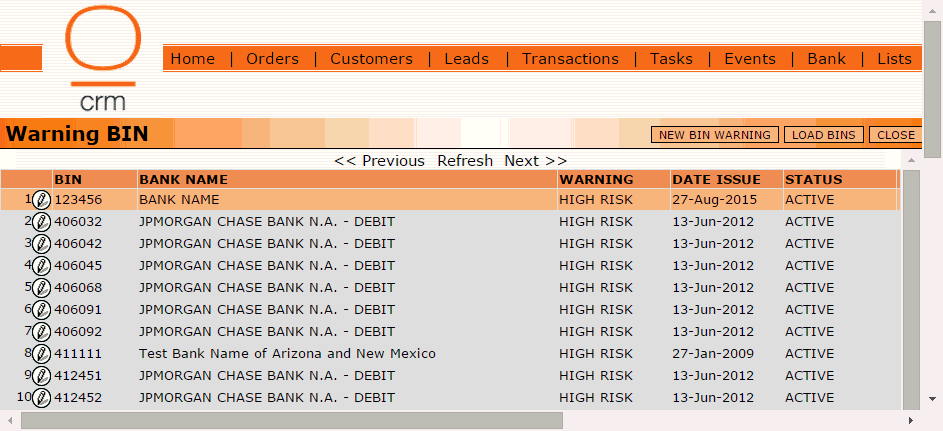
A list of all existing BIN Warnings will be displayed.
To add new BIN Warnings individually, click on the New BIN Warning button in the upper right corner.

A new Warning BIN record will open.

BIN
Enter the Bank Identification Number.
Bank Name
Enter the name of the bank.
Warning
Select whether you want this BIN to flag the customer as either a HIGH RISK or a LOW RISK.
Issue Date
This field will auto-populate with the date this BIN Warning was created.
Notes
Enter any important details you wish to record about this BIN Warning for reference purposes.
Click the Save button when you are done editing the Warning BIN record.
Creating BIN Warnings From a BIN List
To create BIN Warnings from a BIN list, go to the Lists menu and click on Warning BINs.

A list of all existing BIN Warnings will be displayed.
To load a BIN list, click on the Load BINs button in the upper right corner.

The Warning BIN Load window will open.
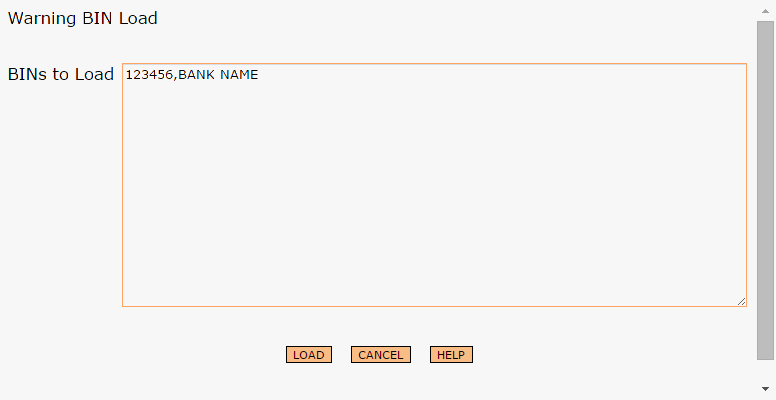
An example of the required format (BIN,Bank Name) will appear in the BINs to Load field. Please note that there are no spaces and you must enter only one BIN per line.
Delete the format example and simply copy and paste your BIN list into the BINs to Load field. Make any edits needed to ensure the formatting matches the format example.
Click the Load button to load the BIN list. OrangeCRM will then process the BIN list and create a new BIN Warning for each unique BIN in the list. A confirmation box will pop up with the results, as shown below.

The new BIN Warnings created from the loaded BIN list should now appear in the Warning BIN list.
