

Acquisition Centers
In this Topic: Hide
 Click one of the links listed above
to jump to a section on this page.
Acquisition Centers are used to separate customers who belong to the same Program based on how they were acquired. While a Program is the top level under which all related customers are grouped together, the Acquisition Centers are the next level down. To illustrate this, think of a Program as a tree... the Acquisition Centers are the branches and the customers are the leaves. All customers are linked to both a Program and an Acquisition Center.
As an example, let's say you sell a diet pill product. All customers who buy the diet pill would be assigned to one Program named Diet Pill. Within the Diet Pill Program, you wish to track the phone orders, internet orders and mail orders separately. To do that, you would create the following 3 Acquisition Centers in the Diet Pill Program:
1. Diet Pill Phone Orders
2. Diet Pill Internet Orders
3. Diet Pill Mail Orders
Acquisition Centers are also a way of separating data in reporting. Comparison reports can be run to see how each of your Acquisition Centers are performing.

 As you are deciding how to separate different groups of customers
into Acquisition Centers, you should take into consideration how you wish
to separate the data in your reports.
Existing Acquisition Centers can be accessed from one of two places, either from a Customer Record or from the List Menu. Both options are covered below.
Accessing the Acquisition Center From a Customer Record
You can access the Acquisition Center that a particular customer belongs to from the Customer Record window. After you have searched for the customer, open his record and click on the paper icon shortcut beside the Acquisition field. This will open the Acquisition Center the customer is in.

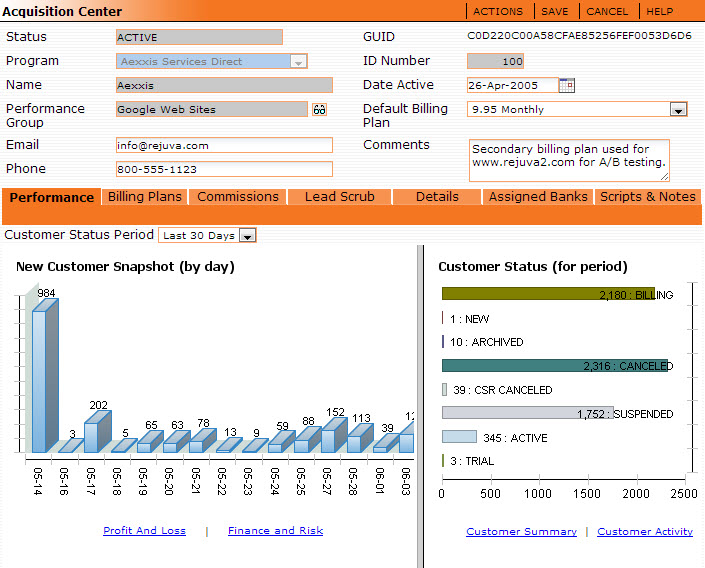
Below is an example of a Manager's view when the customer's acquisition center is opened. Notice that you are able to see the tabs for Performance, Billing Plans, Commissions, Lead scrub, Assigned Banks, and Scripts & Notes.
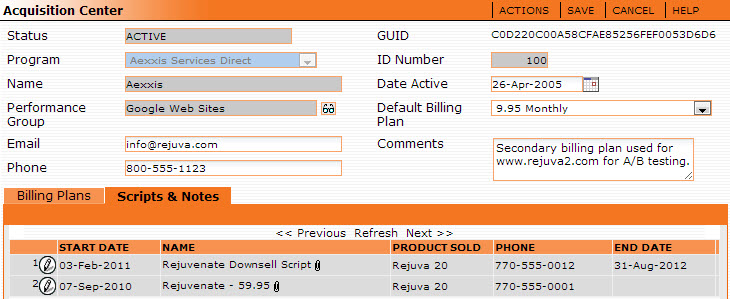
Below is an example of a CSR's view when the customer's acquisition center is opened. Notice that you are ONLY able to see the tabs for Billing Plans and Scripts & Notes. If you need access to the other tabs, please contact your system administrator.
Accessing All Existing Acquisition Centers From the Lists Menu
To view all existing Acquisition Centers, go to the Lists Menu on the home page and click on Acquisition Centers.
 The Lists menu is typically only visible to managers.
If you require additional permissions, please see your CRM administrator.

In the Acquisition Centers list, your view is limited to only the Acquisition Centers within the selected Program. Use the Program drop down menu in the upper left corner to view the Acquisition Centers in other Programs.

The results will be displayed in ascending order by ID Number and will include details such as the Report Group, Status, Phone, and Email for each Acquisition Center.
Click on the pencil icon beside an Acquisition Center to open it and view more details.
Hover over the Lists Menu and click on Acquisition Centers.

Click on the New Center button (top right).

A new Acquisition Center window will open.

Program
Select the Program this Acquisition Center will be assigned to.
Name
This is an important field. It is used to identify the Acquisition Center and will be referenced in other places throughout the CRM including reports. Therefore, make sure you choose a name that is descriptive, clearly differentiates this Acquisition Center from others and identifies which program it will be assigned to. Example: Program A - Call Center 123. Note: Acquisition Center names can't be changed in the future, so take your time when considering the naming convention you will use.
Important: Each Acquisition Center, across all Programs, should have a unique name. Acquisition Centers with an identical name can easily be confused in reporting and other areas in the CRM, even if they are assigned to different programs.
Default Billing Plan
If an order comes into OrangeCRM with no Billing Plan assigned to it, the system will automatically assign the selected Default Billing Plan.
Performance Group
This is an optional feature that isn't always used by all businesses. If your business does use Performance Groups, you may click on the eyeglasses icon to make a selection. For an explanation of what Performance Groups can be used for and for instructions on how to set them up, please see the Performance Groups page.
Phone, Email and Comments
These three fields are optional and are only used for reference purposes. Feel free to use them as needed.
The next steps are determined by the method in which you will be inserting new customers into this Acquisition Center. Customers can be inserted into OrangeCRM in one of two ways, either through a Lead File Upload or API. Please proceed accordingly with one of the two options listed below.
API - If you are inserting new customers via API, the Acquisition Center creation is complete. Be sure to click Save in the top right corner of the Acquisition Center.
Lead File Upload - If you are inserting new customers through a Lead File Upload, proceed with the remaining steps listed below.
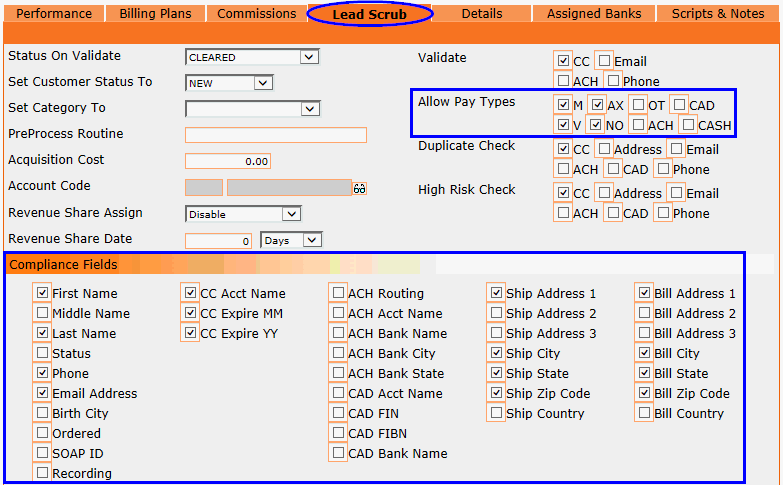
Go to the Lead Scrub tab and select the Pay Types allowed for this Acquisition Center.
 Pay Type OT = all other types of credit cards that are not Mastercard,
VISA, American Express or Discover. Examples of OT Pay Types are JCB,
Elo, Hipercard or Aura.
Duplicate Check
Select the fields you wish to enable Duplicate Check on. This feature checks for existing customers that already have the same value as the new customer in the selected field. If a duplicate is found, a new customer record won't be created. We recommend enabling Duplicate Check on continuity offers to prevent repeated orders, which may be fraudulent. If you don't want to use the Duplicate Check feature, leave all boxes unchecked.
High Risk Check
Select the fields you wish to enable High Risk Check on. This feature checks the value in the selected fields against your black list of customers who have been marked as a High Risk. If a match is found, a new customer record won't be created. If you don't want to use the High Risk Check feature, leave all boxes unchecked.
 Leaving
the high risk options unchecked will allow blacklisted customers to place
future orders.
Select which Compliance Fields are required for each incoming Lead. Leads without all of the selected Compliance Fields will be rejected.
Click Save in the top right corner of the Acquisition Center.
The Acquisition Center window will close and you should now be back to the main Acquisition Centers page. Click Refresh to see your new Acquisition Center in the list.

 Your view
is limited to only the Acquisition Centers within the selected Program.
If you have more than one Program in your CRM, you will need to select
the Program that you assigned
the Acquisition Center to.

To complete the remaining setup steps for an Acquisition Center that will be using Lead File Uploads, please see How To Add a Bank Assignment to an Acquisition Center on this page.
Open the Acquisition Center that you want to clone. Then go to the Actions menu and click on Clone Acq Center.
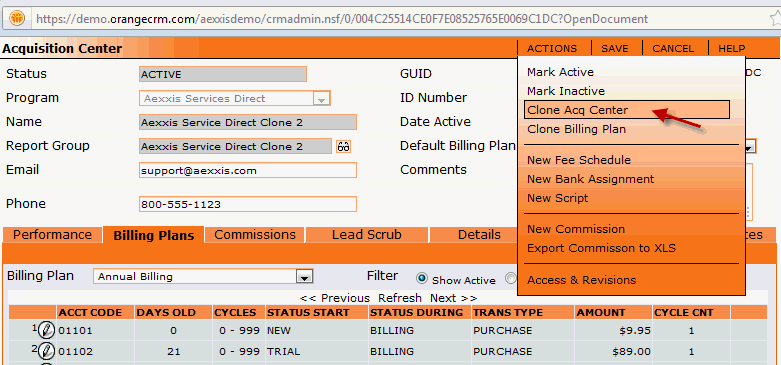
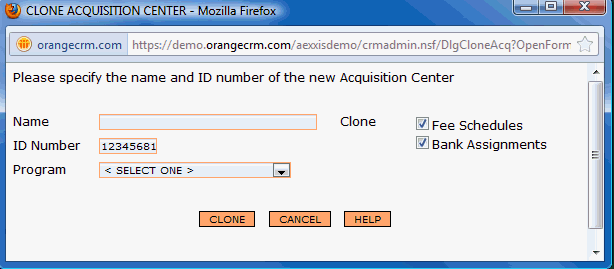
A box will pop up, as shown below. Type in the Name of the new Acquisition center and select the Program it should be assigned to. You can also clone the Fee Schedules and Bank Assignments if desired by clicking on the Fee Schedules and Bank Assignments boxes. Click the Clone button and the CRM will make a copy of the Acquisition Center.
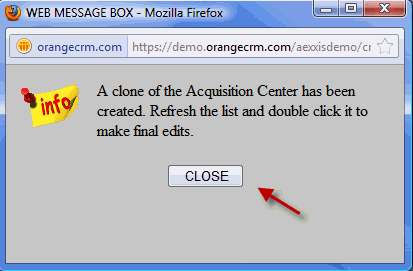
A confirmation box will pop up saying the cloned acquisition center has been created. Close the box when finished.
Click Refresh in the Acquisition Centers list to see the new cloned Acquisition Center.

Click on the pencil icon beside the new cloned Acquisition Center to open it and make the necessary edits to fit the unique needs of the new center.
A Bank Assignment is how you link a Merchant Bank to an Acquisition Center. Acquisition Centers that use Lead File Uploads require Bank Assignments for transaction processing.
If the only method of inserting customers into an Acquisition Center is via the API, Bank Assignments are not needed. For more details please see the API page.
Open the Acquisition Center, go to the Actions Menu and select New Bank Assignment.

The Bank Assignment window will open. Click on the Eyeglasses icon to select the Bank Name and then click Save.

 Leave
the Fee
Schedule field
blank if you want the Bank Assignment to
apply to any Fee Schedule within
this Acquisition Center. If you
want to limit the Bank Assignment to one Fee Schedule, click on the Eyeglasses
icon to select the desired Fee Schedule.
In the Acquisition Center, go to the Assigned Banks tab to see the new Bank Assignment.
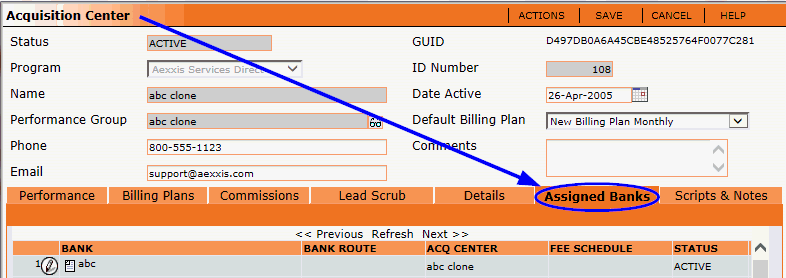
 You can
add as many Bank Assignments to the Acquisition Center as necessary.
Fee schedules are what allow you to manage the billing cycles for customers who reside in a particular Acquisition Center. Each Billing Plan typically consists of at least one Fee Schedule. Without at least one Fee Schedule, a Billing Plan cannot process any customer billing.
Once a Billing Plan has been setup with all of its required Fee Schedules, customers assigned to that Billing Plan will automatically be billed according to the parameters that have been predefined within its Fee Schedules.
Go to the Lists menu on the home page and click on Acquisition Centers.
 The Lists menu is typically only visible
to managers. If you require additional permissions, please see your CRM
administrator.

In the Acquisition Centers list, your view is limited to only the Acquisition Centers within the selected Program. Use the Program drop down menu in the upper left corner to view the Acquisition Centers in other Programs.

Once you have located the Acquisition Center in the correct Program, click on the pencil icon beside the Acquisition Center to open it.
In the Acquisiton Center window, go to the Billing Plans tab and use the drop down list to select the Billing Plan you wish to create a Fee Schedule for.
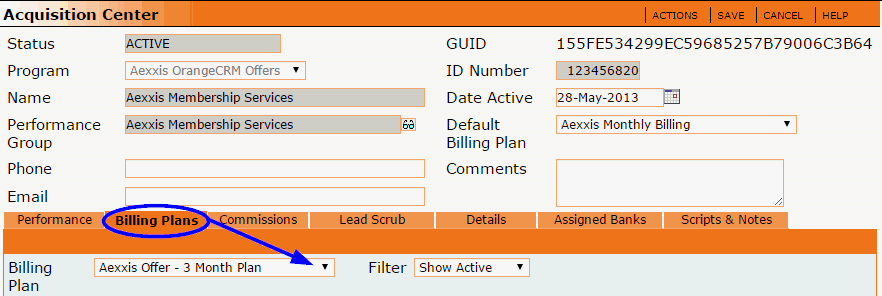
Then go to the Actions menu and click on New Fee Schedule.
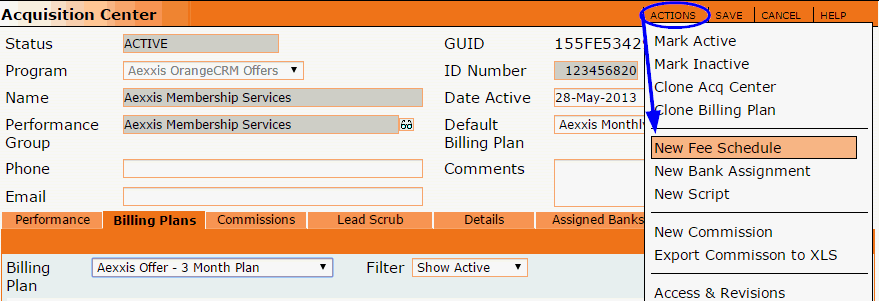
A new Fee Schedule window will open.

Select the Acct Code for this Fee Schedule by clicking on the eyeglasses icon. All fee schedules must be linked to an account code. See the Account Codes section in the Banks topic.
In the Amount field, enter the dollar amount this fee schedule will charge.
In the Retry Amount/Attempt fields, enter a dollar value less than the fee schedule amount and specify the RETRY attempt on which to implement the lower charge amount. If the initial charge attempt fails, the system will automatically retry the failed transaction in the number of days specified in the Merchant Bank settings (see the topic Banks).
 When entering the Retry Attempt, keep in mind
that it only applies to the number of times a transaction is RETRIED.
Therefore, the initial charge attempt counts as RETRY
Attempt 0, the first RETRY attempt
counts as Retry Attempt 1, the second RETRY
attempt counts as Retry Attempt 2, and so forth. For example, if your
fee schedule amount is $100 and you want to retry failed transactions
for the full amount on the first RETRY
attempt but then you want to drop it down to $50 on the second RETRY
attempt, you would enter $50.00 in the Retry Amount field and the number
2 in the Retry Attempt field.
Trigger Tab
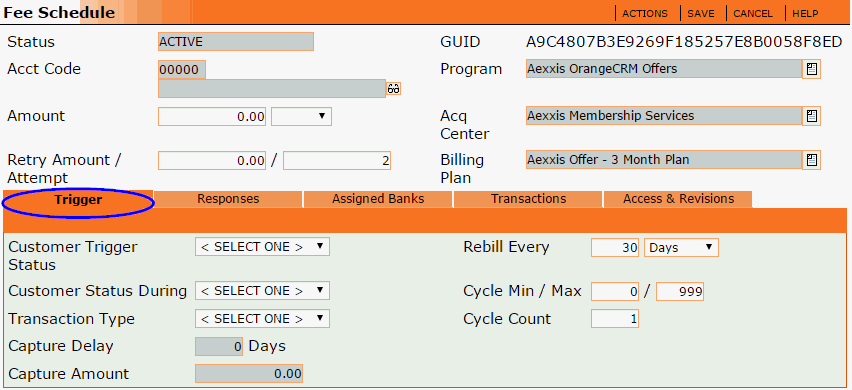
In the Trigger tab, configure each of the following settings to dictate the parameters in which this Fee Schedule will automatically be triggered:
Customer Trigger Status
Select the customer status that will trigger this Fee Schedule.
Customer Status During
Select what you wish the customer status to be set to while this Fee Schedule is being processed. The typical settings we recommend are as follows: If the Customer Trigger Status is Active, the customer Status During is generally also set to Active. If the Customer Trigger Status is New or Trial, the Customer Status During is typically set to Billing.
Transaction Type
Select the type of transaction to be processed on this Fee Schedule. If no billing is to be processed in this Fee Schedule, select No Trans from the drop down list.
Capture Delay
This field only applies to Capture transactions. Enter the number of days you wish to delay the capture of a PreAuth.
Capture Amount
This field only applies to Capture transactions. Enter the dollar amount to be captured (may be equal to or less than the original PreAuth amount).
Rebill Every
Enter the number of days or months to wait between the prior Fee Schedule and this Fee Schedule. In other words, how long do you want the CRM to wait before it bills the customer for this Fee Schedule.
 0 days = today. When creating
the first Fee Schedule, if the
customer is to be billed on the first day, Rebill Every would need to
be set to 0 days.
Example: Let's say you want to bill the customer upfront on day one for a small shipping & handling fee, then in 2 weeks you want to bill them for the full purchase price and every month after that, you want to bill them monthly until they cancel. In this scenario, the first Fee Schedule would have Rebill Every set to 0 days. The second Fee Schedule would have Rebill Every set to 14 days, and the remaining Fee Schedules would have Rebill Every set to 1 month.
Cycle Min / Max
Enter the minimum and maximum billing cycles that this Fee Schedule will qualify for. Cycle 0 means no prior billing cycles have been processed. The default Cycle Min/Max is set to 0/999, which indicates that this Fee Schedule will qualify for any cycle. However, you can change the Cycle Min/Max to limit the Fee Schedule as needed.
Cycle Count
This is typically left at the default setting of 1, which means each time the Fee Schedule is processed, the billing cycle will be increased by one.
Responses Tab
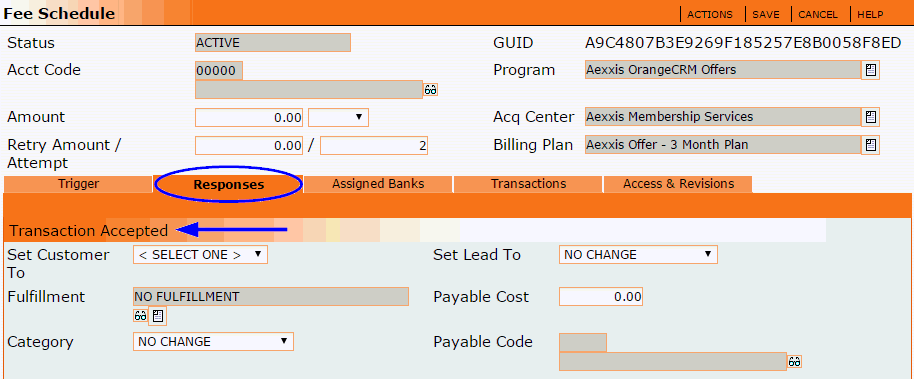
You will see that there are four sections in the Responses tab: Transaction Accepted, Transaction Declined, Transaction Error and Transaction Retry. Within each of these sections you can select specific actions for the CRM to take based on the result of the processed transactions:
Set Customer To
Changes the Customer Status after a given transaction result. For example, an Accepted Transaction may set the Customer Status to Active, whereas a Declined Transaction would result in Canceled or Suspended Customer Status, etc.
 Declined, Error and Retry transactions already have a default Customer
Status selected. These are just recommended settings that can be changed
to suit your needs.
Category
Changes the Category of a customer, based on the result of a transaction. Categories are predefined in the Lists menu on the home page. See the Categories section in the Customers topic.
Lead Status Set
Changes the Lead Status after a given transaction result. It is quite common to leave this set to No Change.
Fulfillment
Triggers the selected Fulfillment, based on the result of a transaction (see Fulfillments for more information).
Assigned Banks Tab

If you have multiple Bank Assignments on this Acquisition Center and you need to limit a Fee Schedule to one particular bank, you may do so by adding a Bank Assignment to the Fee Schedule. Although this is not common, the option is available if needed.
As an example, you may need to process the First Fee schedule in a Billing Plan through one specific bank, while the rest of the Fee Schedules in the Billing Plan can be processed through any one of the banks assigned to the Acquisition Center. In that case, you would only add a Bank Assignment to the first Fee Schedule. By NOT adding a Bank Assignment to the remaining Fee Schedules in the Billing Plan, you will allow those Fee Schedules to qualify for processing through any one of the Merchant Banks assigned to the Acquisition Center.
To add a Bank Assignment to a Fee Schedule, go to the Actions menu in the Fee Schedule window and click on New Bank Assignment.

The following Bank Assignment box will pop up.
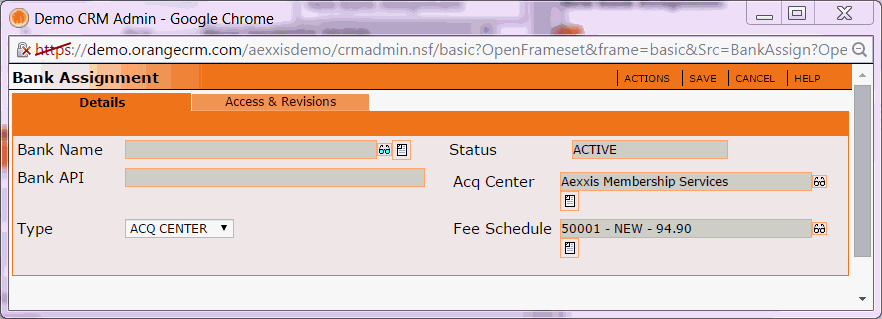
Click on the eyeglasses icon to select the Bank Name.
The Bank API, Acq Center and Fee Schedule fields will auto-populate.
In the Type field choose either Acq Center or Bank Route:
Acq Center - This option allows any customer in this Acquisition Center to qualify for this Bank Assignment.
Bank Route - This option only allows customers with the specified Bank Route stamped on their customer record to qualify for this Bank Assignment.
Then click the Save button.
You should now see the new Bank Assignment, in the Assigned Banks tab of the Fee Schedule window.
Tax & Shipping Tab
These settings are used if you want to track and report on taxes or shipping costs associated with the transactions generated by a particular Fee Schedule. The Money Module is required to use these features.
Note: These settings do NOT have any impact on the amount that customers are billed. This is strictly for reporting purposes.

Shipping Calculation
If the shipping cost is already included in the amount charged by this Fee Schedule, select Inclusive to subtract the specified shipping amount (entered in the field below) from the total that was billed in reporting.
If the shipping cost isn't already included in the amount charged by this Fee Schedule, select the carrier used for shipping to enable the CRM to calculate the shipping amount and add it to the total that was billed in reporting.
Shipping Amount
This field is only used if the shipping cost is already included in the amount charged by this Fee Schedule. Enter the shipping cost for each transaction generated from this Fee Schedule. The specified shipping amount will be subtracted from the total that was billed in reporting.
If the shipping cost isn't already included in the amount charged by this Fee Schedule, the shipping amount will be determined by the selected carrier and added to the amount that was billed in reporting.
Tax Calculation
If tax is already included in the amount charged by this Fee Schedule, select Inclusive to subtract the specified tax amount (entered in the field below) from the total that was billed in reporting.
If tax isn't already included in the amount charged by this Fee Schedule, select which tax rate calculator the CRM will use to add the current tax rate to the amount that was billed in reporting.
Tax Amount
This field is only used if tax is already included in the amount charged by this Fee Schedule. Enter the tax amount for each transaction generated from this Fee Schedule. The specified tax amount will be subtracted from the total that was billed in reporting.
If tax isn't already included in the amount charged by this Fee Schedule, the tax amount will be determined by the selected tax rate calculator and added to the amount that was billed in reporting.
Transactions Tab
We typically recommend keeping the default settings in the Transactions Tab. However, there can be special circumstances when some of these settings may need to be changed.

Merchant Product, Descriptor Text and Descriptor Phone
Some payment processors allow the use of multiple Descriptors if you sell more than one type of product in a single merchant account. Please contact your payment processor directly to find out if they support this feature. If they do, all transactions generated from this Fee Schedule will be sent to your gateway with the Descriptor entered into these fields.
 The Descriptor Text field on the Merchant
Bank must be left blank in order for this feature to work properly.
Default for Acq Lead Preauth/Capture
This setting is used if you allow your calling center to process preauth transactions at the time of the sale. In order for OrangeCRM to process a capture against the original preauth, the preauth must be tied to a Fee Schedule. If you select Enable in this field, you will be designating this Fee Schedule as the default Fee Schedule for lead capture processing.
Set Customer Last Process Date To
Determines which date will be used to set the Last Process Date on the customer record.
 The Last Process Date is used to calculate when
the customer is billed again. Changing this setting will change the number
of days between billing cycles.
Issue Duplicate InQueue Transaction
Sets whether or not to allow duplicate InQueue Transactions.
 Allowing this option makes it possible to double
bill a customer.
When you are done configuring the settings in the Fee Schedule, click the Save button.
You should now see the new Fee Schedule listed in the Billing Plans tab of the Acquisition Center.
 The
Clone Billing Plan feature is provided as a shortcut to help you save
time when building new Billing Plans.
Open the Acquisition Center that contains the billing plan you want to clone.
Go to the Billing Plans tab and select from the drop down menu the Billing Plan you wish to clone.
Now go to the Acquisition Center Actions menu and click on Clone Billing Plan.
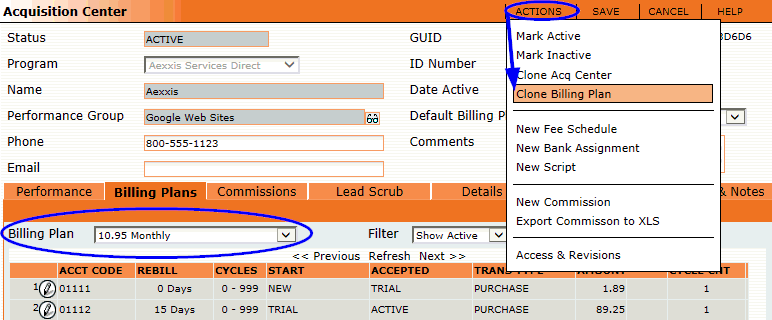
A box will pop up, as shown below.
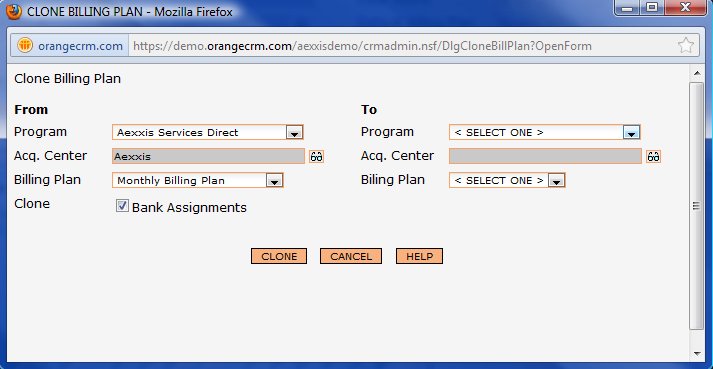
The From section will auto-populate with the Program, Acq. Center and Billing Plan you are cloning from.
The To section is where you will select the Program, Acq. Center and Billing Plan you want to assign the clone to.
Then click the Clone button and the CRM will clone the Billing Plan.
A confirmation box will pop up saying that the cloned billing plan has been created.
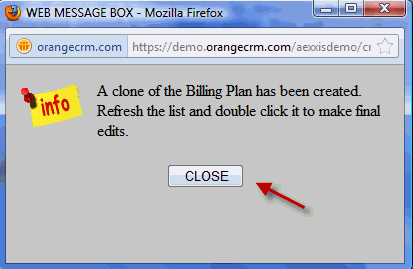
Close the box when finished.
Now open the Acquisition Center you cloned the Billing Plan to.
Go to the Billing Plans tab and select the new cloned Billing Plan from the drop down menu and make the necessary edits to the Fee Schedules to fit the unique needs of the new Billing Plan. For a description of Fee Schedule settings, please see the section How to Create a New Fee Schedule on this page.
Some Acquisition Centers charge on a commission basis for their leads. Some leads my require that you pay a commission to an individual. To facilitate this, the CRM can be configured to automatically calculate Lead Commissions that you need to pay out.
Creating a Master Commission
Before you can add a Lead Commission to an Acquisition Center, you must first create the master Commission by going to the Lists menu on the home page and clicking on Commissions.

A list of all existing Master Commissions will be displayed. To create a new Master Commission, click on the New Commission button in the upper right corner.

A new Commission record will open.

Commission Payee
Enter a descriptive name for the individual or company who will be receiving this commission.
Security (Optional)
Restricts this commission to one single Program.
Date Created
Auto populates today's date, however you can use the calendar selector to change the date if necessary.
Acq Centers Tab
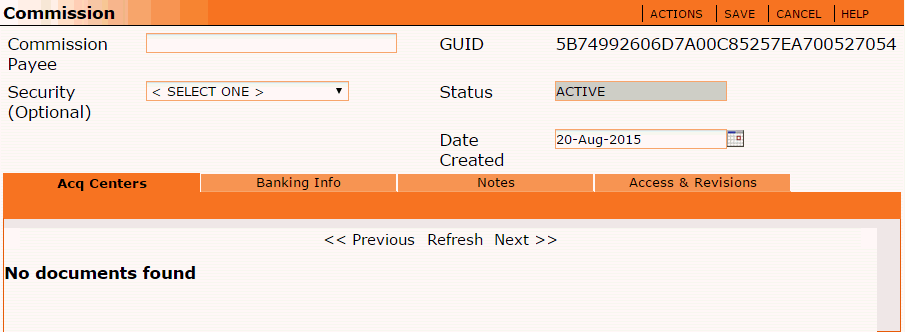
The Acq Centers tab displays a list of all Acquisition Centers linked to this master commission. Instructions on how to assign a commission to an Acquisition Center are listed below.
Since this new commission has not been linked to any Acquisition Centers yet, the Acq Centers tab will say No documents found.
Banking Info Tab
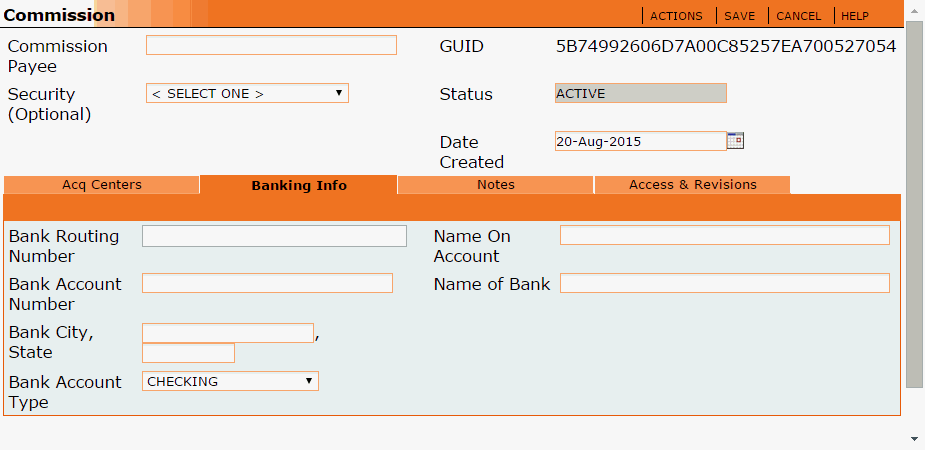
Filling in the fields in the Banking Info tab is optional and is used strictly as a point of reference. It does not enable any type of bank processing.
Notes Tab
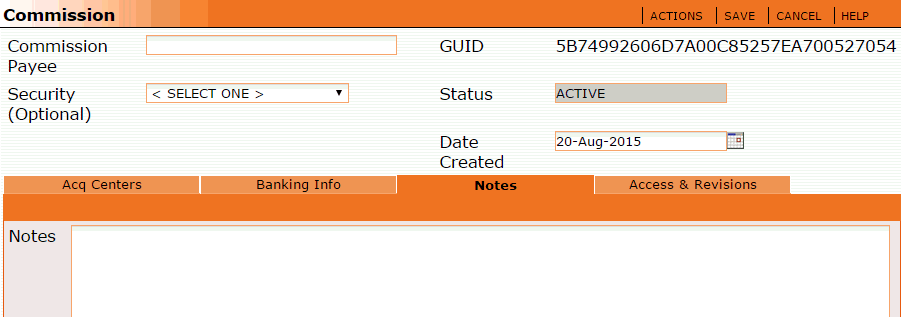
The Notes tab is also optional and can be used to record any miscellaneous details about this commission.
Click the Save button when you are done.
Assigning a Master Commission to an Acquisition Center
Once the master Commission has been created, you can add a Lead Commission to the Acquisition Center.
Start by opening the Acquisition Center. Go to the Actions menu and click on New Commission.

This will open the Lead Commission window, as shown below.
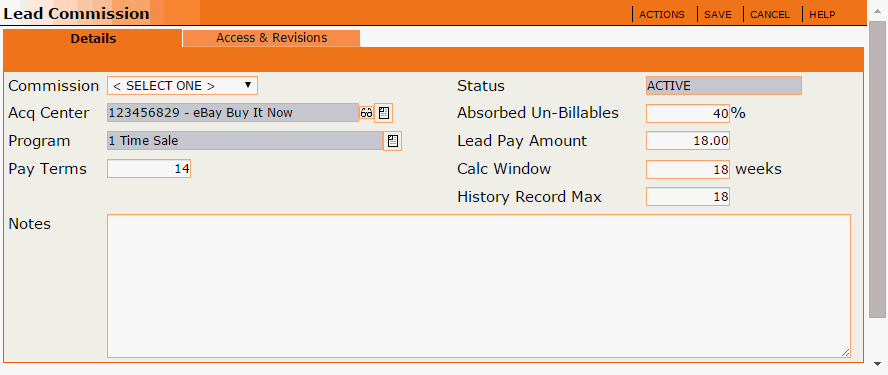
Configure each of the following settings for this Lead Commission:
Commission
Select the master Commission for this Lead Commission.
Acq Center and Program will be auto-populated.
Pay Terms
Enter the payment terms in number of days, starting from when the lead is received.
Status
The status of the Lead Commission, either Active or Inactive. An Inactive Lead Commission will not be calculated.
Absorbed Un-Billables
Enter the percentage of bad leads that you will absorb into your own costs before you begin to charge them back to the originating Acquisition Center. This percentage will be determined by the contract with your Acquisition Center.
Lead Pay Amount
Enter the dollar amount that you pay for a lead.
Calc Window
Enter the agreed upon number of weeks (between you and the acquisition source) that a customer must remain active (starting from lead creation) in order to be considered as a good lead that warranted a commission payment. If a customer cancels within this window, a credit for the paid commission will be applied to future payouts.
History Record Max
This number should be set to the same number as the Calc Window to prevent duplicate commission payouts. This is the number of payout summary records that are retained for future reference (i.e. the number of snapshots stored). The purpose of this feature is to allow you to view recently paid Lead Commissions, in cases where a credit or adjustment may be needed due to an over payment or lost customers from previous batches.
Notes
Enter any miscellaneous notes you may want to record for future reference regarding this Lead Commission.
Then click the Save button.
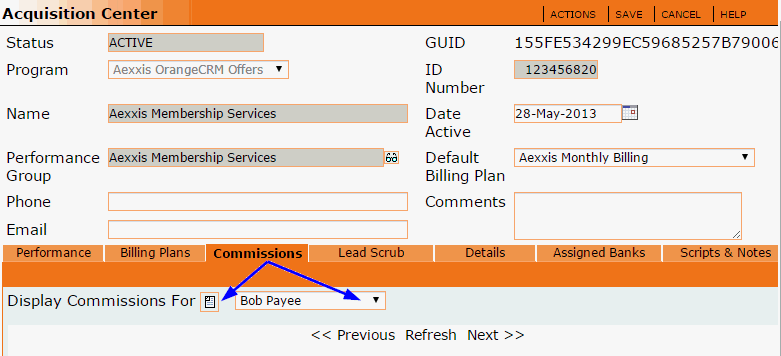
To view the new Lead Commission you just created, go to the Commissions tab in the Acquisition Center.
Then select the master Commission from the drop down list and click on the paper icon shortcut to view the Lead Commission that you assigned to that master Commission.
 Manager level access is required to add a script
to an Acquisition Center.
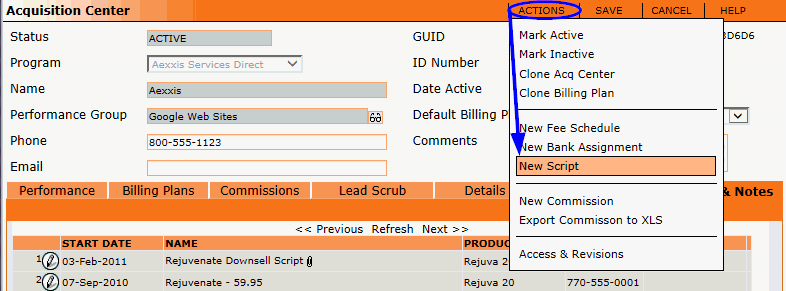
Open the Acquisition Center, go to the Actions menu and click on New Script.
The Acquisition Script window will open.
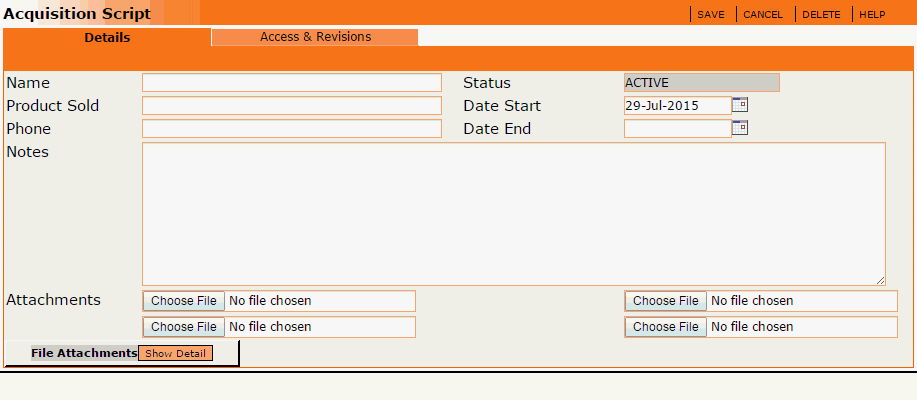
Fill in the following fields in the Acquisition Script window:
Name
The name of the script.
Product Sold
The name of the product being sold with this script.
Phone
The phone number associated with this script.
Date Start
The date this script is to be activated. The default date will be set to today's date.
Date End
The date you wish to deactivate this script.
Notes
Enter any miscellaneous notes you wish to record for reference purposes regarding this script.
Attachments
Click on the Choose File button to attach the document that contains the script. You may also attach additional files that contain supporting documentation.
Then click the Save button.
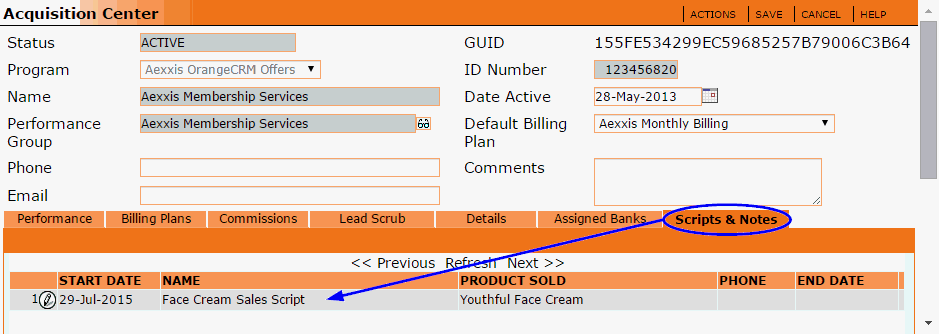
You should now see the new script listed in the Scripts & Notes tab of the Acquisition Center.
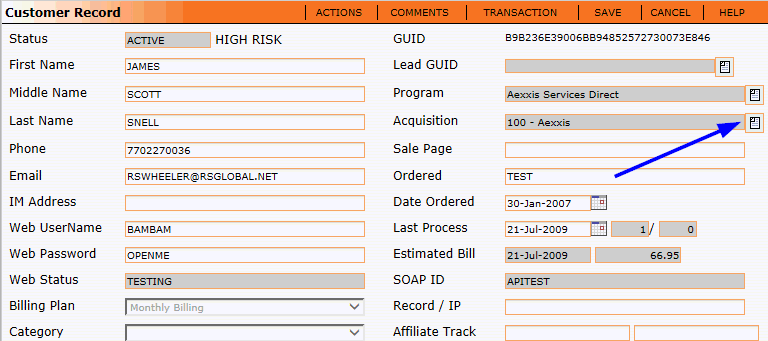
Once a script has been added to an Acquisition Center, CSRs can access the script by simply clicking on the paper icon shortcut beside the Acquisition Center field on a customer record.
This section provides a description of the fields in each section of the Acquisition Center record.
Top Portion of Acquisition Center Record

Status
This box will be auto-populated by the system and set as Active when a new center is created.
Program
Select the Program you want to assign to this Acquisition Center (see Programs for more information).
Name
This is an important field. The Acquisition Center Name is a key piece of information that is used throughout the system & in reporting. The Name field is only editable upon creation, so take some time to make sure that this name is appropriate, meaningful and free of typos before saving.
Performance Group
Select the report group you wish to assign this acquisition center to by clicking the eyeglasses. For reporting that is based on the acquisition center report group, instead of the acquisition center name, this acquisition center will be shown with the selected group. (See Performance Groups)
Phone
The phone number associated with this Acquisition Center. This field is used purely for user reference and is optional.
The email address associated with this Acquisition Center. This field is used purely for user reference and is optional.
GUID
The unique ID number assigned to this Acquisition Center.
ID Number
This must be a unique number, assigned by the user, usually 3 digits beginning with 100.
Date Active
Auto-populated with today's date or can be manually selected by editing the text box, or using the calendar application.
Default Billing Plan
If a customer comes into OrangeCRM with no Billing Plan assignment, the CRM will automatically assign the Default Billing Plan selected in this field.
Comments
For user reference only.
Acquisition Center Actions Menu
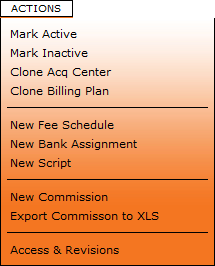
The Actions menu of the Acquisition Center allows for a number of different actions to be taken:
Mark Active
Changes the status of the Acquisition Center from Inactive to Active.
Mark Inactive
Inactivates the Acquisition Center.
Clone Acquisition Center
Allows you to copy the structure of an existing Acquisition Center to a new Acquisition Center, as shown below. For instructions, see the section How to Clone an Acquisition Center on this page.
 This feature is provided as a shortcut to help you save time when
building new Acquisition Centers.
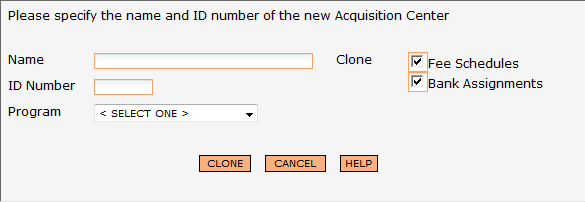
Clone Billing Plan
Allows you to clone a Billing Plan from the current Acquisition Center to another Acquisition Center, as shown below. For instructions, see the section How to Clone a Billing Plan on this page.
 This feature is provided as a shortcut to help you save time when
building new Billing Plans.

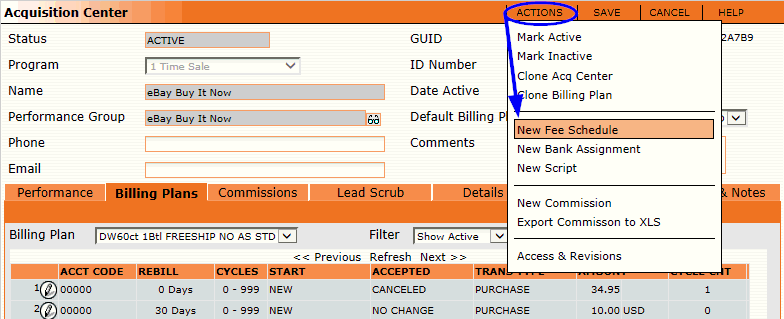
New Fee Schedule
Creates a new Fee Schedule in the Billing Plan currently selected in the Billing Plans tab. For instructions, see the section How to Create a New Fee Schedule on this page.
New Bank Assignment
Adds a new Bank Assignment to the Acquisition Center. For instructions, see the section How to Add a Bank Assignment to an Acquisition Center on this page.
 Typically all customers in an Acquisition Center
will qualify for processing through any one of the banks assigned to the
Acquisition Center, unless
bank routing is being used or a specific Fee Schedule has a Bank Assignment
(see the Bank Routes section in the Banks
topic and the section How to Create a
New Fee Schedule on this page).

New Script
Allows you to add a script to the Acquisition Center. For instructions, see the section How to Add a Script to an Acquisition Center on this page.
New Commission
Lets you to add a new Lead Commission to the Acquisition Center. For instructions, see the section How to Add a Lead Commission to an Acquisition Center on this page.
Export Commission to XLS
Exports the Acquisition Center's Commission information in an Excel spreadsheet.
Access & Revisions
The access and revisions tab shows any changes that have been made to the record.
Performance Tab
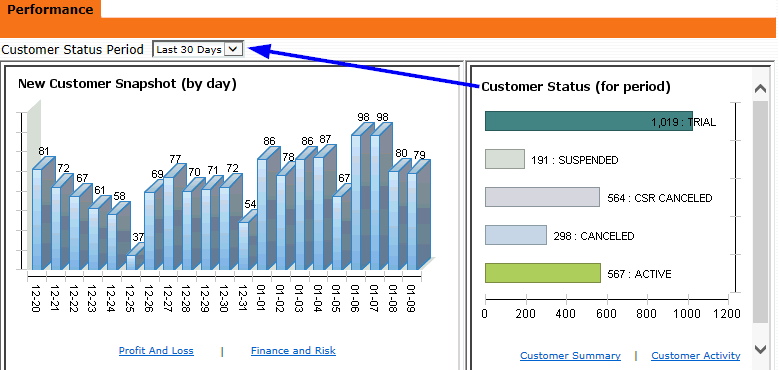
New Customer Snapshot (by day)
Shows you the quantity of new customers created in this acquisition center per day. Below the bar graph are shortcut links to the Profit and Loss and Finance and Risk reports for your convenience.
Customer Status (for period)
Gives you a breakdown of the quantity of customers by status for the selected time period. The default time period is set to the last 30 days, however you may change the time period by using the Customer Status Period drop down menu. Below the bar graph are shortcut links to the Customer Summary and Customer Activity reports for your convenience.
Billing Plans Tab
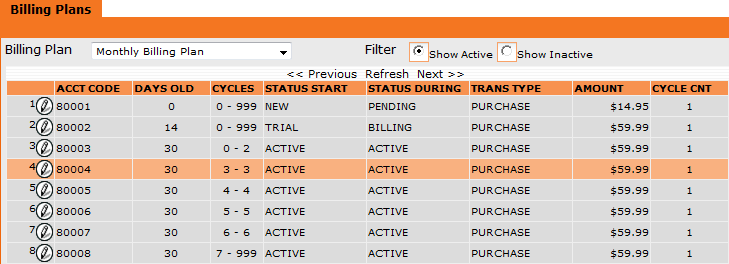
In this tab you can view each of the Billing Plans assigned to the Acquisition Center. Each Billing Plan has it's own individual Fee Schedules that determine when and how much a customer will be billed throughout each cycle of their life. For more information see the section How to Create a New Fee Schedule on this page.
Billing Plan
Pick a Billing Plan from the drop down list and the individual Fee Schedules associated with that Billing Plan will be displayed.
Filter
Allows you to show only Active or only Inactive Billing Plan information.
To open and edit a Fee Schedule, click on the pencil icon beside it.
To create a new Fee Schedule for the Billing Plan currently being viewed, go to the Acquisition Center Actions menu, and select New Fee Schedule, as shown below. For instructions on how to setup a new Fee Schedule, please see the section How to Create a New Fee Schedule on this page.
Commissions Tab
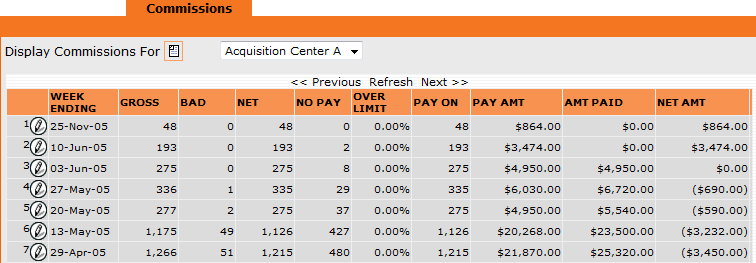
In this tab you can view each of the Commissions assigned to the leads in this Acquisition Center. Choose a Commission from the drop down menu to see a payout summary for the selected Commission.
Column Definitions:
Week Ending
Week ending date that leads came in.
Gross
The number of leads for that period.
Bad
The number of "bad" leads (Lead Status of Duplicate, Out of Compliance, CSR Check Fail or Error).
Net
The number of "usable" leads (Lead Status of New, Processed or Accepted).
No Pay
The number of no pay leads. (Lead Status of Canceled or Unbillable).
 You pay for any leads that are under the Absorb
Un-Billables limit. For more details, see the section How
to Add a Lead Commission to an Acquisition Center on this page.
Over Limit
This is the percentage of non-pay leads that is over your Absorb Un-Billables limit. For more details, see the section How to Add a Lead Commission to an Acquisition Center on this page.
Pay On
The number of leads you will be paying a commission on.
Pay Amt
The amount owed on this commission.
Amt Paid
The amount paid to the payee.
Net Amt
Shows any credits or adjustments that need to be made, based on an over payment, or lost customers from previous batches. Depending on the contract you have with the acquisition center, the calculation time of lost customers will vary. For more details, see the section How to Add a Lead Commission to an Acquisition Center on this page.
To see a breakdown of leads by status for a particular week, click on the pencil icon.

This will open the Leads Summary for that week, which includes a breakdown of leads by status. See example below.
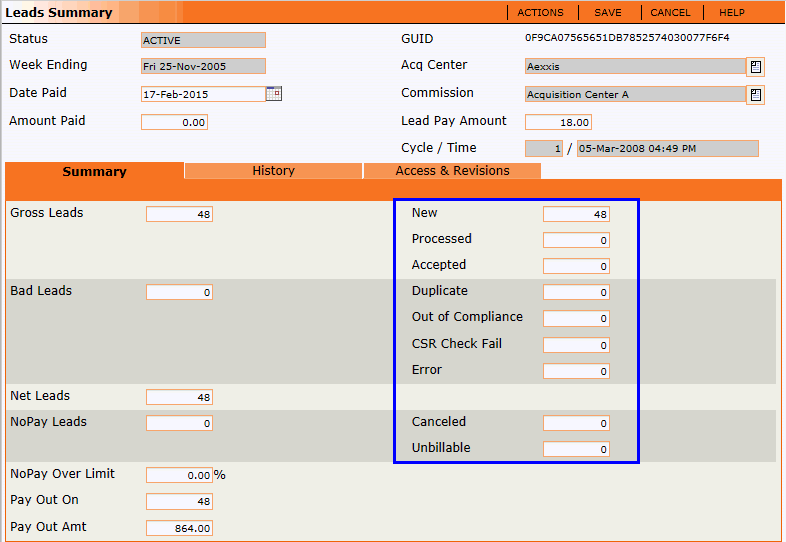
For more details, please see the Leads topic.
 To
open and edit the commission currently being viewed, click on the paper
icon shortcut beside the commissions drop down menu.

For instructions on how to create a new Commission, please see the section on this page titled How To Add a Lead Commission to an Acquisition Center.
Lead Scrub Tab
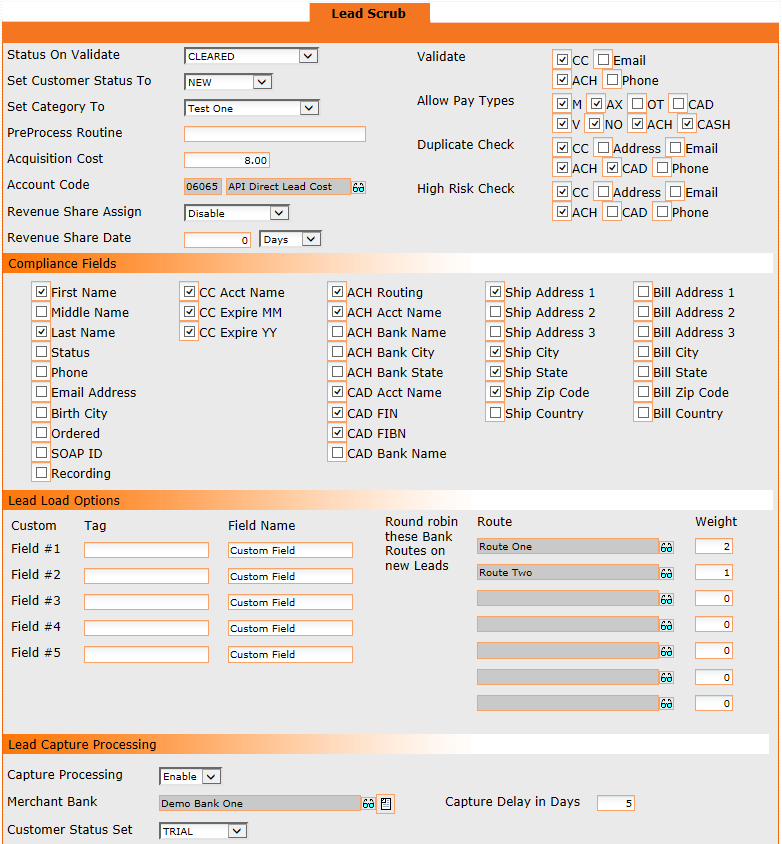
The Lead Scrub tab is where you set the rules for how incoming leads are processed and what qualifies as an acceptable lead that will become a customer in the CRM.
 If you are not using a lead file upload, you do not need to do
anything in this tab.
Status On Validate
Indicates the status a lead will be set to when it is loaded from this acquisition center after validation, generally set to cleared. See Leads for more information.
Set Customer Status To
What the customer status will be set to when the lead is loaded from this acquisition center. See Customers for more information.
Set Category To
Indicates what the category on the customer will be set to when it is loaded from this acquisition center. This is not a required field. See Customers for more information.
PreProcess Routine
This can be used for one of two purposes:
To send a unique incremented number to the fulfillment house. Some fulfillment houses require a unique number to be sent, and then that number referenced from that point on. To set up this option, you will need to use the following format: AssignExtID("Lead Ext Tag", "Acquisition Center GUID") Fill in the specific Lead Ext Tag, and the correct Acquisition Center GUID.
To block/decline leads based on a specific field. To set up this option, use the following format: OCCByField("Field Name","Field Values","Acquisition Center GUID",Set all compliant leads to Cleared? - True or False) Fill in the appropriate Field Name, Field Value, the correct Acquisition Center GUID and the word True or False to indicate whether or not you want all of the compliant leads to be automatically set to cleared status by the CRM. In almost all cases, this is set to True. The only reason you would set it to False is if you need to require compliant leads to be manually set to cleared after a manual review process such as for quality control. Example: OCCByField("State","IN~Indiana~AK~Alaska~HI~Hawaii~IA~Iowa","C9432DB48C1CAE7885257D1E00476E60",True) Feel free to copy and paste this example and replace the values with what is accurate for your application. Include the state abbreviates as well as the full state names to ensure that you are covered regardless of which of the two values your call center uses.
Acquisition Cost
The amount of money paid to acquire each lead or customer.
Account Code
The account code associated with this acquisition center. Click the eyeglasses to select from current account codes.
Validate
Select the types of payment you would like to validate (Credit Card and Automatic Cash Handling). OrangeCRM is not a gateway and the validation check is check-digit calculation that will mark leads as unbillable if they fail the check.
Allow Pay Types
Select payment types you would like to allow. If "cash" is selected, all payment types will be accepted. If other payment types are selected but come back invalid, they will be assumed to be cash.
Duplicate Check
Checks to see if there are existing matching Customers already in the system. Duplicates will be checked against the fields selected and duplicate records found will be rejected.
High Risk Check
Checks to see if there are existing High Risk customers already identified in the system based on the fields selected.
Compliance Fields
Compliance fields are the minimum fields that will be required for a lead to be considered acceptable. If a required field is not passed to OrangeCRM, the lead will be rejected as invalid. OrangeCRM will accept data for fields that are unchecked, but will not require the data for the lead to be considered valid.
Lead Load Options: Custom Fields
Custom fields allow you to customize the acquisition center. Any field that you would like added to the acquisition center, specific to your program or to this acquisition center, can be created here. The Tag is the value of the field. Field name is the name of the field, which are defaulted to custom field.
Lead Load Options: Bank Routes
Allows you to setup round robin bank routing for the leads that turn into customers. (See Banks).
Lead Capture Processing
Enable Lead Capture processing only if you offer a trial period in which you need to delay the capture of the initial transaction on a customer. Select the Merchant Bank to be used for the capture, enter the number of days to delay the capture by (e.g. the number of days in your trial period) and select the desired customer status during the trial period.
Details Tab
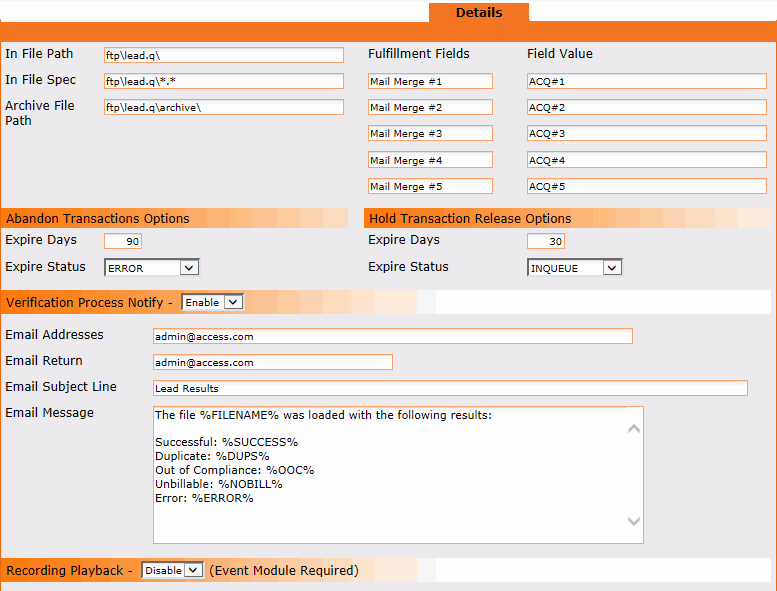
In File Path
The file path that lead files will be dropped off to.
In File Spec
The name of the files that can be dropped off. (*.* is a wild card.)
Archive File Path
The file path where used files will be stored.
Fulfillment Fields
The fulfillment options allow you to add 5 fields to any fulfillment that may require additional information that is specific to this acquisition center. Filling out the mail merge fields will allow you to import that information onto a master fulfillment. The master fulfillment record has the option of importing the mail merge #1 - mail merge #5 field values. Please see the Fulfillments topic for more details.
Abandon Transactions Options - Expire Days
Defines the number of days that a transaction will remain in Pending status before it is "abandoned."