

Leads
 Click one of the links listed above
to jump to a section on this page.
Leads are information about potential customers. They are generally created by a third party program and loaded into the CRM via the API or by batch upload.* As noted in the Acquisition Centers topic, all information must come from or be linked back to an acquisition center. The lead record information is checked against the rule set created by the user, and the lead is either rejected or accepted. If accepted, a customer record is created. Most of the information on a customer record is acquired from a lead record, so the forms for customers and leads are similar in many ways. It is important to remember that not all leads become customers, therefore, the Status selection for leads and customers is different. The fee schedule will update both customer status and lead status, and commission structures can be setup based on lead status.
*Note: Most call centers use our standard lead file format. LiveOps is one of the few that do not use our standard lead file format. For those of you who use LiveOps, be sure to include the word "liveops" (all one word) anywhere in the file name, to avoid lead file upload errors.
Lead records that have been received by the CRM can be reviewed. Under the Lead menu on the main navigation page, you can view the lead by either Status or Batch. Choosing one of these options will display a list of leads in the order you chose.
Leads By Status
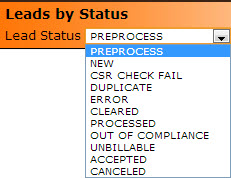
Preprocess
A valid lead that is loaded and is ready to be processed.
New
A new lead that is loaded and is ready to be processed.
CSR Check Fail
A lead that a CSR marks as fail after he verifies that it cannot be made into a new customer.
Duplicate
A duplicate lead because it exist somewhere else in the leads list.
Error
A lead that cannot be processed because of some error.
Cleared
A lead that has passed all checks and that can be turned into a new customer.
Processed
A lead has been processed and will be cleared as a new customer.
Out of Compliance
A lead that is missing some required information and cannot be made into a new customer. (Ex. Missing Billing information)
Unbillable
A lead whose credit card has been declined.
Accepted
A lead that has completed the approval process and is accepted as a new customer. A good lead file. (New - Processed - Cleared - Accepted)
Canceled
A lead that has been canceled.
An example of Leads by Status is shown below.

Leads By Batch
Selecting Leads By Batch will bring up a new view window. From this window, click the eyeglasses to select which batch you would like to load.

Lead Batch Selector
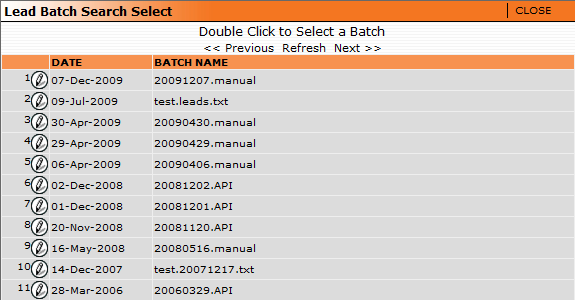
Double click the batch you want to see.
A new lead record can also be manually created by going to the main navigation page of the CRM, under the Lead menu, select New Lead... . This feature allows for CSRs to add potential customers who may directly call a customer service center and order a product.
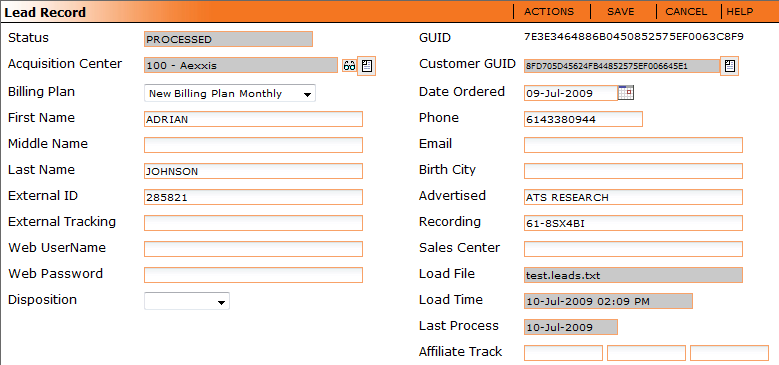
Status
The status of the lead.
Acquisition Center
The Acquisition Center the lead came through. See Acquisition Centers.
Billing Plan
The billing plan associated with this lead. See also the Billing Plans topic.
First Name/Middle Name/Last Name
The lead's first, middle, and last name.
External ID
The ID identifying where the lead came from.
External Tracking
Any tracking information of where this lead came from.
Web UserName/Web Password
If you have set up the lead for using the web interface, their username and password will go into these fields.
Disposition
The disposition for this lead (the reason the lead was rejected). See also the Reason Codes topic.
GUID
The unique number of this lead.
Customer GUID
The unique number given to the lead that is attached to this customer. By clicking the box, you can follow this record.
Date Ordered
The date the lead was ordered.
Phone
The lead's phone number.
The lead's email address.
Birth City
The birth city of the lead, as a security.
Advertised
The advertising medium associated to this lead.
Recording
Any recording of the customer agreeing to the lead.
Sales Center
The sales center that generated this lead.
Load File
The file the lead came in.
Load Time
The time the load file was loaded.
Last Process
The date of the last process of this lead.
Affiliate Track
This field tracks the affiliate (source) associated with the acquisition of the lead. This information is only downloaded via the API. The first field is the affiliate code, the second field is the affiliate sub code, and the third field is the salespage. The last field, SalesPage, is used to track the HTML "landing page" used to close internet based sales.
Notes Tab

From the Notes tab, the user can set the lead status to Cleared or CSR Check Fail. The details of Check By, Check Date, and Check Reason can be inserted here for any leads set to CSR Check Fail. Notes associated with this lead are also recorded here.
Address Tab

Shipping Address
The customer's shipping address.
Billing Address
The customer's billing address.
Same as Billing Address
Click in the check box to copy the Shipping Address over to the Billing Address fields.
Account Tab
The account tab contains the specific billing details for the lead. If you have admin status in the CRM, you can use the Bank Route feature (as noted by the arrow below) to route this lead for the balance of their life to a specific MID or bank.

There are four different types of account information that can be stored here, as seen below:
1. Credit Card Info

Payment Type
The type of payment. Changing this will change the account information options.
Name on Card
The card holders name.
Credit Card
The credit card number.
CC Expire
The credit card expiration date.
AVS
The AVS number on the card.
2. US Bank Info

Payment Type
The type of payment. Changing this will change the account information options.
Account Name
The name of the account.
Routing Number
The routing number to the bank.
Account Number
The account number.
Name of Bank
The name of the bank that the account is held at.
Bank City, State
The address information of the bank that the account is held at.
Bank Account Type
The type of account can be chosen from the drop down selections.
3. Canada Bank Info

Payment Type
The type of payment. Changing this will change the account information options.
Account Name
The name of the account.
Account Number
The account number.
Name of Bank
The name of the bank that the account is held at.
Institution Number
The number to the Canadian institution.
Branch Transit Number
The branch of the banks transit number.
4. Cash

Details Tab
The details tab will contain specific details about the lead.

Acquisition Cost
The cost of acquiring this lead.
Account Code
The payable account code associated with this lead.
Center Tag
The acquisition center this lead came from.
Plan Tag
This field is used to specify a billing plan via a lead upload file. If the Plan Tag is not specified, the Default Billing Plan on the acquisition center is used. See Acquisition Centers.
Orig Customer
By clicking the box, you can follow this record.
Load Data
Used internally to store the actual data row from the leads upload file and allows the operator to see the actual data received from the call center.
Custom Fields
Custom fields allow you to enter information on this lead, which can later be used in grouping for reporting, or in searching for this lead.
Actions Menu
The Actions menu on the lead record menu, allows for a number of user actions. Below is seen an example of the actions menu, as it would appear to an administrator of the site. Depending on your CRM access rights, you may see different options.
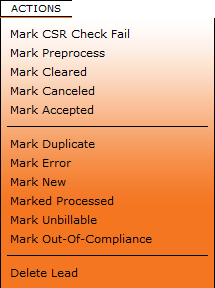
As noted on the above Actions menu, you can change the status of the lead or delete the lead by selecting the appropriate option.
Lead Summary records can be seen from the acquisition center form, on the commission tab. Double clicking will open the lead record. The lead summary gives you a detailed layout of how many "usable" and "bad" leads you have had in the last week. It gives you a summary of how many new leads there were, how many processed, how many were bad, and the reason why they were bad leads. This summary is given over the last week of leads.
Below is an example of a Lead Summary record.

Status
The status of the lead summary.
Week Ending
The week that the lead summary is from.
Date Paid
The date that the lead summary is set to be paid on.
Amount Paid
The total amount payable for the net leads in this period.
GUID
The unique number given to the lead summary record.
Acq Center
The acquisition center that the leads were acquired from.
Commission
This is the commission payee. See the section titled How To Add a Lead Commission to an Acquisition Center in the Acquisition Centers topic.
Lead Pay Amount
The amount that is paid for each "usable" lead.
Cycle/Time
The cycles of the leads, and the time stamp on the leads.
Summary Tab
The summary tab gives you the general information about this lead summary.
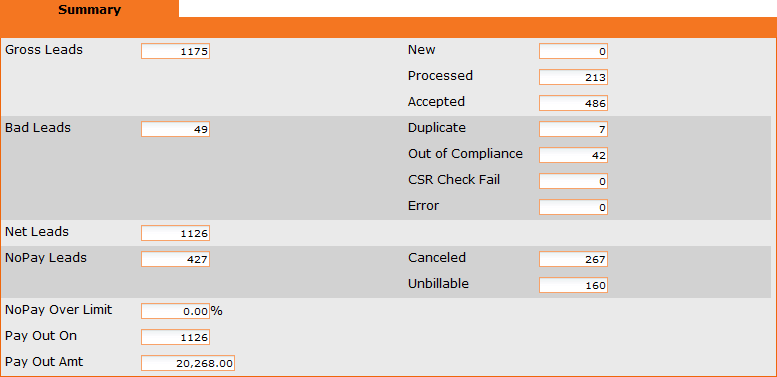
Gross Leads
The total number of leads in this lead summary.
New - The number of gross new leads.
Processed - The number of gross leads that were processed.
Accepted - The number of gross leads that were accepted.
Bad Leads
The number of leads that were unacceptable. Considered "bad."
Duplicate - The number of duplicate leads considered bad.
Out Of Compliance - The number of leads that were out of compliance.
CSR Check Fail - The number of bad leads that failed the CSR check.
Error - The number of bad leads that were in error.
NoPay Leads
Leads there were considered good, but received a NSF response or the customer canceled.
Canceled - The number of no pay leads that were customer canceled.
Unbillable - The number of no pay leads that came back NSF.
NoPay Over Limit
The percent of leads that were nopay that were over the set acceptable limit.
Pay Out On
The total number of leads that will need to be paid commission on.
Pay Out Amt
The total cost of the leads that needs to be paid.
History Tab
The lead summary history tab shows you the history of leads linked with this lead summary. The window of how long lead summary records will be kept in the history tab is set on the lead commission form, under the "Calc Window" option (for example 12 weeks, etc.). See the section titled How To Add a Lead Commission to an Acquisition Center in the Acquisition Centers topic.
Actions Tab
The Actions tab of the Leads Summary form has one allowable action, "Delete Lead Summary." This feature can be used delete leads that are no longer required for lead commission reporting.
The Lead Commission links commissions to an Acquisition Center based on the leads that they send to the CRM. By creating a lead commission, you will enable a Commission Payee to be able to collect commissions from leads acquired from an Acquisition Center.
To create a Lead Commission, you can either select New Lead Commission from the action menu on Commissions (located on the main navigation menu under Lists):

Or you can select New Commission from the Acquisition Center action menu (located on the main navigation menu under Lists: Acquisition Centers):
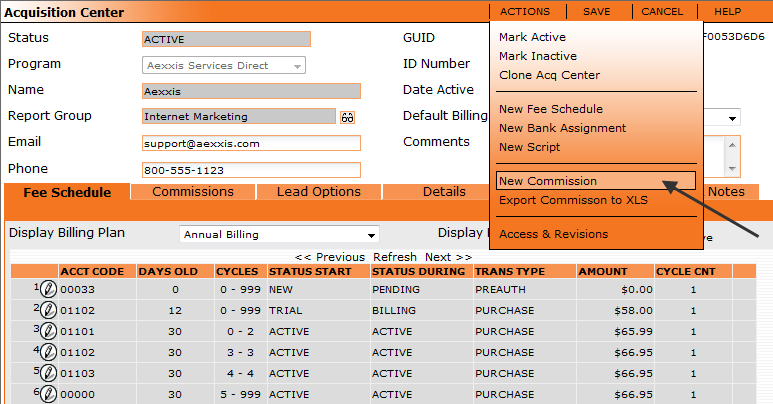
An example of a Lead Commission is seen below.
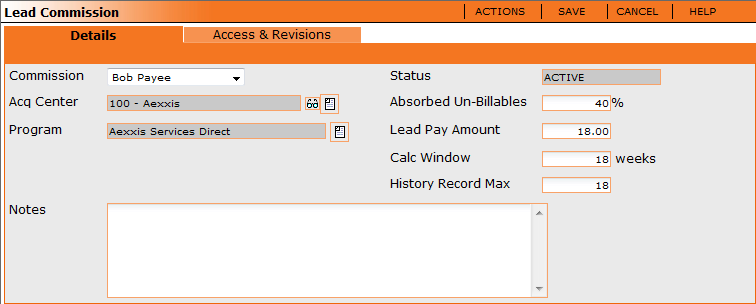
Details Tab
The Details tab will show you the details for this commission structure. It shows the Commission payee, the Acquisition Center, and which program the lead commission is under.
Status
The status of the lead commission, either active or inactive. An inactive Lead Commission will not be calculated.
Absorbed Un-Billables
Unbillables are the amount of bad leads that you will absorb into your own costs before you begin to charge them back to the originating Acquisition Center. This amount will be determined by your Acquisition Center's contract.
Lead Pay Amount
The dollar amount that you pay for a lead.
Calc Window
Duration in number of weeks that the summary process counts backwards in time to determine if a lead was "good". This number is often determined by the contract with your acquisition center.
History Record Max
The number of records that are retained. (i.e. the number of snapshots stored). This number should not be higher then the calc window.
To view a list of all lead files that have been uploaded to the CRM, go to the Leads menu and click on Lead File Uploads.

A history of lead file uploads will appear, including file name, upload date and time and current file status. An example is shown below.

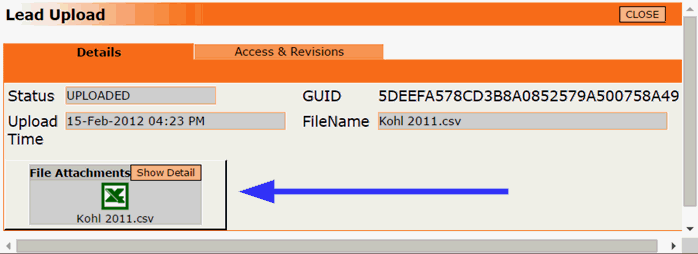
To view the contents of an uploaded lead file, double click on the line item.
When the Lead Upload window opens, click on the file attachment to download and open the document.
Typically, Lead Files are uploaded to your OrangeCRM FTP server and automatically imported by a scheduled Batch Job. To handle an exception, you can upload a Lead File manually.
Go to the Leads menu and click on Lead File Uploads.

Then click on the Upload New Lead File button.
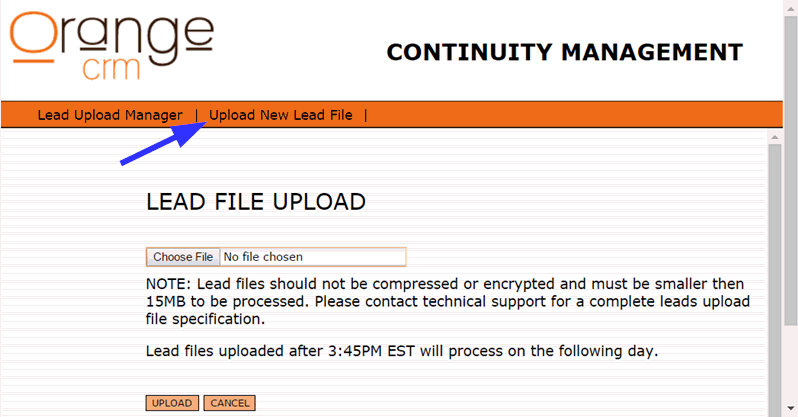
Use the Choose File button to locate the file on your computer. Once you have selected the file, click the Upload button.