
Billing Plans
 Click one of the links listed above
to jump to a section on this page.
A Billing Plan is the name you assign to a particular set of billing cycles, which are called Fee Schedules in OrangeCRM. Each product offer with a different price point, trial period and/or life cycle requires its own unique Billing Plan.
To view a list of all existing Billing Plans, go to the Lists menu and click on Billing Plans.

A list of all active Billing Plans will be displayed.

Click the New Billing Plan button located in the top right corner of the Billing Plan list.
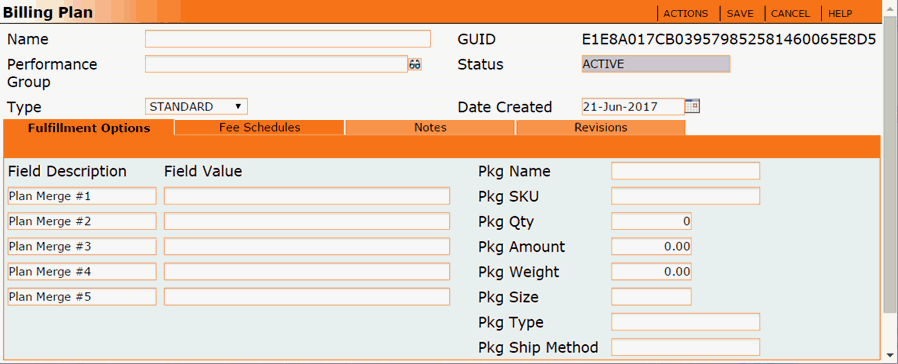
A new Billing Plan window will open.

Name
Enter a descriptive name for the billing plan. Example: ProductABC 1.95 30DayTrial 16.95Monthly
 It
is recommended to include such details as the product name, price point,
trial length, the length of time between billing intervals, etc. This
will allow you to easily differentiate between the billing plans for various
offers both now and in the future as your business continues to grow and
additional products, price points and billing schedules are added. Abbreviations
and acronyms are helpful when you have reached the maximum character limit.
Performance Group
Click on the eyeglasses icon to choose a performance group for this billing plan to be categorized in for reporting purposes.
Type
Billing Plan Types allow you to group your bill plans into categories based on their function, which can then be used to restrict the bill plans that are available to CSRs in the drop down list of a customer salvage event that allows bill plan changes. See the section titled How To Configure a Master Event in the Events topic.
GUID
The unique ID assigned to this billing plan.
Status
The status of this billing plan, either active or inactive.
Date Created
The date the billing plan was created.
Fulfillment Options Tab
The set of fields on the left side of the Fulfillment Options tab allow you to create up to five custom fields to input details that are specific to only this particular Billing Plan. The set of fields on the right side of the Fulfillment Options tab allow you to enter package information that is specific to only this particular Billing Plan.
Master fulfillments can be set up to pull any of the values entered in this section of the Billing Plan and insert those values into the customer fulfillments it generates. Please see Fulfillments.
Note: If custom fields or package details are the same across multiple Billing Plans, you will save time by entering that data on the master fulfillment record rather than in each individual bill plan.

Fee Schedules Tab
The Fee Schedules tab allows you to see a list of all the fee schedules associated with this Billing Plan.

Notes Tab
This tab allows you to document any details about the billing plan that you may want to reference at some point in the future.

The Actions Menu
The actions menu only has two functions: to mark the billing plan active or inactive.
A Fee Schedule is basically a Billing Schedule that consists of rules and parameters to control when and how customers are billed from one cycle to the next. At least one Fee Schedule must be assigned to a Billing Plan in order for customer billing to occur. For plans that require recurring billing, multiple Fee Schedules are typically required, as shown in the example below.

 Before
you can start creating Fee Schedules, you must first create the Billing
Plans they will be assigned to. If you haven't already done so, please
scroll up to the section on this page titled How
To Create a New Billing Plan.
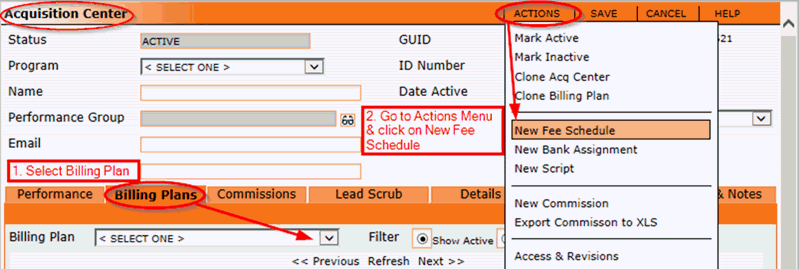
Fee Schedules are created at the Acquisition Center level. Open an Acquisition Center, go to the Billing Plans tab and follow the steps listed below:

A new Fee Schedule window will open.

Status
Either active or inactive. Active means it will run, inactive means it will not.
Acct Code
All fee schedules should be linked to an account code. Click the eyeglasses icon to select from your current list of account codes. For more information, see the account codes section in the Banks topic.
Amount
Enter the dollar amount you want this fee schedule to charge.
 If
the OrangeMoney module has
been installed in your OrangeCRM database, you may use the drop down selector
beside the Amount field to choose the currency you want this Fee Schedule
to assign to the transactions it creates.
 Keep in mind
that Customer currency assignments override Fee Schedule currency assignments.
In other words, transactions created for a customer that has a currency
assignment (in the Account tab of the Customer record) will inherit that
currency, regardless of a currency assignment on the Fee Schedule.
 Transactions created from a Fee Schedule with
a currency assignment will only get picked up by a Merchant Bank that
is configured to process that currency (either in the Bank Currency field
or in the Currency Filters of a Merchant Bank). In other words, you must
create a Merchant Bank that is configured to process transactions in the
currency you have assigned to a Fee Schedule. If you don't, the transactions
created by that Fee Schedule will never get processed. For instructions,
please see the section titled How To
Create a New Merchant Bank in the Banks
topic.
Retry Amount / Attempt
This is a decline management feature that you may or may not wish to use. It allows you to decrease the dollar amount after a specific number of failed billing attempts at the full amount. If you don't want to use this feature, leave the default settings as they are. If you do wish to use this feature, enter the lower dollar amount and the number of failed billing attempts you want to allow at the full amount before trying the decreased amount. Example: If you enter two attempts, the lower amount will be used on the third billing attempt.
 Maximum
retry attempts are managed within your Merchant Banks.
Those settings should be taken into consideration when entering the number
of failed billing attempts allowed before trying the lower dollar amount.
If you enter a number greater than or equal to the maximum retry attempts
allowed, the lower dollar amount will never be tried.
GUID
The unique ID number given to this fee schedule.
Program, Acquisition Center, Billing Plan
These three fields are auto-filled from the Acquisition Center the Fee Schedule was created from.
Trigger Tab
The Trigger tab is where you set the rules for when the Fee Schedule is triggered, i.e. when it's allowed to charge customers.

Customer Trigger Status
Select the status the customer must be in to qualify for being billed by this Fee Schedule.
Customer Status During
Select the status the customer will temporarily be assigned to during the billing process. We don't recommend using the same status as the trigger status. We typically recommend either Pending or Billing status, as that will make it easy to identify any customers who may be stuck in one of those statuses due to a billing exception.
Transaction Type
Purchase - A straight, up front charge.
Preauth - A temporary preauthorization hold on the funds, not an actual charge.
Capture - The settlement against a preauthorization hold, when the charge is finally processed.
No Trans - No Transaction will be processed, but the customer status changes and assigned fulfillments will be processed.
Capture Delay
Delay in days before capturing the PreAuth amount. This field is only available for PreAuth transactions.
Capture Amount
The amount to be captured from a PreAuth. This field is only available for PreAuth transactions.
Rebill Every
Enter the number of days/months the system will wait before processing the fee schedule, starting from the last processed transaction or starting from the customer created date if no previous transactions exist.
 To
implement fixed monthly bill dates, change the drop down menu to months
instead of days.
Cycle Min / Max
Enter the minimum cycle and the maximum cycle customers must be in to qualify for being billed by this fee schedule.
Cycle Count
Enter the number to increment the customer's cycle count by when this fee schedule is processed. This is typically set to one (1).
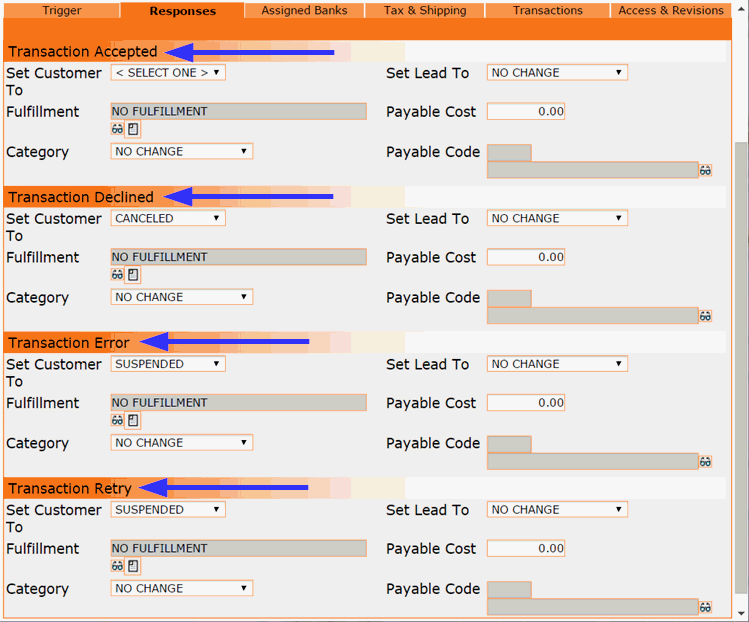
Responses Tab
Responses control what happens to customers based on the result of their processed transactions.
There are four separate sections in the Responses tab:
Transaction Accepted - A successful charge.
Transaction Declined - A hard decline, which can result from one of two things: the Merchant Bank responding with a code that is configured as a hard decline with the Merchant Bank settings or the transaction repeatedly being declined up to the point of reaching the retry limit set in the Merchant Bank and after which no further billing attempts will be made.
Transaction Error - The Merchant Bank responded with a code that is configured as an error or the transaction batch wasn't successfully processed.
Transaction Retry - A soft decline that has been resubmitted to the Merchant Bank for another billing attempt in accordance with the retry limits configured within the Merchant Bank.

Each section contains the same set of options, of which you may choose to use only some or none at all, depending on your particular business needs.
Set Customer To
This setting is used when you want the CRM to automatically change the status of customers based on the result of processed transactions from this Fee Schedule. Our recommended statuses are set as the default setting for declined, error and retry transactions. Trial or Active status are typically what is used for accepted transactions.
Fulfillment
This option is only used if you want a fulfillment to automatically be generated based on the result of processed transactions from this Fee Schedule. A few examples include sending a product fulfillment to customers when a transaction is approved, emailing a list of customers whose transactions are in Error status to internal business members for special handling, sending a notification email to customers when a transaction is declined, etc. Click on the eyeglasses icon to choose from a list of available fulfillments. For more information, please see the Fulfillments page.
Category
Not all businesses use categories. If you have set up a list of custom-named categories (see the section on Categories in the Customers topic), you may choose to have the CRM auto-assign a specific category to customers based on the result of processed transactions from this Fee Schedule.
Set Lead To
This setting is used when you want the CRM to automatically change the status of leads based on the result of processed transactions from this Fee Schedule. An example would be updating leads to Unbillable status when transactions are declined.
Payable Cost and Payable Code
A record of costs that your business pays out can be generated and tracked based on the result of processed transactions from this Fee Schedule. To use this option, enter the dollar amount of the cost per transaction and click on the eyeglasses icon to select the related account code for reporting purposes.
Assigned Banks Tab
This is where you can view a list of all Merchant Banks that have been assigned to this Fee Schedule.
Note: Bank Assignments on Fee Schedules do NOT trump any other bank assignments that may exist on Bank Routes or Acquisition Centers. It simply means that transactions generated by the Fee Schedule are allowed to be processed by the Merchant Banks assigned to it, in addition to any other available Bank Assignments on Bank routes or Acquisition Centers.

To disable a Bank Assignment double click on the line item to open it. Then use the Bank Assignment Actions menu to Mark Inactive.

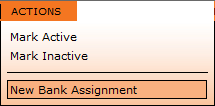
New Bank Assignments can be added from the Fee Schedule Actions menu.

Tax & Shipping Tab
These settings are used if you want to track and report on taxes or shipping costs associated with the transactions generated by a particular Fee Schedule. The Money Module is required to use these features.
Note: These settings do NOT have any impact on the amount that customers are billed. This is strictly for reporting purposes.

Shipping Calculation
If the shipping cost is already included in the amount charged by this Fee Schedule, select Inclusive to subtract the specified shipping amount (entered in the field below) from the total that was billed in reporting.
If the shipping cost isn't already included in the amount charged by this Fee Schedule, select the carrier used for shipping to enable the CRM to calculate the shipping amount and add it to the total that was billed in reporting.
Shipping Amount
This field is only used if the shipping cost is already included in the amount charged by this Fee Schedule. Enter the shipping cost for each transaction generated from this Fee Schedule. The specified shipping amount will be subtracted from the total that was billed in reporting.
If the shipping cost isn't already included in the amount charged by this Fee Schedule, the shipping amount will be determined by the selected carrier and added to the amount that was billed in reporting.
Tax Calculation
If tax is already included in the amount charged by this Fee Schedule, select Inclusive to subtract the specified tax amount (entered in the field below) from the total that was billed in reporting.
If tax isn't already included in the amount charged by this Fee Schedule, select which tax rate calculator the CRM will use to add the current tax rate to the amount that was billed in reporting.
Tax Amount
This field is only used if tax is already included in the amount charged by this Fee Schedule. Enter the tax amount for each transaction generated from this Fee Schedule. The specified tax amount will be subtracted from the total that was billed in reporting.
If tax isn't already included in the amount charged by this Fee Schedule, the tax amount will be determined by the selected tax rate calculator and added to the amount that was billed in reporting.
Transactions Tab
We typically recommend keeping the default settings in the Transactions Tab. However, there can be special circumstances when some of these settings may need to be changed.

Merchant Product, Descriptor Text and Descriptor Phone
Some payment processors allow the use of multiple Descriptors if you sell more than one type of product in a single merchant account. Please contact your payment processor directly to find out if they support this feature. If they do, all transactions generated from this Fee Schedule will be sent to your gateway with the Descriptor entered into these fields.
 The Descriptor Text field on the Merchant
Bank must be left blank in order for this feature to work properly.
Default for Acq Lead Preauth/Capture
This setting is used if you allow your calling center to process preauth transactions at the time of the sale. In order for OrangeCRM to process a capture against the original preauth, the preauth must be tied to a Fee Schedule. If you select Enable in this field, you will be designating this Fee Schedule as the default Fee Schedule for lead capture processing.
Set Customer Last Process Date To
Determines which date will be used to set the Last Process Date on the customer record.
 The Last Process Date is used to calculate when
the customer is billed again. Changing this setting will change the number
of days between billing cycles.
Issue Duplicate InQueue Transaction
Sets whether or not to allow duplicate InQueue Transactions.
 Allowing this option makes it possible to double
bill a customer.
Actions Menu
The Fee Schedule Actions menu includes options to Mark Active, Mark Inactive and Add New Bank Assignment.
