

Events
In this Topic: Hide
 Click one of the links listed above
to jump to a section on this page.
Events are used to manage and track CSR actions such as refunds, salvages, cancellations, fulfillment re-ships, revenue shares, chargebacks, QA performance and more. This allows each action to be traced back to the agent who performed it.
The OrangeEvent module enables the CRM administrator to regulate customer service activity by dictating which actions are allowed and when they can be performed. A customized set of pre-defined actions or “Events” will be presented as available options to users, based on the conditional rules established. Since each Event is pre-defined with its own unique set of rules, it will always reflect the true actions of your CSRs, guaranteeing accurate and reliable data! OrangeEvent is an effective management tool that puts you in control of customer care tasks, while providing a reliable way of recording and accurately reporting on such activity.
Customer Event
A Customer Event is an action or event performed by a CSR on a customer record or a transaction record.
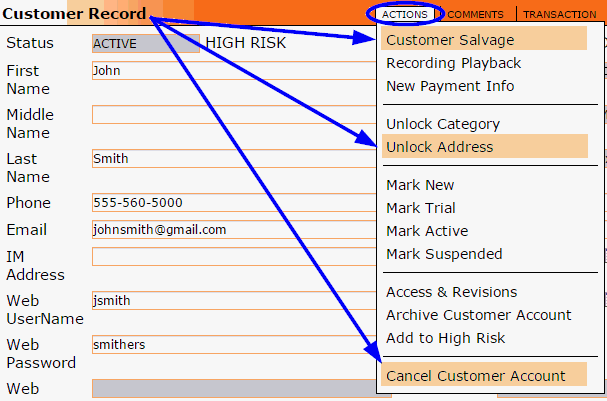
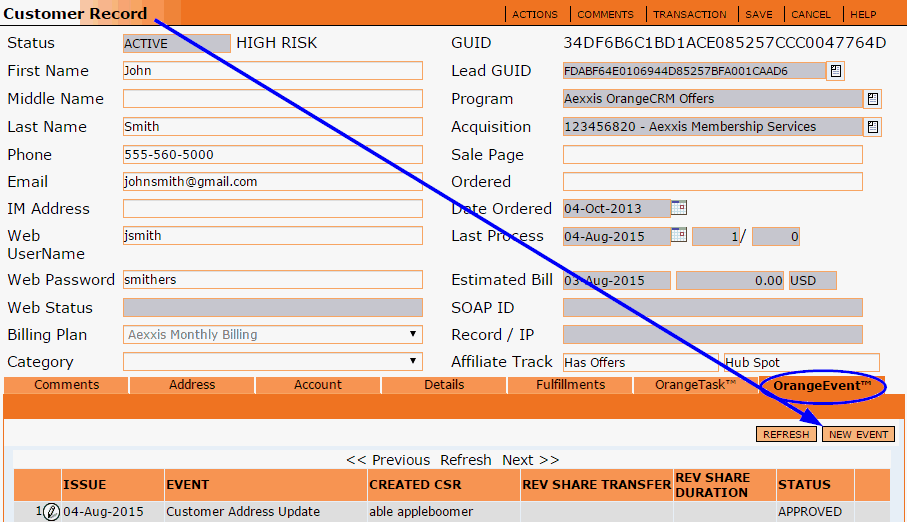
CSRs can perform a Customer Event from the Actions menu on a customer record, from the OrangeEvent tab on a customer record or from the Actions menu on a transaction record. An example of each is shown below. For detailed instructions on each of these options, please see the section How to Perform a Customer Event on this page.
Actions menu on a customer record
OrangeEvent tab on a customer record
Actions menu on a transaction record

Master Event
A Master Event is where the predefined rules for a Customer Event are configured by the CRM administrator. An example is shown below.
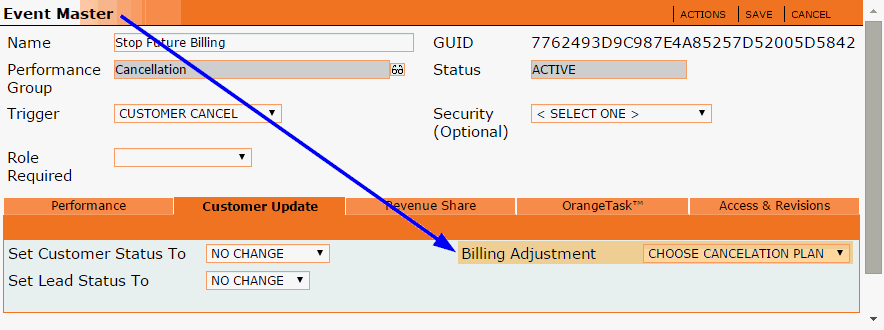
OrangeCRM comes with a pre-installed set of default Master Events, which can be reconfigured or marked as Inactive according to your needs. For detailed instructions, please see the sections How to Configure a Master Event and How to Deactivate an Active Master Event on this page.
 CSRs
never have access to Master Event records. Administrator permissions are
required to view and edit Master Events.
If you will be configuring any of your Master Events to use Revenue Share, you must first create a list of Revenue Share IDs. A Revenue Share ID identifies a person or company you will be paying revenue shares to. Revenue Share IDs and ACL Users are two different types of records that are managed separately. If you will not be using Revenue Share, you may skip this step and proceed with the following section on this page titled How To Configure a Master Event.
There are two ways to create a new Revenue Share ID, from an ACL User record or from the Events module. Both options are covered below.
Creating a New Revenue Share ID From an ACL User Record
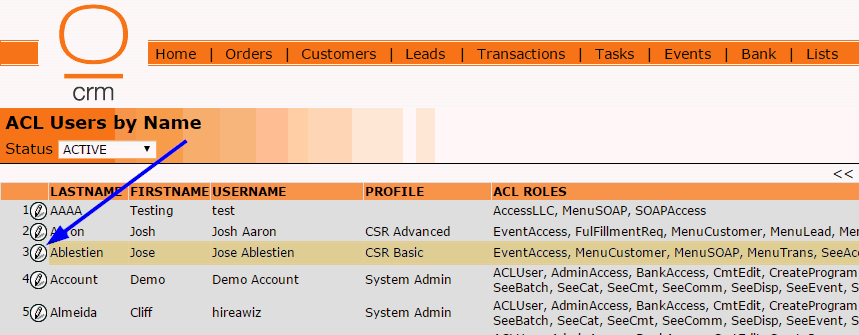
To create a new Revenue Share ID from an ACL User record, hover over the Home menu and click on User Security.
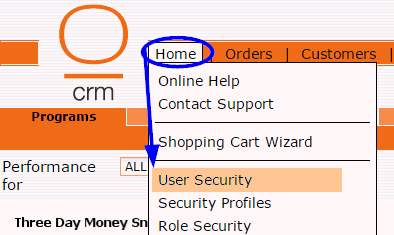
A listing of all active ACL Users By Name will be displayed. Click on the pencil icon beside the ACL User record you want to create a Revenue Share ID for.
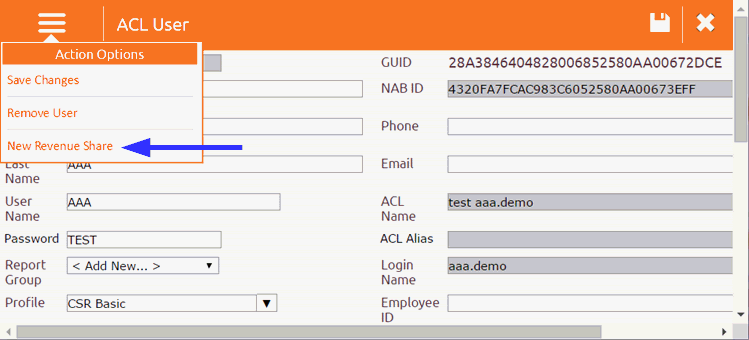
The ACL User record will open. Go to the Actions menu and click on New Revenue Share.
A new Revenue Share record will open.

Name
The Name field will be auto-populated with the name from the ACL User record.
Security (Optional)
If you wish to restrict this person's revenue shares to one particular program, you may use the Security drop down list to do so. Otherwise, leave this field blank.
Click the Save button in the upper right corner to save this new Revenue Share ID.

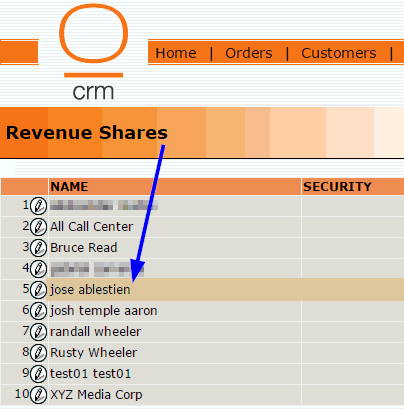
To double check that the new Revenue Share ID was successfully created, hover over the Events menu and click on Revenue Shares.

A listing of all existing Revenue Share IDs will be displayed. Check this list to make sure you see the name of the ACL User you just created a Revenue Share ID for.
Creating a New Revenue Share ID From the Events Module
To create a new Revenue Share ID from the Events module, hover over the Events menu and click on Revenue Shares.

A listing of all existing Revenue Share IDs will be displayed. Click on the New Revenue Share button in the upper right corner.

A new Revenue Share record will open.

Name
Enter the name of the person or company for this Revenue Share ID.
Security (Optional)
If you wish to restrict this person's revenue shares to one particular program, you may use the Security drop down list to do so. Otherwise, leave this field blank.
Click the Save button in the upper right corner to save this new Revenue Share ID.

To double check that the new Revenue Share ID was successfully created, refresh the Revenue Shares list by clicking on the Refresh button located in the top center of the page.

You should see the new Revenue Share ID in this list.
 You
must have administrator permissions to edit a Master Event.
Existing Master Events can always be reconfigured at any time or you may choose to create a new Master Event.
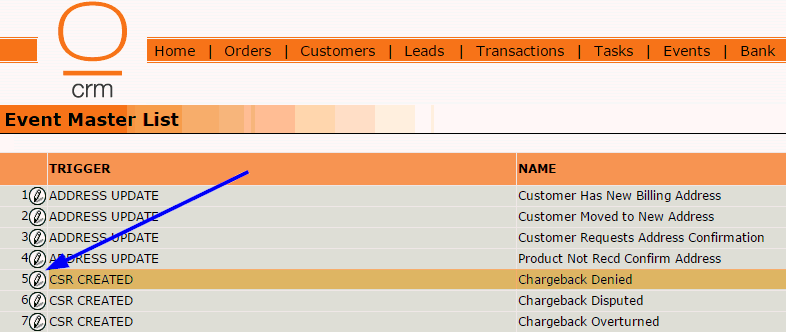
To configure a Master Event, hover over the Events menu and click on Events Master List.

To change the settings on an existing Master Event, click on the pencil icon beside the Master Event you wish to reconfigure.
To create a new Master Event, click on the New Event button in the upper right corner.

The Event Master window will open. This is where you will configure the settings for this Master Event.

Name
This is an important field. It is used to identify the Master Event and will be referenced in other places throughout the CRM, including reports. Therefore, make sure you choose a name that is descriptive and that clearly identifies the purpose of the Event. Event names can always be changed in the future, if need be.
Performance Group
Select the desired Performance Group, which is the category under which this event will be displayed in reporting.
 Although
OrangeCRM comes with a pre-installed set of default Performance Groups,
you can also create your own custom Performance Groups as needed. For
instructions, see the topic Performance
Groups.
Trigger
Use the drop down list to select one of the following triggers for this event:
Address Update
Triggers a Customer Event when a CSR goes to the Actions menu on a customer record and clicks on Unlock Address. This will track every instance a customer address is viewed or updated. To track the reasons for address unlocks, you can create multiple Master Events with the Address Update trigger, each with a different name that represents each of your most common reasons for address updates.
CSR Created
Triggers a Customer Event when a CSR goes to the OrangeEvent tab on a customer record and clicks on the New Event button. This can be used to record and track any additional miscellaneous events that are not being tracked under the Customer Salvage trigger. Common examples include customer service dispositions that need to be reported on and special QA, chargeback or revenue share related actions performed by advanced CSRs or managers.
Customer Cancel
Triggers a Customer Event when a CSR goes to the Actions menu on a customer record and clicks on Cancel Customer Account. This will track every customer cancellation. To track the reasons for customer cancellations, you can create multiple Master Events with the Customer Cancel trigger, each with a different name that represents each of your most common cancellation reasons.
Customer Salvage
Triggers a Customer Event when a CSR goes to the Actions menu on a customer record and clicks on Customer Salvage. This is used to track common actions performed by basic CSRs to retain customers, such as billing deferments, package/product upgrades, price plan changes, etc. You can create multiple Master Events with the Customer Salvage trigger to accommodate each of the customer salvage actions your basic CSRs will be performing on a frequent basis.
Decline Salvage
Triggers a Customer Event when a CSR goes to the Actions menu on a transaction record and clicks on Immediate Decline Salvage. This will track every instance a previously declined transaction is resubmitted to the bank in real time. To track the reasons for decline salvages, you can create multiple Master Events with the Decline Salvage trigger, each with a different name that represents each of your most common decline salvage reasons.
Fulfillment Resend
Triggers a Customer Event when a CSR goes to the Fulfillments tab on a customer record, opens a fulfillment record and clicks Resend Fulfillment from the fulfillment Actions menu. This will track every fulfillment reship request. To track the reasons for resent fulfillments, you can create multiple Master Events with the Fulfillment Resend trigger, each with a different name that represents each of your most common reasons for resent fulfillments.
Refund Issued
Triggers a Customer Event when a CSR goes to the Actions menu on a transaction record and clicks on Refund Transaction. This will track every refund that is issued. To track the reasons for refunds, you can create multiple Master Events with the Refund Issued trigger, each with a different name that represents each of your most common refund reasons.
Role Required
If you want to allow any user to perform this event, leave the Role Required field blank. If you wish to restrict who has access to perform this event, use the drop down list to select the User Security Role that will be required to perform this event. Users who do not have the selected Required Role will not be presented with this event as an available option.
Security (Optional)
If you want to allow this event to be performed on a customer in any Program, leave the Security field blank. If you wish to restrict the Program this event can be performed in, use the drop down list to select the Program that this event will be restricted to.
Performance Tab
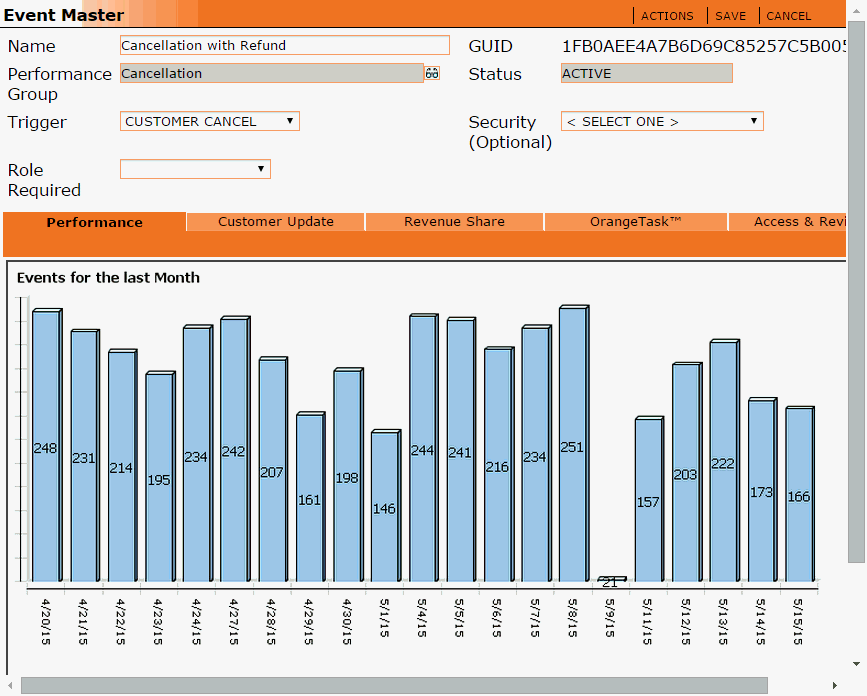
The Performance Tab contains a bar graph displaying a daily total of the number of times this Event has been performed in the last month.
Customer Update Tab
Use the drop down menus in the Customer Update Tab to select any updates you want the system to make to the customer record when this Event is performed by a CSR.

Set Customer Status To
Select what you want the customer status to be changed to. If you do not want this Event to change the customer status, leave this field set to No Change.
Set Lead Status To
Select what you want the lead status to be changed to. If you do not want this Event to change the lead status, leave this field set to No Change.
Billing Adjustment
If you want this Event to adjust customer billing, select one of the following types of billing adjustments:
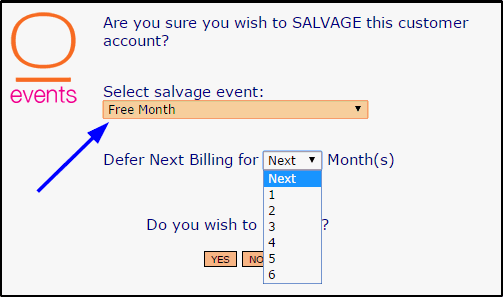
Free Month - Allows CSRs to defer the next billing for 1 to 6 months. Pictured below is the option CSRs will be presented with when this Event is performed from the Customer Salvage option in the Actions menu of a customer record.
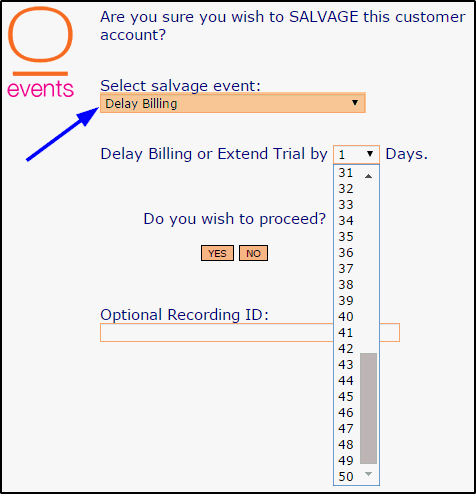
Delay Billing - Allows CSRs to delay billing or extend a trial for 1 to 50 days. Pictured below is the option CSRs will be presented with when this Event is performed from the Customer Salvage option in the Actions menu of a customer record.
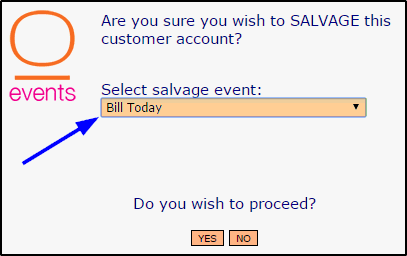
Bill Today - Sets the next billing to today's date. Pictured below is the option CSRs will be presented with when this Event is performed from the Customer Salvage option in the Actions menu of a customer record.
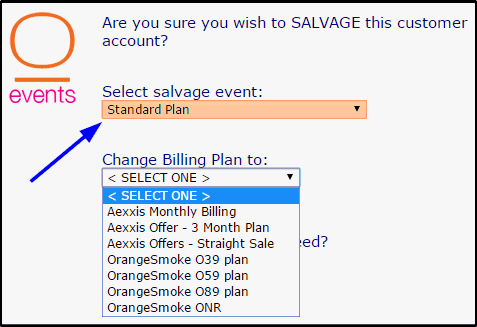
Choose Standard Plan - CSRs will be able to choose from a list of bill plans that have been categorized as Standard Type (for info on bill plan types, see the topic Billing Plans). Standard bill plans relate to your main offers/packages. Pictured below is an example of the option CSRs will be presented with when this Event is performed from the Customer Salvage option in the Actions menu of a customer record.
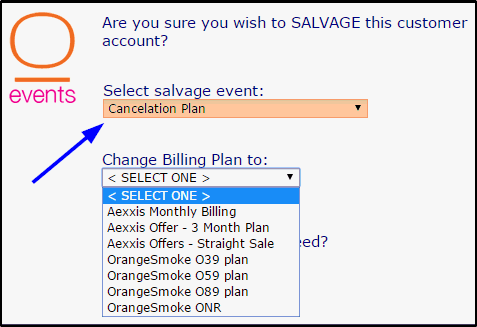
Choose Cancelation Plan - CSRs will be able to choose from a list of bill plans that have been categorized as Cancelation Type (for info on bill plan types, see the topic Billing Plans). Cancelation bill plans are used to cancel a customer account. Pictured below is an example of the option CSRs will be presented with when this Event is performed from the Customer Salvage option in the Actions menu of a customer record.
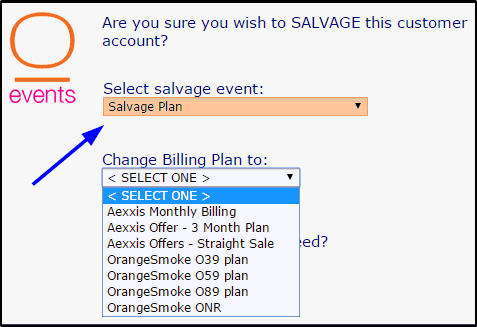
Choose Salvage Plan - CSRs will be able to choose from a list of bill plans that have been categorized as Salvage Type (for info on bill plan types, see the topic Billing Plans). Salvage bill plans are used to retain customers by switching them to a lower price plan or an upgraded package/product. Pictured below is an example of the option CSRs will be presented with when this Event is performed from the Customer Salvage option in the Actions menu of a customer record.
Revenue Share Tab
In the Revenue Share tab, use the drop down menus to select the desired settings. If you do not want to use revenue share with this event, leave the settings disabled.

Revenue Share Transfer
If you want to allow a revenue share to be transferred from one user to another by means of this Event, use the drop down list to select one of the following options:
Require SignOff
If you want to require that this Event be reviewed after each time it has been performed, use the drop down list to select Enable. Otherwise, leave it set to Disable.
Revenue Share Extend
If you want to allow a revenue share duration to be extended by means of this Event, use the drop down list to select one of the following options:
Revenue Share Extend By
If you want to allow a revenue share duration to be extended by means of this Event, enter the number of days/months it will be extended by. Use the drop down menu to toggle between days and months.
OrangeTask Tab
In the OrangeTask Tab, use the drop down menu to enable the Generate Ticket feature if you wish to automatically generate a ticket in OrangeTask when this event is triggered. This is a good feature to use when you want a certain action/event to be reviewed by a manager or quality control on a daily basis.
Select the desired Ticket Queue, and enter a Ticket Subject and a Ticket Message.

Once you are done configuring the Master Event, click the Save button to make your settings go into effect.

 You
must have administrator permissions to edit a Master Event.
OrangeCRM comes with a pre-installed set of default Master Events. Any Master Event that you do not wish to use can be marked as Inactive, which will remove it from the available options presented to CSRs and from the Event Master List. Inactive Master Events are not deleted from the CRM. They will always be there if you ever wish to reactivate them in the future (see the section How to Reactivate an Inactive Master Event).
To deactivate a Master Event, hover over the Events menu and click on Events Master List.

A listing of all Active Master Events will be displayed. Click on the pencil icon beside the Master Event you want to deactivate.

The Event Master record will open. Go to the Actions menu in the Event Master record and click on Mark Inactive.

You should now see that the Event Master Status has changed to Inactive.

Click the Save button to apply your changes.

Master Events in Inactive status will not be presented as available options to CSRs and will not appear in the Event Master List. To reactivate an Inactive Master Event, please see the section How to Reactivate an Inactive Master Event on this page.
 You
must have administrator permissions to edit a Master Event.
Inactive Master Events can be reactivated any time you wish to add them back into the set of available options presented to CSRs.
To reactivate an Inactive Master Event, hover over the Events menu and click on Events Master List.

To view the Inactive Master Events, click on the Inactive Toggle button in the upper right corner.

The Inactive Master Events will be displayed at the bottom of the Event Master List.
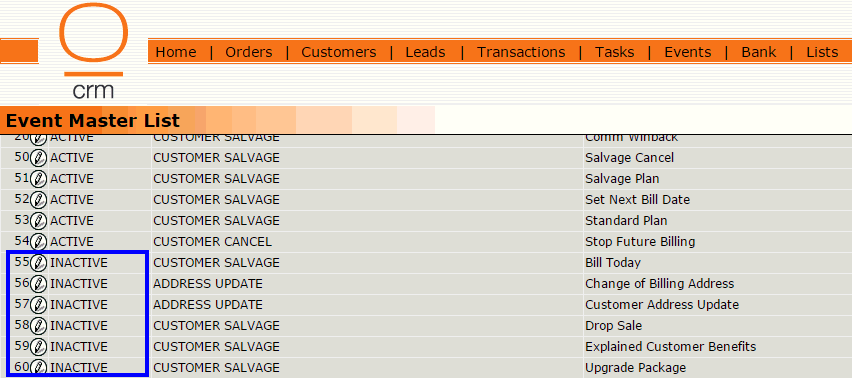
Click on the pencil icon beside the Master Event you want to reactivate.
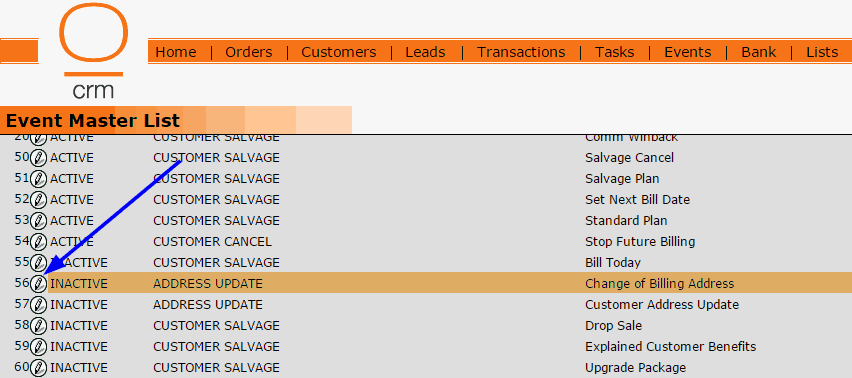
The Event Master record will open. Go to the Actions menu in the Event Master record and click on Mark Active.

You should now see that the Event Master Status has changed to Active.

Click the Save button to apply your changes.

A Customer Event can be performed in one of the following three main ways:
This section will provide instructions on how a Customer Event can be performed in each of the three main ways listed above.
1. Performing a Customer Event from the Actions Menu on a Customer Record
The following options in the Actions Menu of a customer record will trigger a Customer Event:
Customer Salvage
Unlock Address
Cancel Customer Account

These actions are the most common types of Customer Events performed by basic CSRs. Each of these actions are covered below.
Customer Salvage
Customer Salvage events are used for common actions performed by basic CSRs, such as adjusting a customer's next bill date or changing a customer's billing plan.
To perform a Customer Salvage event, click on Customer Salvage in the customer record Actions menu.
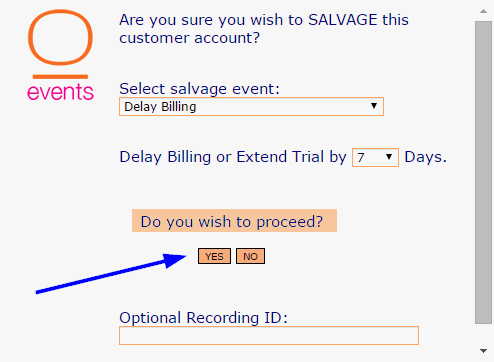
A pop up box will prompt you to select which salvage event you want to perform on this customer.
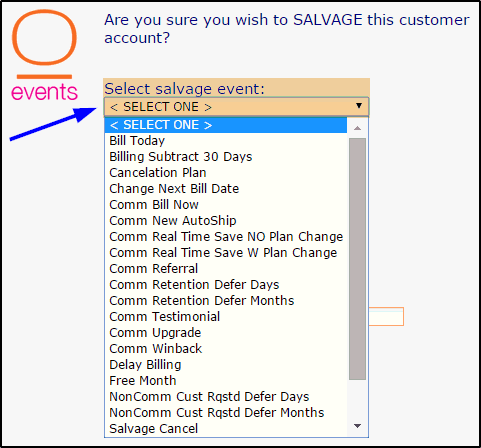
 Your
CRM administrator is the one who determines which events will be made
available to you in the Customer Salvage drop down list. If you do not
see an option in the list that matches the event you need to perform,
please contact your system admin to have the event added to the Customer
Salvage Event list.
If you have selected an event that allows you to make a billing adjustment, you may be prompted to choose how many days or months to defer the next billing or choose which Billing Plan you want to change the customer to. See the examples shown below.
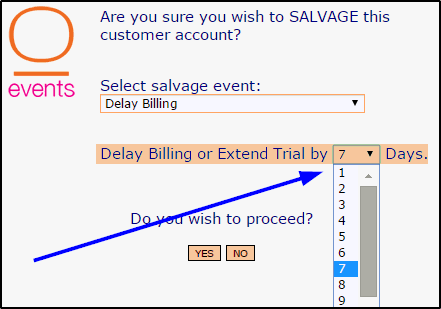
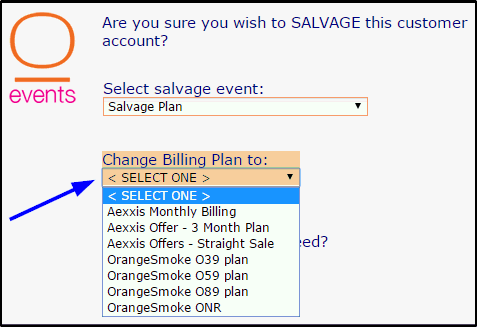
The Optional Recording ID field is typically left blank. However, your company may require you to enter the audio recording ID, your user ID or some other value in this field. Please follow your company's protocol in this regard.
Once you have finished making your selections, click Yes to proceed.
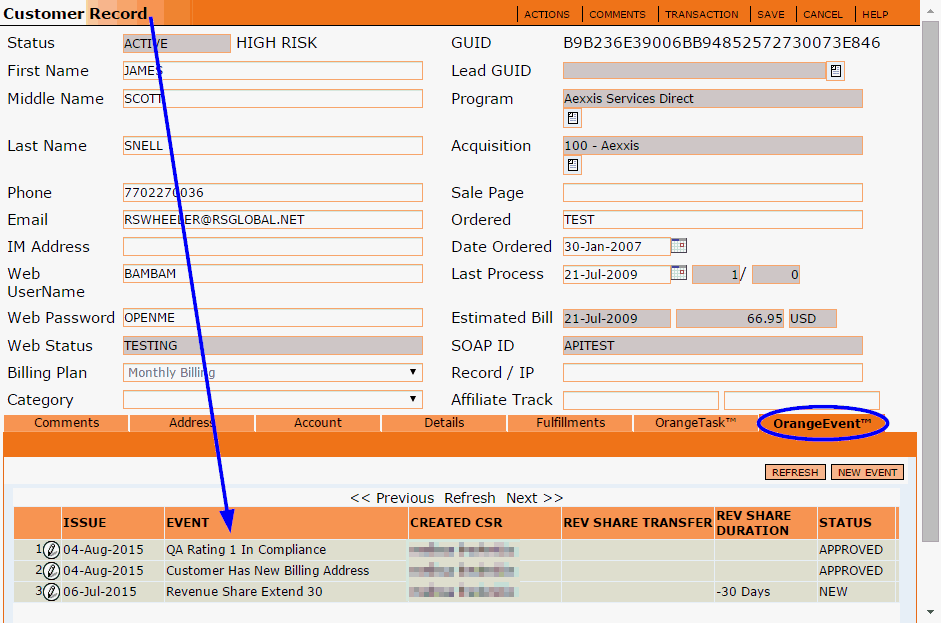
You should now see your new Customer Salvage Event listed in the OrangeEvent tab of the customer record.
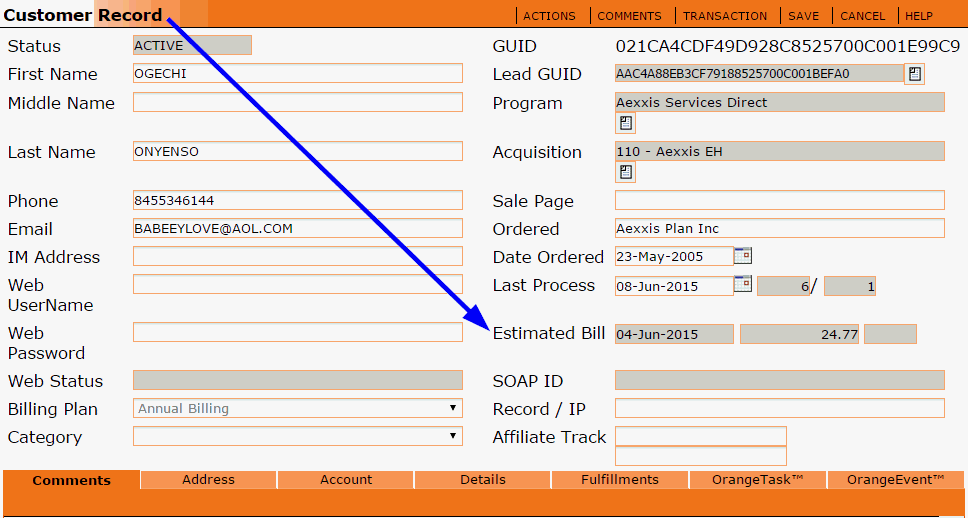
If the Customer Salvage Event you performed involved a billing time adjustment, the Estimated Bill field will automatically recalculate the next billing date, allowing CSRs to immediately see the updated Estimated Bill Date and provide customers with the most up to date information.
Unlock Address
The Unlock Address event is used to view and/or update a customer's billing or shipping address in the Account tab of a customer record.
To perform an Unlock Address event, click on Unlock Address in the customer record Actions menu.
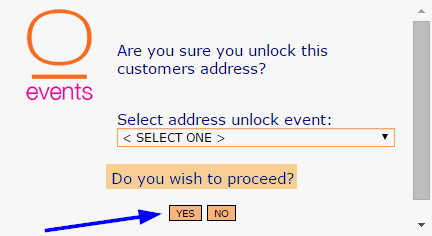
A pop up box will prompt you to select which address unlock event you want to perform on this customer.
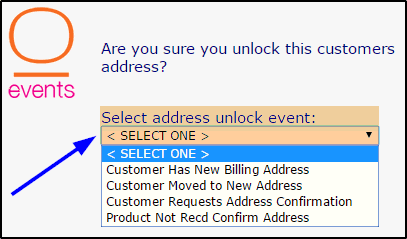
Once you have made your selection, click Yes to proceed.
Now you may go to the Address tab on the customer record to view and/or update the customer's shipping or billing address.
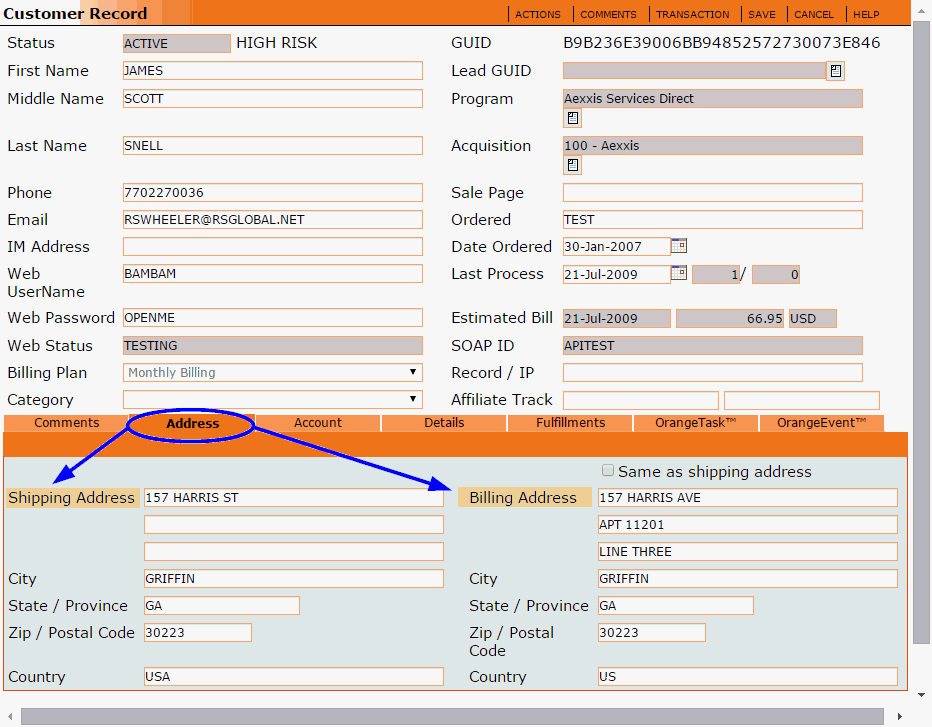
When you are done updating the address, click on the Save button in the customer record.
You should now see your new Address Unlock Event listed in the OrangeEvent tab of the customer record.

Cancel Customer Account
The Cancel Customer Account event is used to stop all future billings and fulfillments.
To perform a Cancel Customer Account event, click on Cancel Customer Account in the customer record Actions menu.
A pop up box will prompt you to select which cancellation event you want to perform on this customer.
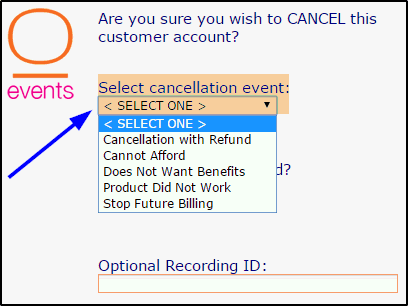
The Optional Recording ID field is typically left blank. However, your company may require you to enter the audio recording ID, your user ID or some other value in this field. Please follow your company's protocol in this regard.
Once you have made your selection, click Yes to proceed.
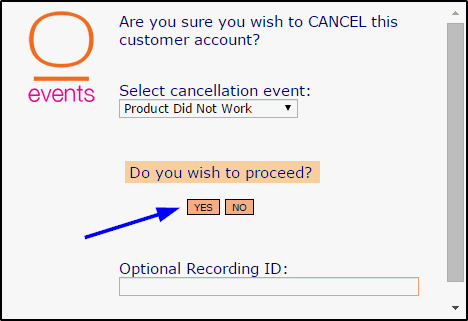
You should see that the customer Status has changed to CSR Canceled and your new cancellation event should be listed in the OrangeEvent tab of the customer record.
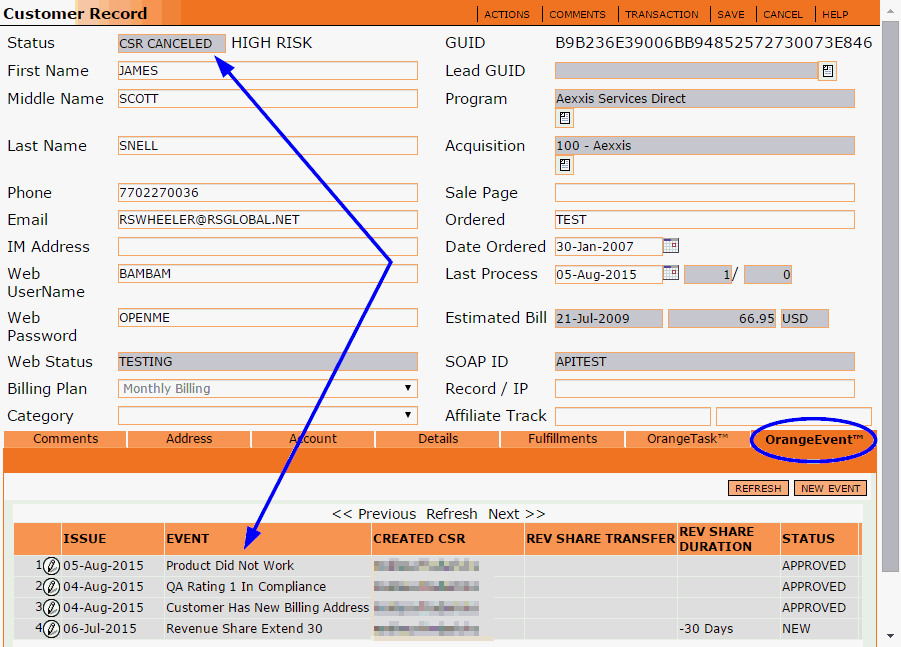
2. Performing a Customer Event from the OrangeEvent Tab on a Customer Record
Customer Events are less commonly performed from the OrangeEvent tab on a customer record. These events are typically used for special actions performed by advanced CSRs or managers, such as quality control or chargeback related events, which are not listed in the Customer Salvage event list.
To perform a Customer Event from the OrangeEvent tab of a customer record, click on the New Event button in the upper right corner.
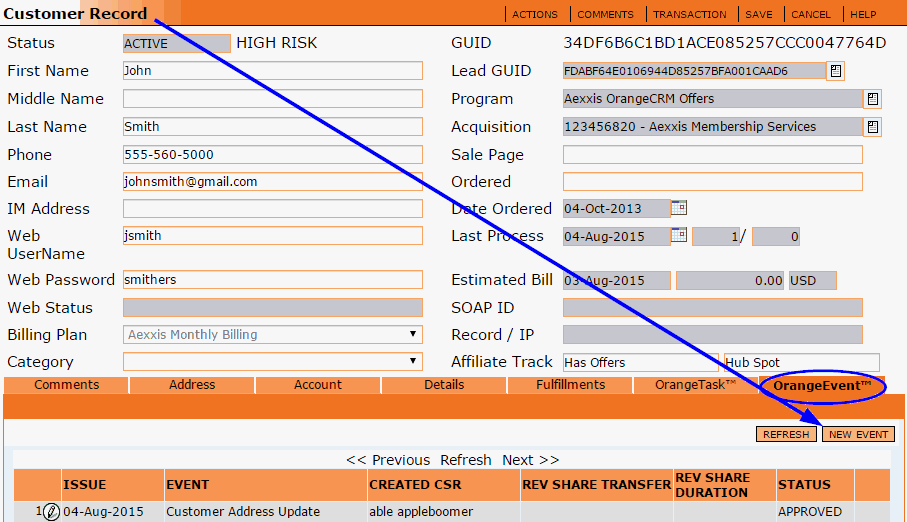
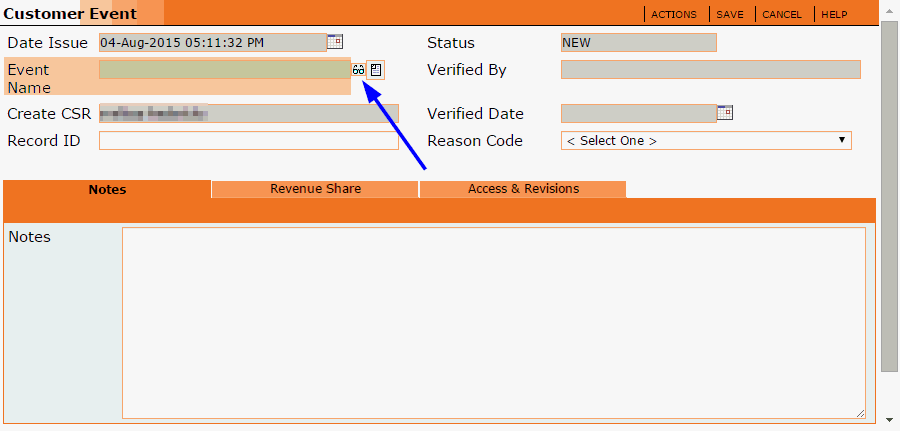
A blank Customer Event form will open.
Click on the eyeglasses icon beside the Event Name field to select the Customer Event you want to perform.
A list of available Events will be displayed.
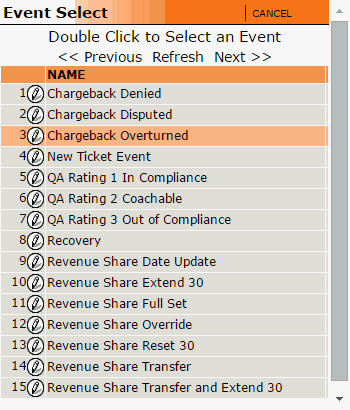
Double click on the Event you wish to select.
You should now see the selected event populated in the Event Name field.
If your company requires it, fill in the Record ID field with the audio recording ID, your user ID or any other value determined by your CRM administrator.
If your company requires it, select the appropriate Reason Code for this event.
In the Notes tab you may enter any details that need to be recorded about this particular event.
When you are done with the Customer Event, click the Save button.
You should now see your new Customer Event listed in the OrangeEvent tab of the customer record.

3. Performing a Customer Event from the Actions Menu on a Transaction Record
There are two options in the Actions Menu of a transaction record that will trigger a Customer Event: Immediate Decline Salvage and Refund Transaction. Both of these options are covered below.

Immediate Decline Salvage
The Immediate Decline Salvage event is used to send a previously declined transaction back to the bank for another processing attempt in real time.
To perform an Immediate Decline Salvage event, go to the transaction Actions menu and click on Immediate Decline Salvage.
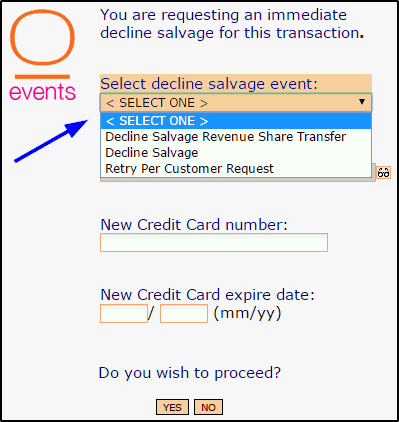
A pop up box will prompt you to select which decline salvage event you want to perform on this transaction.
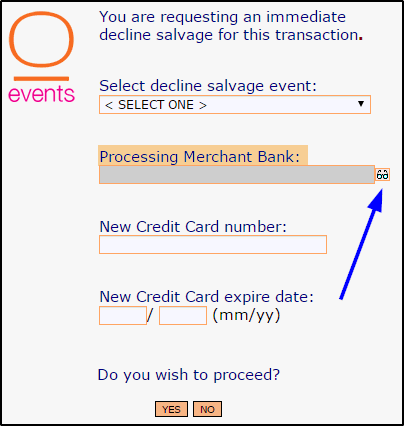
The Processing Merchant Bank field is typically left blank. It is only used in cases where you need to process the previously declined transaction through a different Merchant Bank than was used before. To select a Merchant Bank, click on the eyeglasses icon beside the Processing Merchant Bank field.
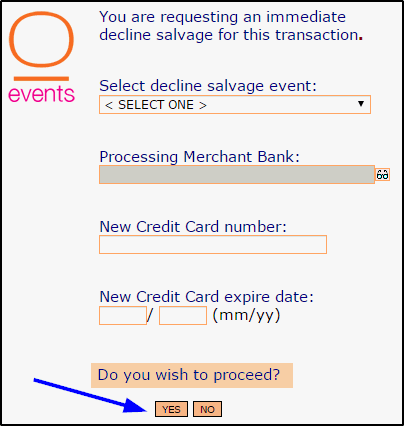
The New Credit Card Number and New Credit Card Expire Date fields are typically left blank. They are only used in cases where the customer has requested that you process the previously declined transaction on a new credit card.
 New
credit card details entered in the Immediate Decline Salvage pop up box
will only apply to this individual transaction. If the customer wants
the new credit card to be used on all future transactions, you must also
update the payment info on the customer record by clicking on New Payment
Info in the Actions menu of the customer record.
When you are done making your selections, click Yes to proceed with sending the previously declined transaction to the bank for another processing attempt in real time.
Refund Transaction
The Refund Transaction event is used to issue a refund on a capture or purchase transaction that is in Approved status.
To perform the Refund Transaction event, go to the transaction Actions menu and click on Refund Transaction.
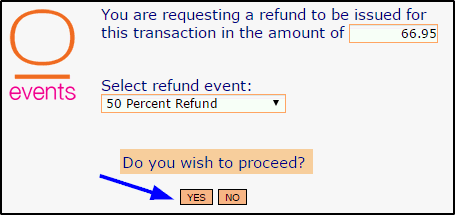
A pop up box will prompt you to enter the dollar amount to be refunded and select the refund event you want to perform on this transaction.
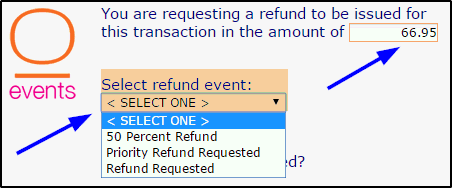
Once you have made your selection, click Yes to proceed with issuing a refund on this transaction.
You should now see a new Refund transaction in On Hold status in the Transactions For Customer list.

 You
must have administrator permissions to approve/decline Customer Events.
Most Customer Events are auto-approved by the CRM upon creation. Only Customer Events that have Require Sign-off enabled on the Event Master record can be approved or declined.
The approve/decline feature is a way to review a historical record of actions that have already taken place. Declining a Customer Event will not prevent or undo its actions.
To approve or decline a Customer Event, hover over the Events menu and click on Events For Approval.

A listing of Events For Approval will be displayed, as shown below.
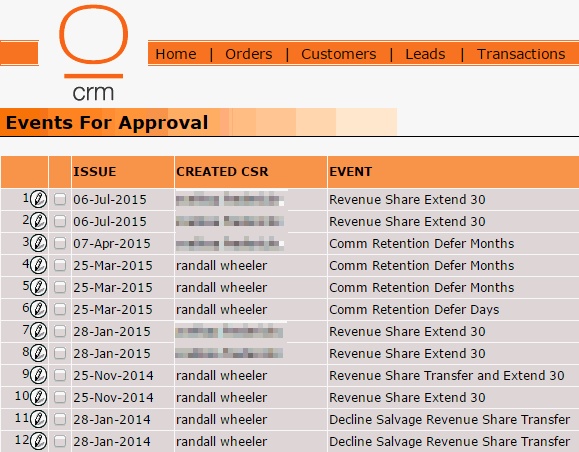
You can approve/decline each Event individually or you may select multiple Events to be approved or declined simultaneously. Both options are covered below.
Approve/Decline Events Individually
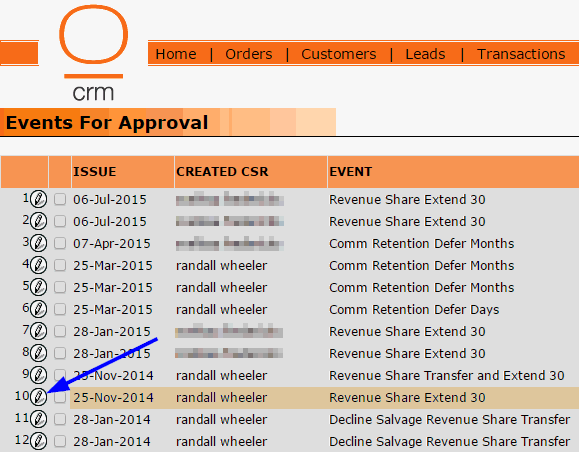
To approve or decline each Event individually, click on the pencil icon beside the Customer Event you wish to review.
The Customer Event record will open. This is where you can review all of the details of the Customer Event that was performed.
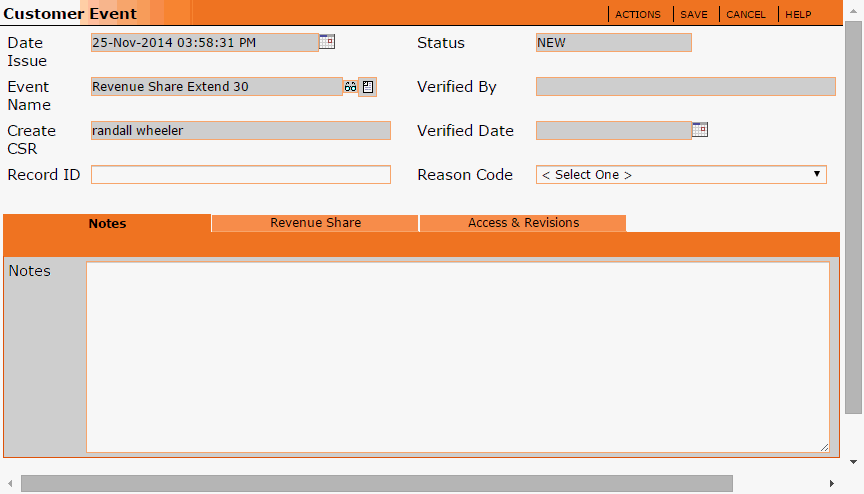
Date Issue
This is the date and time the Customer Event was created.
Event Name
The name of the Event performed.
Create CSR
The name of the user who performed the Event.
Record ID
The value entered into the Record ID field (if any) when the Event was performed. It is common for this field to be left blank.
Status
The current status of the Event. Events waiting for approval will remain in New status until they are either approved or declined.
Verified By
When an Event is manually approved or declined, the Verified By field auto-populates with the name of the user who approved or declined the Event. If the Event was auto-approved by the CRM, the Verified By field will say Auto Approved.
Verified Date
The date the Event was either approved or declined.
Reason Code
Use the Reason Code drop down list to select the reason why the Event is being approved or declined.
Notes
Use the Notes field to record any miscellaneous details about your review of this Event.
Revenue Share Tab
The Revenue Share tab displays the details of the Revenue Share actions that were performed by means of this Event.
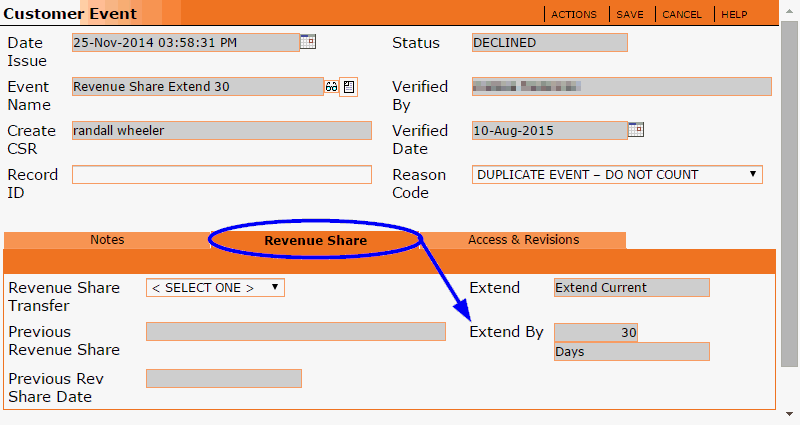
If the Event represents a Revenue Share Transfer, the Revenue Share Transfer field will display the name of the new user that the revenue share was transferred to, the Previous Revenue Share field will display the name of the user that the revenue share belonged to before the transfer and the Previous Rev Share Date will display the date the revenue share was assigned to the previous user.
If the Event represents a Revenue Share Extension, the Extend field will display a description of the type of extension performed on the revenue share (for an explanation of the types of revenue share extensions, please see the section on this page titled How To Configure a Master Event). The Extend By field will display the duration of the revenue share extension.
To view more details related to this Customer Event, go to the Actions menu and click on System Data.

The System Data will be displayed in the bottom portion of the Customer Event record, as pictured below.
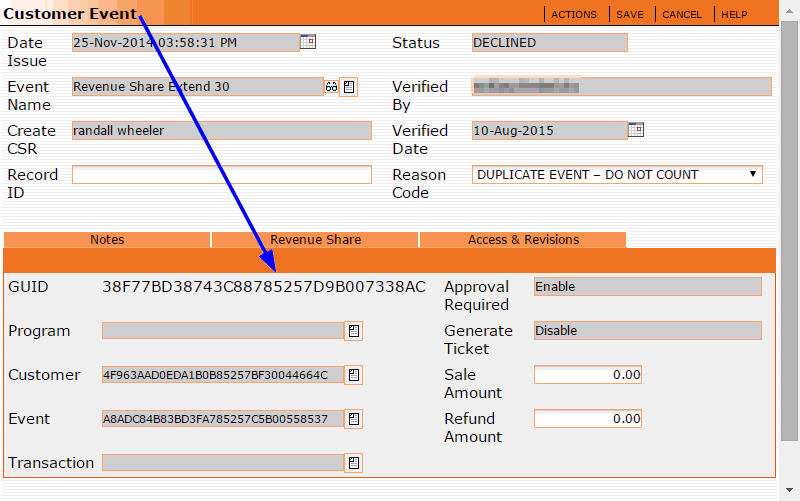
GUID
The unique 32 digit ID number for this Customer Event.
Program
The Program this Customer Event was performed in.
Event
The GUID number of the Master Event record tied to this Customer Event.
Transaction
The GUID number of the transaction that was created with this Customer Event, if any.
Approval Required
Shows whether or not the Require SignOff feature was enabled on the Master Event Record tied to this Customer Event.
Generate Ticket
Shows whether or not the Generate Ticket feature was enabled on the Master Event Record tied to this Customer Event.
Sale Amount
If a sale transaction was created by means of this Customer Event, the Sale Amount field will show the dollar amount of the sale transaction.
Refund Amount
If a refund transaction was created by means of this Customer Event, the Refund Amount field will show the dollar amount of the refund transaction.
To approve or decline the Customer Event, go to the Actions menu and click on the appropriate option.

Then click the Save button.

Approve/Decline Multiple Events Simultaneously
To approve or decline multiple Events simultaneously, click in the check box next to each Event you want to either or approve or decline.
Then click either the Approve button or the Decline button in the upper right corner to approve/decline the selected events simultaneously.

The Events For Approval list will auto-refresh and the approved/declined Events will no longer appear in the list. The status of the approved/declined Customer Events will have changed from New to Approved or Declined.
Customer Events are historical records of actions that have already taken place. Customer Event records are stored within the customer record. Once a Customer Event record has been created, it can not be deleted. Customer Events are permanent records that reflect the past actions performed on a customer record.
To view Customer Event records, open a customer record and go to the OrangeEvent tab.
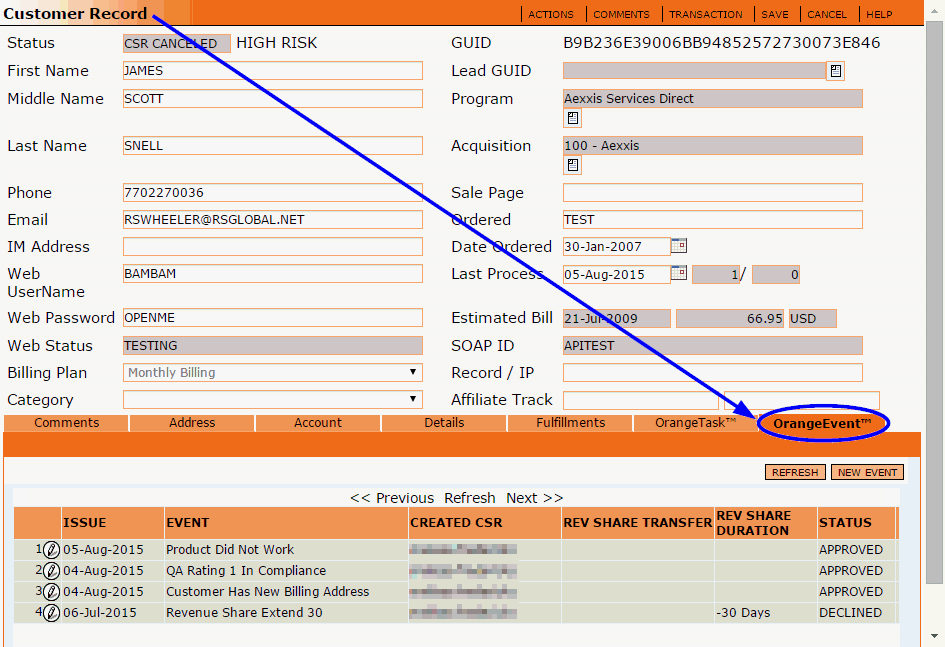
The OrangeEvent tab displays a list of all Events performed on this customer. To view the details of a particular Event, click on the pencil icon to open the Customer Event record.
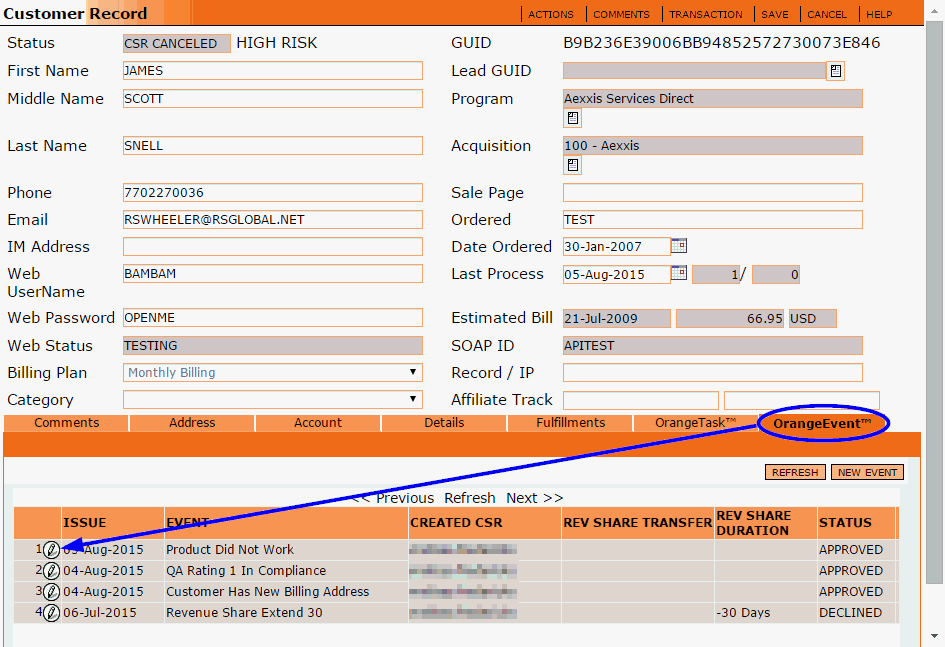
The Customer Event record will open. This is where you can view all of the details of the Customer Event that was performed.

Date Issue
This is the date and time the Customer Event was created.
Event Name
The name of the Event performed.
Create CSR
The name of the user who performed the Event.
Record ID
The value entered into the Record ID field (if any) when the Event was performed. It is common for this field to be left blank.
Status
The current status of the Event. Possible Customer Event Statuses include:
New - The Customer Event is waiting for approval from the CRM administrator or other authorized personnel. Most Customer Events are auto-approved by the CRM upon creation. The Only Customer Events that are not auto-approved are those that allow revenue share and have Require Sign-off enabled on the Master Event record.
Approved - The Customer Event was approved.
Declined - The Customer Event was declined.
Verified By
The name of the user who approved/declined the Event. If the Event was auto-approved by the CRM, the Verified By field will say Auto Approved.
Verified Date
The date the Event was either approved or declined.
Reason Code
The Reason Code that was selected when the Event was approved or declined.
Notes
Any miscellaneous details that were recorded about the Event.
Revenue Share Tab
The Revenue Share tab displays the details of the Revenue Share actions that were performed by means of this Event.

If the Event represents a Revenue Share Transfer, the Revenue Share Transfer field will display the name of the new user that the revenue share was transferred to, the Previous Revenue Share field will display the name of the user that the revenue share belonged to before the transfer and the Previous Rev Share Date will display the date the revenue share was assigned to the previous user.
If the Event represents a Revenue Share Extension, the Extend field will display a description of the type of extension performed on the revenue share (for an explanation of the types of revenue share extensions, please see the section on this page titled How To Configure a Master Event). The Extend By field will display the duration of the revenue share extension.
To view more details related to this Customer Event, go to the Actions menu and click on System Data.

The System Data will be displayed in the bottom portion of the Customer Event record, as pictured below.

GUID
The unique 32 digit ID number for this Customer Event.
Program
The Program this Customer Event was performed in.
Event
The GUID number of the Master Event record tied to this Customer Event.
Transaction
The GUID number of the transaction that was created with this Customer Event, if any.
Approval Required
Shows whether or not the Require SignOff feature was enabled on the Master Event Record tied to this Customer Event.
Generate Ticket
Shows whether or not the Generate Ticket feature was enabled on the Master Event Record tied to this Customer Event.
Sale Amount
If a sale transaction was created by means of this Customer Event, the Sale Amount field will show the dollar amount of the sale transaction.
Refund Amount
If a refund transaction was created by means of this Customer Event, the Refund Amount field will show the dollar amount of the refund transaction.
Customer Event records can also be searched for with the Quick Find feature. Simply select Events from the Quick Find drop down list and enter the value you are looking for in the search box.

For more details on how to search for Customer Event records, please see the topic titled Searching in OrangeCRM.
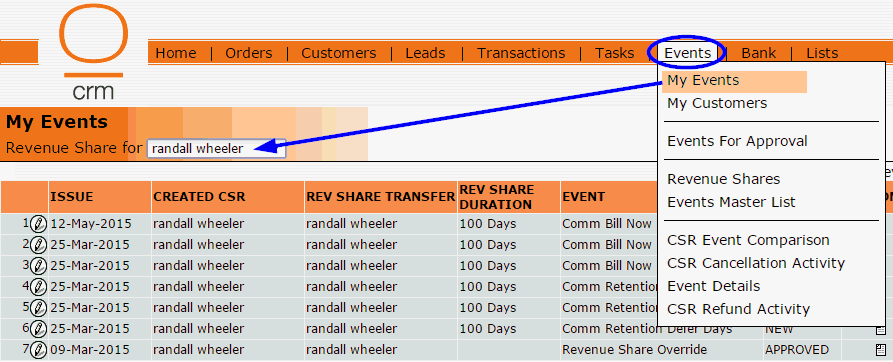
CSRs may view the Revenue Shares that belong to them by hovering over the Events menu and clicking on either My Events or My Customers.

My Events
My Events will display a listing of each Event record that contains a Revenue Share that belongs to you.
My Customers
My Customers will display a listing of each Customer record that contains a Revenue Share that belongs to you.

Click on the pencil icon beside a Customer or Event record to open it and view its details.
If you do not currently have any Revenue Shares, the My Events and My Customers lists will be blank.
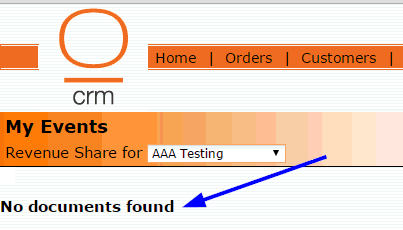
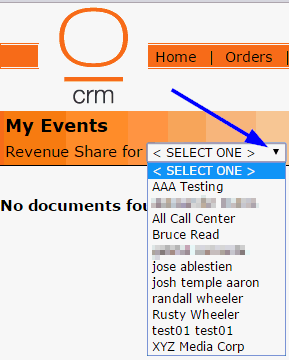
Managers who have the MgrAccess security role may use the Revenue Share selector to view Revenue Shares that belong to any user. The Revenue Share selector will be locked for CSRs and other users who do not have the MgrAccess security role. Their personal Revenue Shares will be displayed automatically without making a selection.
Each individual Master Event record contains a performance report that displays a daily count of the number of times that particular event has been performed during the last month.
 Make
sure the SQL
Event Upload batch job is scheduled to run
daily to ensure accurate reporting. For details on how to setup a batch
job, see the topic Batch
Jobs.
To view the Master Event performance report, hover over the Events menu and click on Events Master List.

Then click on the pencil icon beside the Master Event you wish to view the performance for.

When the Event Master record opens, go to the Performance tab.