Note: Depending on your access rights to OrangeCRM, some of the options and views listed below may vary. See Security and Access and Revisions.
A Merchant Bank is a gateway between your online store and the bank you ultimately deposit/withdraw into/from. These banks are used to take payments from your customers or clients by means of credit card, cash or other methods, and process them.

You may have one or many Merchant Banks. Some banks might be set up just for one or two different credit cards, others just for cash or Automatic Cash Handling, or one bank may be used for all.
From the Merchant Banks list, select New Merchant Bank.
Merchant Bank Fields
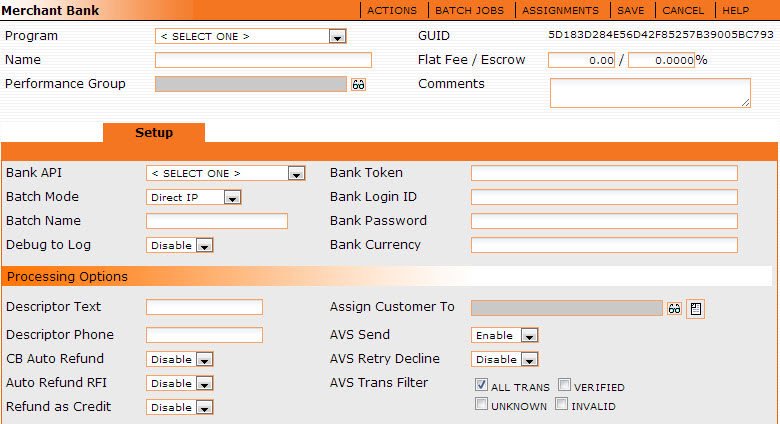
Program - Select the appropriate Program from this drop-down menu.
Name - This would be the name of the bank you are setting up.
Performance Group - Select the report group you wish this merchant bank to be in by clicking the eyeglass. When a report is based on the merchant bank report group, instead of by each merchant bank name, this merchant bank will be shown with the selected group. (See Report Grouping.)
GUID - A unique 32 digit number given to this merchant bank. It can be used for running or find detailed reports.
Flat Fee/Escrow - Enter the flat fee and/or the escrowed amount for the merchant bank here if it is the same or applies to all of the Credit cards, ACH or Cash used by this merchant bank. The escrow field is for any escrow amount your bank may set aside to cover any chargebacks (see bank's User Agreement for more information).
Comments - Enter any descriptive comments about the merchant bank.
Setup Tab
Bank API - This is a program that "talks" to your Merchant Bank or gateway. The Merchant Banks most commonly used may be found in this drop-down. If you find the bank you are attempting to add, much of the information that follows will be filled out for you. It is important to note that there are two API's that are not associated with gateways:
Cash - Takes cash transactions and auto-approves them. May also be used for customers you do not wish to bill.
Manual Process - For transactions that need special processing.
Batch Mode - File transfer will store up all payments for a set period of time, after which a spreadsheet containing all transactions for that time period will be sent to the bank via FTP. Direct IP is used to immediately sent transactions one at a time to the bank.
Batch Name - The name field for the merchant batch job.
Debug to Log - Used when testing the merchant bank setting. See the test output in the Database event log on the Home menu. Normally, it is disabled.
Bank Token - The bank token supplied to you by your merchant bank. See your bank for more details.
Bank Login ID - Login Id supplied to you by your merchant bank. These are security features specific to your bank account. See your bank for more details.
Bank Password - The bank password supplied to you by your merchant bank. These are security features specific to your bank account. See your bank for more details.
Bank Currency - This field is a currency type for gateways that support a currency identifier. The value of the Bank Currency field will be sent with the transaction.
Fields under Processing Options
Descriptor Text - This is used by some merchant banks to control what appears on the customer's credit card statement.
Descriptor Phone - This is used by some merchant banks to control what appears on the customer's credit card statement.
CB Auto Refund - Enabling this feature will perform the following: when a transaction is marked as a chargeback (either by a CSR or from a bank update procedure), merchant banks will be set to auto refund all subsequent transactions (purchase transactions dated later than the CB). In addition, the customer is canceled, the lead is updated to out-of-compliance and any chargeback fulfillments are issued.
Auto Refund RFI - When an RFI is created it automatically refunds the transaction. The disable option allows you manually correspond with the bank to research or dispute the RFI.
Refund as Credit - Issues a refund without referring to the original transaction amount. You can issue out a higher refund than the original transaction.
Assign Customer to - Routes your customer to selected bank route that is available on Bank Assignments list.
AVS Send -This is used to enable or disable the Address Verification System. If disabled, AVS information will not be sent to the bank.
AVS Retry Decline - This option is enabled if you would like to retry processing a payment if the initial payment is invalid.
AVS Trans Filter - Here you may select which AVS information you would like transmitted to the bank. Options are All Transactions, Verified, Unknown or Invalid. Only the options checked will be sent.
Codes - All codes are specific to the bank you are using. In the case of Merchant Banks for whom we already have an API set up, many of these may be automatically set for you. If not you will need to contact your bank for more details.
Gateway Response Codes
You can control which transactions OrangeCRM recognizes as Approved, Declined, Error, Retried or Chargeback by dictating how it handles each response code from your payment gateway and which transaction status is triggered.
A gateway response code is the message your payment processor sends back to the CRM for each transaction. Although the Merchant Bank form automatically populates the response codes for the selected gateway and assigns them to a default transaction status, you can choose to either keep the CRM’s default settings or customize them as needed.

Using the transaction pictured above as an example, let’s say your gateway uses response code 258 for “invalid cards” and the CRM default transaction status is Error. Well, you may wish to treat “invalid cards” as declines instead of errors. In that case you would simply go to the Gateway Response Codes section in the Merchant Bank Setup tab (see image below), remove response code 258 from the Error Codes list and insert it in the Decline Codes list. You could also add it to the list of Retry Codes if you want the CRM to automatically retry all “invalid card” transactions.

This is just one example of numerous ways in which you can customize how OrangeCRM handles transactions based on your gateway’s response codes. If you have any questions, please feel free to contact support at (770) 227-0036 Ext 1.
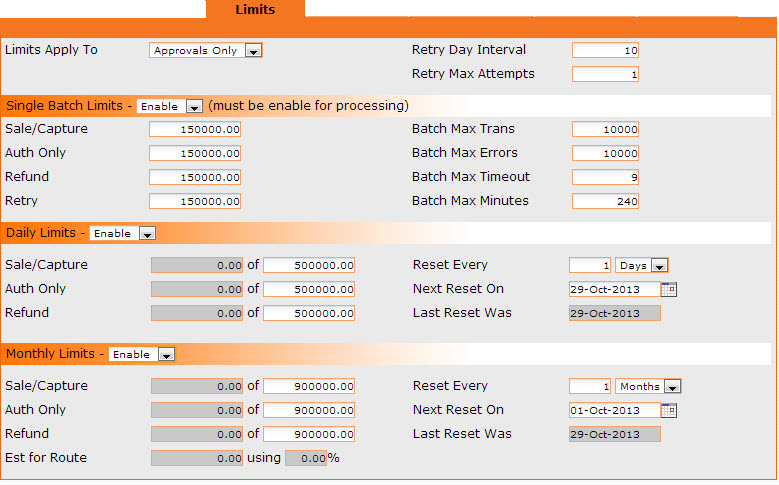
Limits Tab
Limits Apply To - Allows you to set the limits for All Transactions (Declines and Approvals) or Approvals Only.
Retry Day Interval - Number of days between retries.
Retry Max Attempts - Max number of times to retry.
Single Batch Limits drop down fields - Batches can be run several times per day. Set the limits per batch below.
Sale/Capture - Total sales that can be sent in a batch.
Auth Only - When running PreAuth's, enter the amount to limit them to.
Refund - Max amount of refunds per batch.
Retry - Total retries that can be sent in a batch.
Batch Max Trans - Sets max number of transactions per batch.
Batch Max Errors - Sets max number of transactions that can error in a batch before the batch job stops. (Recommended setting is 10 to 25)
Batch Max Timeout - Sets how long (in seconds) OrangeCRM waits for a response from the bank.
Batch Max Minutes - Sets how long (in minutes) OrangeCRM will take to run batch jobs.
Daily Limits drop down fields - Enter your daily currency limits - can be either enabled or disabled. The gray fields below reports the amount you have captured, preauthorized, or refunded from your daily limit.
Sale/Capture - In the white field, enter your total daily sales or captured funds limit. The gray box will report the amount of captured funds against your daily limit.
Auth Only - In the white field, enter the currency amount of your total daily PreAuth limit. The gray field reports the amount of preauthorizations used against your daily limit.
Refund -In the white field, enter the currency amount of your total daily refund limit. The gray field reports the amount of refunds used against your daily limit.
Reset Every - Allows you to adjust the frequency of resets on your daily limit.
Next Reset On - Allows you to select the specific date you want to start your resets on. Once selected, your resets will occur according to what is entered in the Reset Every field.
Last Reset Was - Shows when the last reset occurred.
Monthly Limits drop down fields - Enter your monthly currency limits - can be either enabled or disabled. The gray fields below reports the amount you have captured, preauthorized, or refunded from your monthly limit.
Sale/Capture -In the white field, enter your total monthly sales or captured funds limit. The gray box will report the amount of captured funds against your monthly limit.
Auth Only -In the white field, enter the currency amount of your total monthly PreAuth limit. The gray field reports the amount of PreAuth used against your monthly limit.
Refund - In the white field, enter the currency amount of your total monthly refund limit. The gray field reports the amount of refunds used against your monthly limit.
Est for Route - If you are load balancing merchant banks, this tells you how much of the Estimated load is left on this merchant bank that can be used.
Reset Every - Allows you to adjust the frequency of resets on your monthly limit.
Next Reset On - Allows you to select the specific date you want to start your resets on. Once selected, your resets will occur according to what is entered in the Reset Every field.
Last Reset Was - Shows when the last reset occurred.
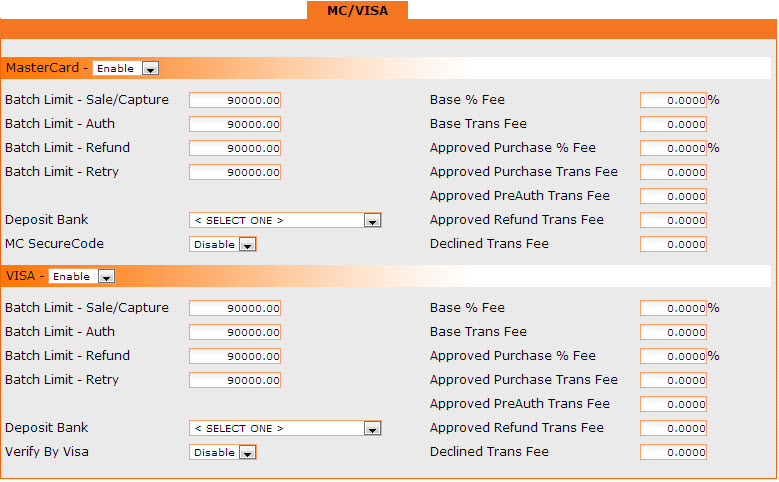
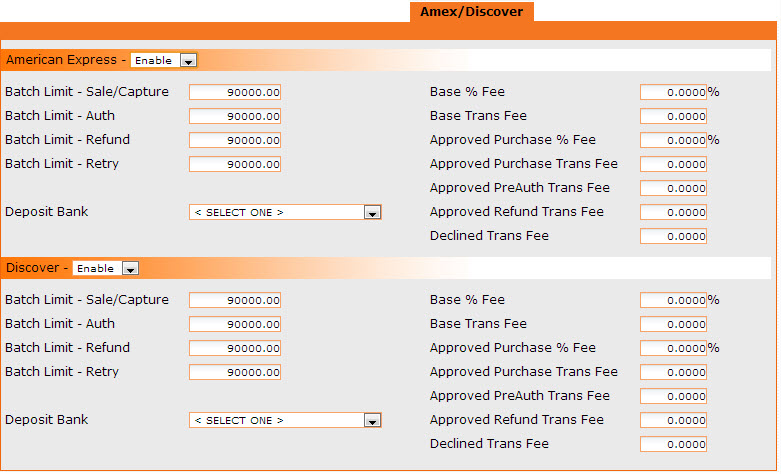
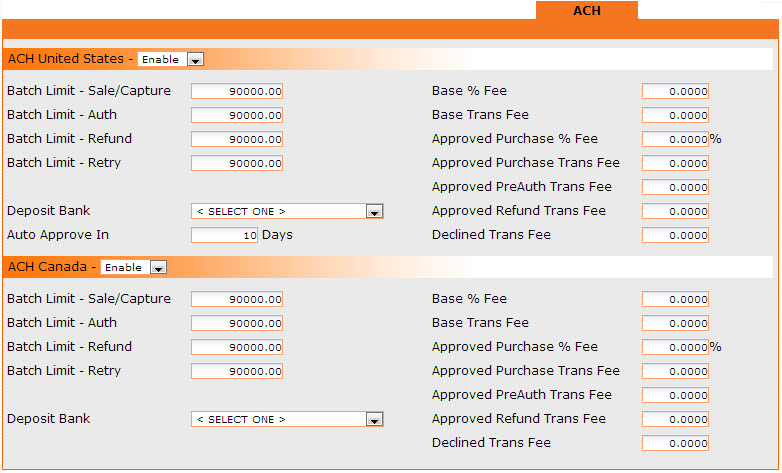
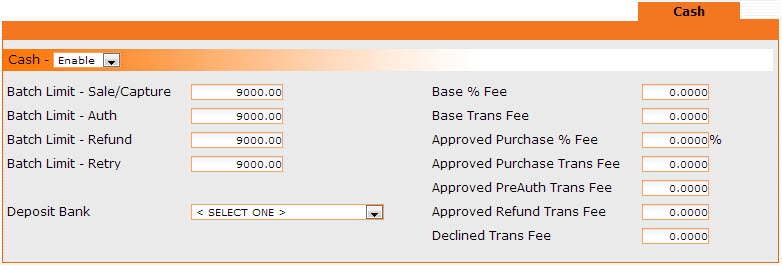
The options for all payment types are the same. You may choose to set up one, some or all of the payment types listed and they may have the same or different setup depending on your preferences.
Enable or Disable the credit cards as needed.
Base % Fee - Fee you will pay based on percentage of sales, determined by your bank.
Base Trans Fee - Fee for bank transactions, determined by your bank.
Approved Purchase % Fee, Approved PreAuth Trans Fee, Approved Refund Trans Fee, Decline Trans Fee - Are various types of fees your banking institution may or may not charge dependent on their policies.
Batch Processing - This option should be enabled if you wish to route transactions to the bank.
Deposit Bank - This is a drop down selection of the bank you wish to use to deposit your funds into (see Deposit Banks for more information).
Batch Limit - Sale/Capture - Allows you to fix how much you wish to send in sales with each batch.
Batch Limit - Auth - Amount you wish to have the bank authorize. This simply checks whether a credit card is valid, it does not process an actual sale.
Batch Limit - Refund - Limits your total refunds per batch.
Batch Limit - Retry - Max amount of funds you attempt a retry on. This amount is included in the options above it and is not in addition to.
Deposit Bank - The bank used to deposit cleared funds into.
MC Secure - MC's protection against unauthorized purchases when shopping online
Verify by VISA - VISA's protection against unauthorized purchases when shopping online
Auto Approve In - Number of days before auto approving an ACH transaction.
Note: See the screenshots of the various kinds of Credit cards, ACH and Cash windows below.
Merchant Bank: Menu Options
Actions Menu
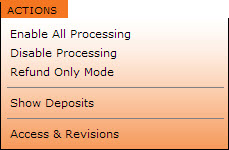
Depending on the users' access rights, the user may be able to perform the actions as noted above: show active fee schedules, show inactive fee schedules, show deposits, and show the access & revisions on this merchant bank.
Enable All Processing - Switches MC/Visa, Amex and Discover to enabled mode. Each credit card type will still need their limits set on their respective tabs.
Disable Processing - Switches MC/Visa, Amex and Discover to disabled mode. Your batch jobs may still run, but they will fail because this process was disabled.
Refund Only Mode - Changes the maximum amount in the Sales/Capture, Auth and Retry fields and sets them to zero. It leaves any credit card enable, but only for Refunds.
Show Deposits - Brings up the Deposit by date menu.
Batch Job (Manager Only)

The batch job menu will allow you to create and control batch jobs that concern this merchant bank directly from the merchant bank form. This provides a short cut to the batch job section of the CRM. See Batch Jobs to learn more.
Show Batch Jobs - Brings up a list of current batch jobs that deal with this merchant bank.
New Batch Job - Brings up a new batch job form, allowing you to schedule the desired function.
Assignments
You can use the Assignments menu feature to show the current bank assignments and create new bank assignments.
Show Bank Assignments - Shows all of the bank assignments already created for this merchant bank.
New Bank Assignment - Creating a new bank assignment enables the routing of transactions to your merchant account based on specified acquisition centers and/or specified fee schedules. See Bank Routes to learn more.
Inactive Toggle
The Inactive Toggle located on the right side on the main Merchant Banks form (as shown below) lists the inactive merchant banks with their payment sources set to disable.