

Programs
 Click one of the links listed above
to jump to a section on this page.
Before setting up anything else in OrangeCRM, you must first create a Program in which all related data will be grouped together. Programs are used to separate customers based on the product or service they purchased. All customers in OrangeCRM are assigned to a Program. You can have an unlimited number of items available for sale in each Program, but they should all relate to the same product or service. If you need the ability to bill a single customer more than once on the same credit card for different products, you will need a separate Program for each product. This allows you to manage subsets of your customer database independently.
The Difference Between a Program and an Acquisition Center
Each Program consists of one or more Acquisition Centers. Acquisition Centers are used to separate customers who belong to the same Program based on how they were acquired. While a Program is the top level under which all related customers are grouped together, the Acquisition Centers are the next level down. To illustrate this, think of a Program as a tree... the Acquisition Centers are the branches and the customers are the leaves. All customers are linked to both a Program and an Acquisition Center.
As an example, let's say you sell a diet pill product. All customers who buy the diet pill would be assigned to one Program named Diet Pill. Within the Diet Pill Program, you wish to track the phone orders, internet orders and mail orders separately. To do that, you would create the following 3 Acquisition Centers in the Diet Pill Program:
1. Diet Pill Phone Orders
2. Diet Pill Internet Orders
3. Diet Pill Mail Orders
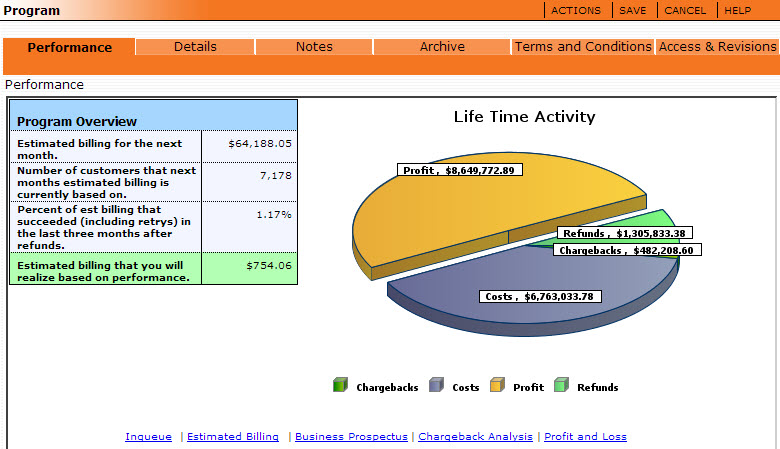
How you structure your programs will determine the top level under which all related data will be categorized in OrangeCRM reporting. A program report example is shown below.
On the Home Page, go to the Lists menu and click on Programs.

Click on the New Program button in the upper right corner.

A new Program window will open.
Go to the Details tab.
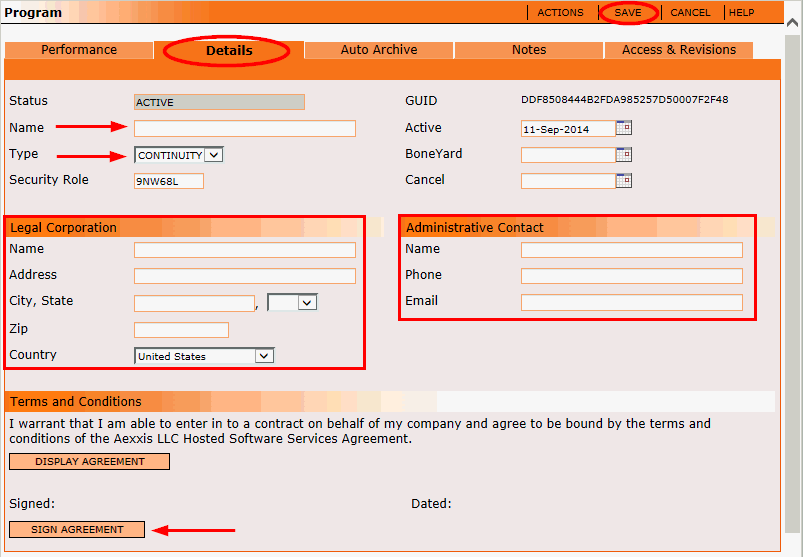
The Status field will be auto-populated as Active when you create a new Program.
The Program Name should be meaningful and cover all items to be sold under that Program. This is an important field. It is used to identify the Program and will be referenced in several places throughout the CRM including reports. Therefore, make sure you choose a name that is descriptive and clearly differentiates this Program from other Programs.
 The Name field can only
be edited during the creation stage. Once you have saved your new program,
you will not be able to change
the name. So take your time when considering the naming convention you
will use and make sure the program name is both meaningful and free of
errors, as it will be stamped throughout the CRM in several locations
and in reports.
Select the Type of program you want to create. There are three types of programs you can choose from:
Continuity - Used for marketing products or services that have a recurring billing or subscription based charge associated with them.
Nonbilling - Used for marketing products or services that do not have recurring billing. This is normally used for one time sale programs or upsell offers.
Four Click - Creates a program with one merchant account, one acquisition center, and one type of fulfillment. This kind of program can only be created by an Aexxis system administrator.
The Security Role field will be auto-populated with a randomly generated alpha-numeric Role name for this Program, however you can edit this field to change it to a more meaningful Role name with up to ten characters.
 Most people like to use the name of the Program (or a shortened
version thereof) as the Security Role name for easy recognition when assigning
security roles to ACL Users.
The Active date field may be left as it is, or you may enter a new date.
In the Legal Corporation section, fill in your company name and address as you want it to appear in the outgoing customer emails you send through OrangeCRM. This is required for SPAM compliance.
In the Administrative Contact section, fill in the name, phone and email of the person you want Aexxis to contact regarding any questions or concerns about your CRM. This information is for Aexxis use only & won’t be displayed in any emails.
Under the Terms and Condistions section, you must click on the Sign Agreement button before it will allow you to save the Program.
Click the Save button when you are done.
You should now see your new Program in the Programs list.

 After
a new Program has been created, you must activate its Security
Role in order for the Program to be accessible to your ACL Users. For
instructions, please see the next section on this page.
To activate a Program's Security Role, go to the Lists menu and click on Programs.

The Programs list will appear. Click on the pencil icon beside the Program you need to activate the Security Role for.
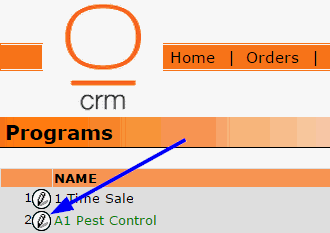
The Program record will open. Then, go to the Actions menu and click on Activate Security Role.

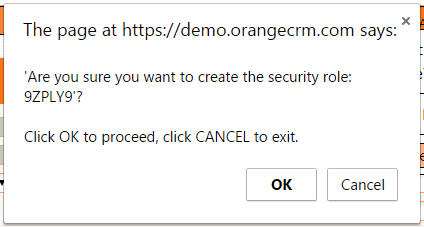
A confirmation box will pop up. Click the OK button to proceed.
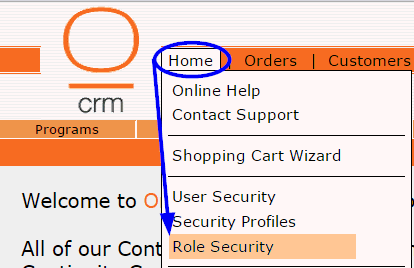
To confirm that the Security Role for this Program has been successfully activated, go to the Home menu and click on Role Security.
The ACL Roles by Name list will appear.
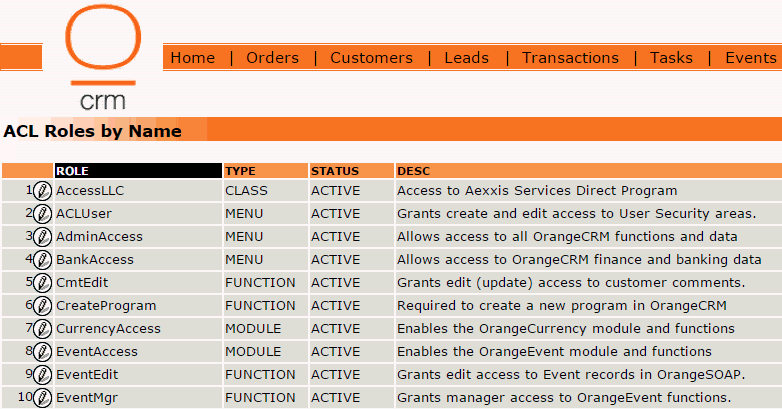
You should see name of the Security Role that was assigned to the Program in this list.
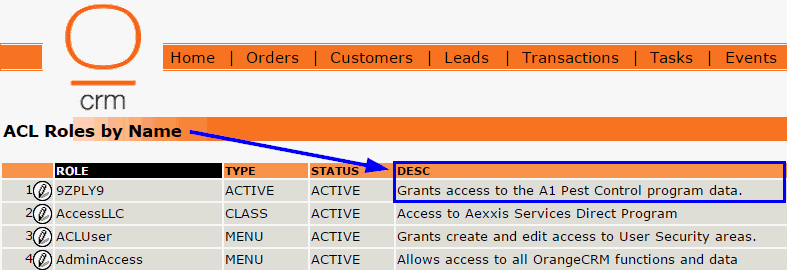
 If you do not recognize any
of the Role names listed, check the Description column for
the Program Name.
 Once a Program's Security
Role has been activated, the Program will be accessible by any ACL Users
who have the SeeAll role (grants access to all programs). For those who
do not have the SeeAll role, they will not be granted access to the Program
unless the Program's Security Role is assigned to their ACL User record.
For instructions, please see the section titled How
To Assign ACL Roles Individually in the User
Security topic.
Existing Programs can be accessed from one of two places, from a Customer Record or from the List Menu. Both options are covered below.
Accessing the Program From a Customer Record
You can access the Program that a particular customer belongs to from the Customer Record window. After you have searched for the customer, open his record and click on the paper icon shortcut beside the Program field. This will open the Program the customer is in.

Below is an example of a Manager's view when the customer's Program is opened. Notice that you are able to see the tabs for Performance, Details, Auto Archive, Notes, and Access & Revisions.
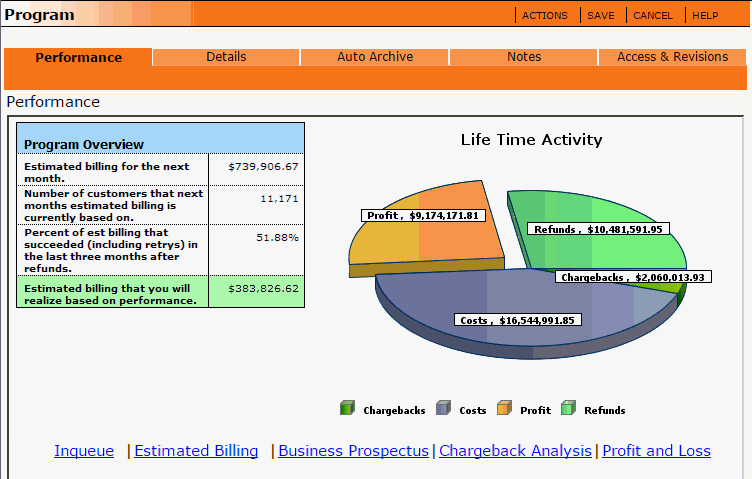
Here is a basic CSR's view when the customer's Program is opened. Notice that you are ONLY able to see the tabs for Details, Auto Archive, Notes and Access & Revisions.
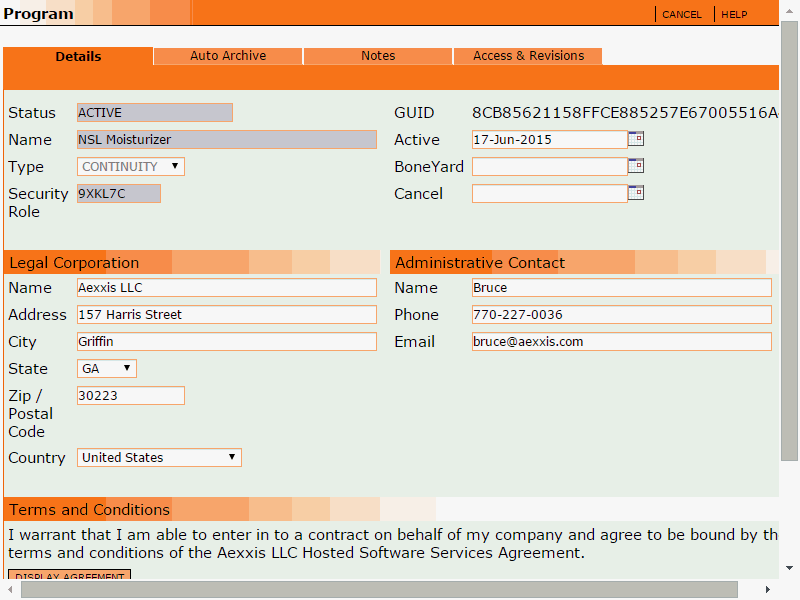
Accessing All Existing Programs
To view all existing Programs, go to the Lists Menu and click on Programs.

A list of all existing Programs will be displayed.

The Programs list view provides an informative breakout of the total number of customers, the number of billable customers, the dollar amount of attempted billings in the last 90 days, the net dollar amount in the last 90 days and the gross dollar amount expected in the next 30 days for each Program.
Click on the pencil icon beside the Program to open it and view more details.
Actions Menu

Mark Inactive
 Use great caution when marking a Program Inactive.
Once a Program is canceled all customer
accounts are canceled and all billing is terminated!
Mark Boneyard
 Use caution when marking
a Program BoneYard. Once
a Program is marked as BoneYard, no new customers can be added to the
Program. Billing will continue
for all existing active customers as attrition continues.
Summary Data
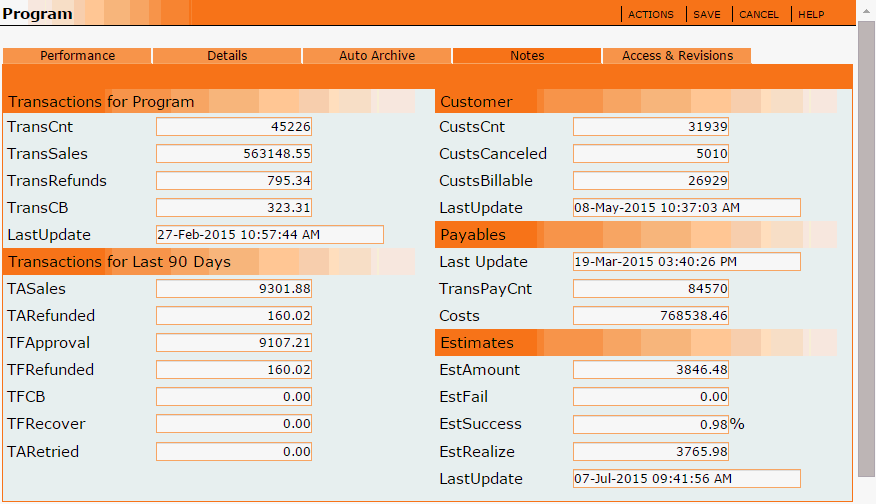
Clicking on Summary Data from the Actions menu of a Program will display a comprehensive summary of all transactions, customers, payables and estimates for the Program. See the example shown below.
Activate Security Role
This allows you to restrict access to the data within this Program. This is commonly used to limit which users or calling centers are allowed to have access to the customers within a particular Program.

After you have edited the default Security Role in the Details tab of the Program, go to the Actions menu and click on Activate Security Role.
 Once you have activated a Program's Security
Role, only users who have been
given that Security Role or the SeeAll Security Role will be able to view
the data within the Program.
A pop-up message will ask: "Are you sure you want to create the security role."
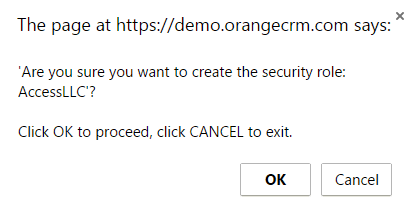
After you confirm the message, the Program's Security Role will be enforced. You must now add the Program Security Role to the users whom you wish to grant access, or assign the SeeAll role to allow the user to see all Programs. See the topic User Security to learn how to add a role to a user.
Performance Tab

The Performance tab provides a graphic overview of your Program's performance, along with convenient links to related reports that provide further details regarding the Program's performance.
Details Tab
Status
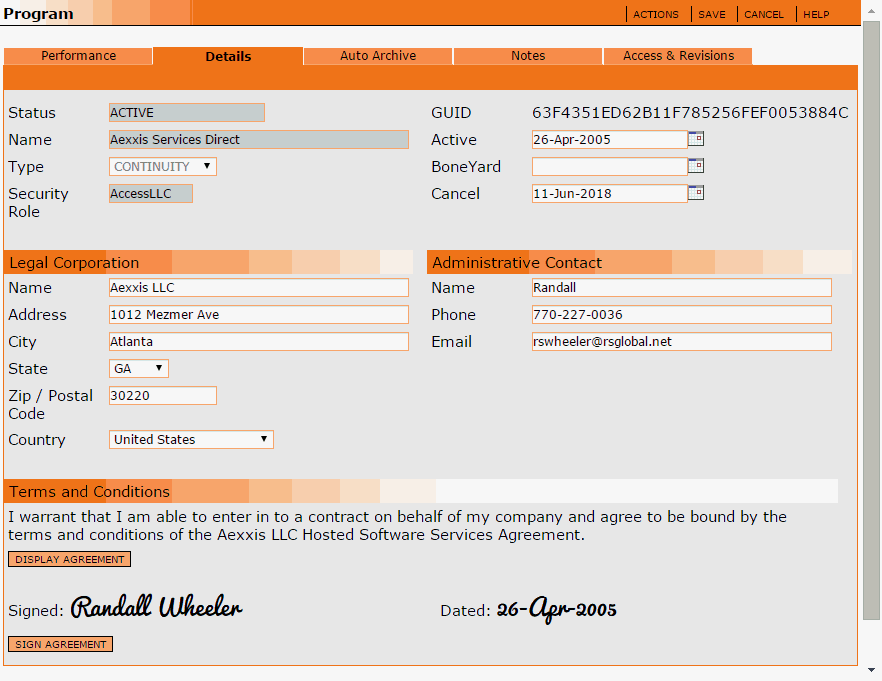
The current status of the Program. When a new Program is created, the Status field is auto-populated as Active.
Name
The Name of the Program. The Program Name should be meaningful and cover all items to be sold under that Program.
 The Name field is only editable
during the creation stage. Once you have saved your new program, you will
not be able to change the name. Make sure
the program name is meaningful and free of errors, as it will be stamped
throughout the CRM in several locations.
Type
The type of Program. There are three types of programs:
Continuity - Used for marketing products or services that have a recurring billing or subscription based charge associated with them.
Nonbilling - Used for marketing products or services that do not have recurring billing. This is normally used for one time sale programs or upsell offers.
Four Click - Creates a program with one merchant account, one acquisition center, and one type of fulfillment. This kind of program can only be created by an Aexxis system administrator.
Security Role
The security role assigned to the Program. This field is auto-populated with a randomly generated value. You may leave it as is or you may edit it as an alpha-numeric text block that will be more meaningful. To change the default Security Role, you must go to the Program Actions menu and click on Activate Security Role after entering the desired value.
Active
The date the Program was created or Activated.
BoneYard
The date the Program Status was changed to BoneYard. This field will remain blank if the Program has never been marked as BoneYard.
 Once a Program is
marked as BoneYard, no new customers can be added to the Program. Billing
will continue for all existing active customers as attrition continues.
Cancel
The date the Program was canceled. You may enter a future date on which you want the system to automatically cancel the Program.
 Once a Program is canceled its status changes
to Inactive, all customer accounts are canceled and all billing is terminated.
Legal Corporation Fields
Your company name and address as you want it to appear in the outgoing customer emails you send through OrangeCRM. This is required for SPAM compliance.
Administative Contact Fields
The name, phone and email of the person you want Aexxis to contact regarding any questions or concerns about your CRM. This information is for Aexxis use only & won’t be displayed in any emails.
Terms and Conditions
Click on the Display Agreement button to view the legally binding terms and conditions that you agree to comply with while using OrangeCRM. Please review it and contact us if you have any questions.
You must click on the Sign Agreement button before it will allow you to save the Program.
Auto Archive Tab

The Auto Archive option enables automatic archiving of old customer records that are in a canceled status. If an archived customer places a new order, a new customer record will be created. Archived records are still searchable, but not editable.
Customer Archive
The system default setting is Disable. To activate the Auto Archive function, select Enable from the drop down list.
Customers In Status
Select from the drop down list which type of canceled status customers must be in to qualify for Auto Archive. The definition of each option is listed below.
Canceled - Any canceled customer record, regardless of whether it was canceled by a CSR or by the system.
CSR Canceled - Only customer records canceled by a CSR or any other CRM user.
System Canceled - Only customer records canceled by the system.
Archive After
Enter the number of days the system must wait before it Auto Archives a customer after they have reached the selected type of canceled status.
 In
order for the Auto Archive feature to work, you must schedule the batch
job named Customer Archive. We
recommend that you schedule this batch job to run at least once a week.
For details on how to schedule a new batch job, see the topic Batch Jobs.
Notes Tab
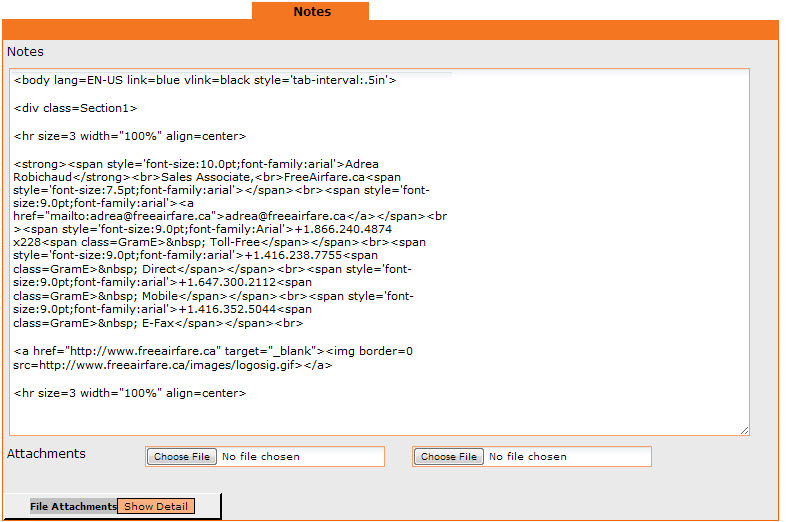
In the Notes tab you will find a large empty box in which you may enter text or HTML code for anything you wish to be displayed when the Program is accessed from the paper icon shortcut on a Customer record.
![]()
This allows for any program related details and external links to quickly be made available to CSRs with a single click.
Shown below is a sample of information that can be displayed when clicking on a program shortcut. Hyperlinks can also be included in your company logo or elsewhere to direct CSRs to a related website.
![]()