
User Security
In this Topic: Hide
 Click one of the links
listed above to jump to a section on this page.
ACL stands for Access Control List. An ACL User is any person whom you have created a username and password for in OrangeCRM. Each ACL User will be assigned a set of security roles specific to the level of access that their work function requires.
In order to have access to OrangeCRM, an ACL User must be assigned at least one ACL Role. An ACL Role is a permission that is assigned to an ACL User Record, which grants the user access to a specific function, menu, module or data set within OrangeCRM. For example, the ACL Role named MenuCustomer enables access to the Customer menu on the home page. Assigning the MenuCustomer role to an ACL User will allow them to view and access the Customer drop down menu.
OrangeCRM comes with a pre-installed set of ACL Roles to get you started. However, please be aware that each time you create a new Program, you must also activate an ACL Role for the new Program. For instructions, please see the section titled How to Activate a Program's Security Role in the Programs topic.
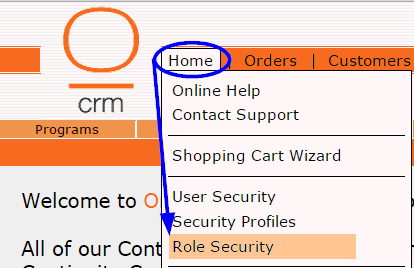
A list of all existing ACL Roles can be viewed by going to the Home menu and clicking on Role Security.
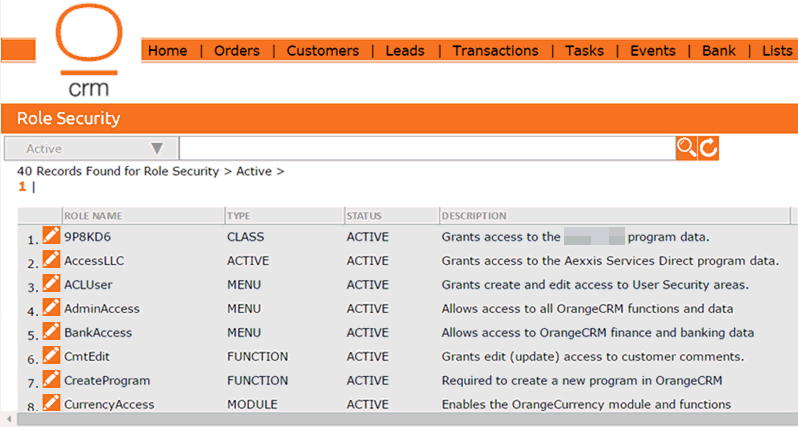
The Role Security list will appear. This view shows you the Name, Type, Status and Description of each existing ACL Role.
To open an ACL Role record and view more details, click on the pencil icon beside it.
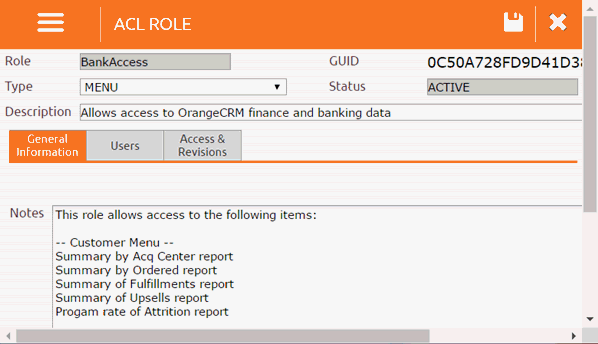
General Information Tab
This is where any miscellaneous details pertaining to this role may be recorded for reference purposes. See the example shown above.
Users Tab
Contains a list of all User records that have this ACL Role assigned to them.
 ACL Roles are managed by system administrators only.
To have an ACL Role changed or a new ACL Role created, please contact
your system administrator or the provider of this software.
To create a new ACL Role, go to the Home menu and click on Role Security.

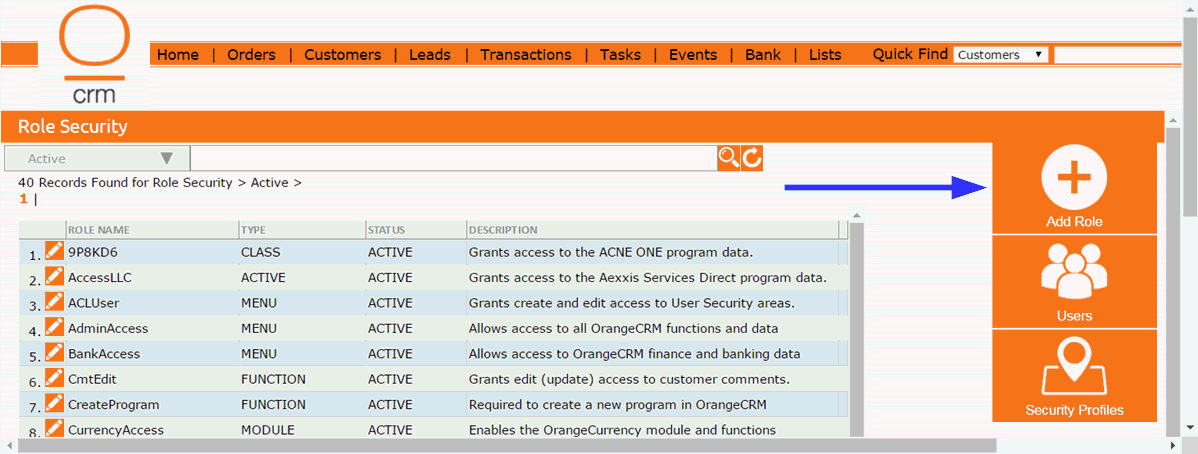
The Role Security list will appear. Click the Add Role button in the upper right corner.
A new ACL Role record will open.
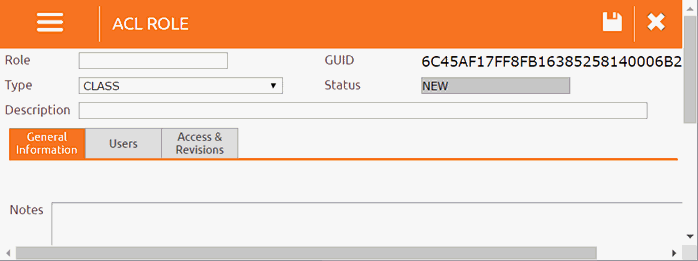
Role
Enter a descriptive name for this Role.
Type
Use the drop down selector to choose one of the following Role Types:
Class - Used for roles that grant access to one single Program, all Programs (SeeAll Role) or other specific areas in the CRM such as the Performance tabs and charts in various records, etc.
Form - Used for roles that grant access to a specific type of record/form, such as all predefined comments or all master event records, etc.
Function - Used for roles that grant access to a specific function, such as the Request New Fulfillment action on a customer record or edit access to transaction records, etc.
Menu - Used for roles that grant access to a main menu on the home page, such as the Customers menu and Transactions menu, etc.
Module - Used for roles that grant access to a module, such as OrangeEvent or OrangeSOAP, etc (see the topic What Is a Module?).
Report - Used for roles that grant access to reporting.
Description
Enter a description for this Role.
Notes
Enter any miscellaneous details about this Role that you wish to notate.
Click the Save button when you are done.
You should now see the new role in the Role Security list.
Protecting your company data is extremely important! So we recommend granting your ACL Users ONLY the level of access that their work function requires. To assist you in that regard, OrangeCRM comes pre-installed with the following 6 recommended Security Profiles:
Accountant
CSR Advanced
CSR Basic
CSR Manager
System Admin
System Manager
Each of the above Security Profiles are assigned their own set of ACL Roles (as shown below).
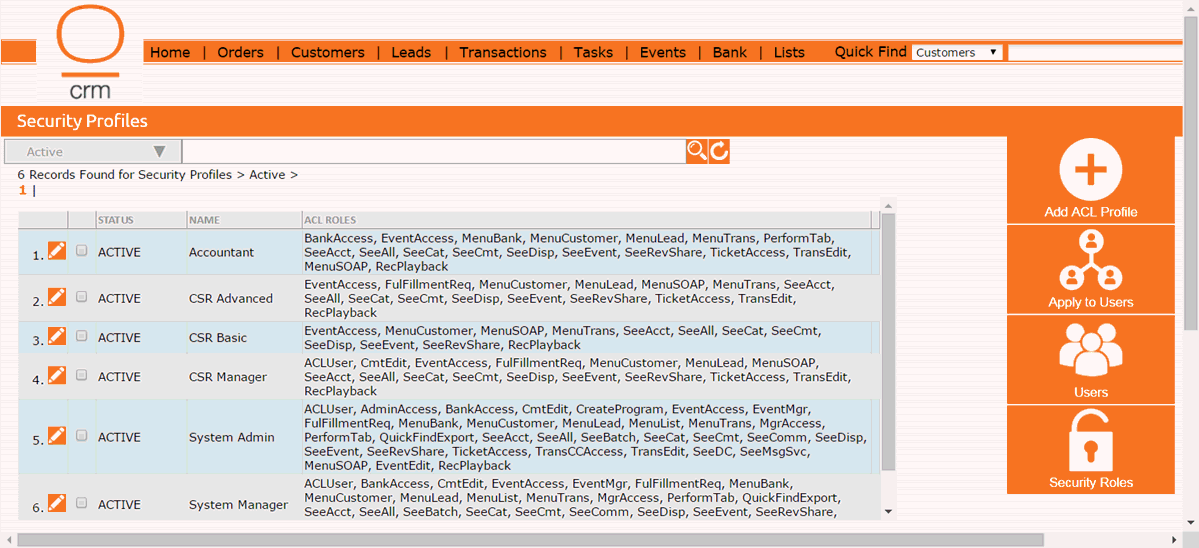
Security Profiles can be customized to fit your company's needs by adding or removing any Role from an existing Profile or by creating a new Profile. Instructions for managing Security Profiles and creating a new Security Profile are provided below.
Managing Security Profiles
To manage your Security Profiles, go to the Home menu and click on Security Profiles.
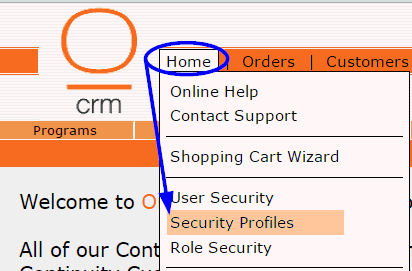
A list of all existing Security Profiles will be displayed, along with the ACL Roles assigned to each profile (as shown below).
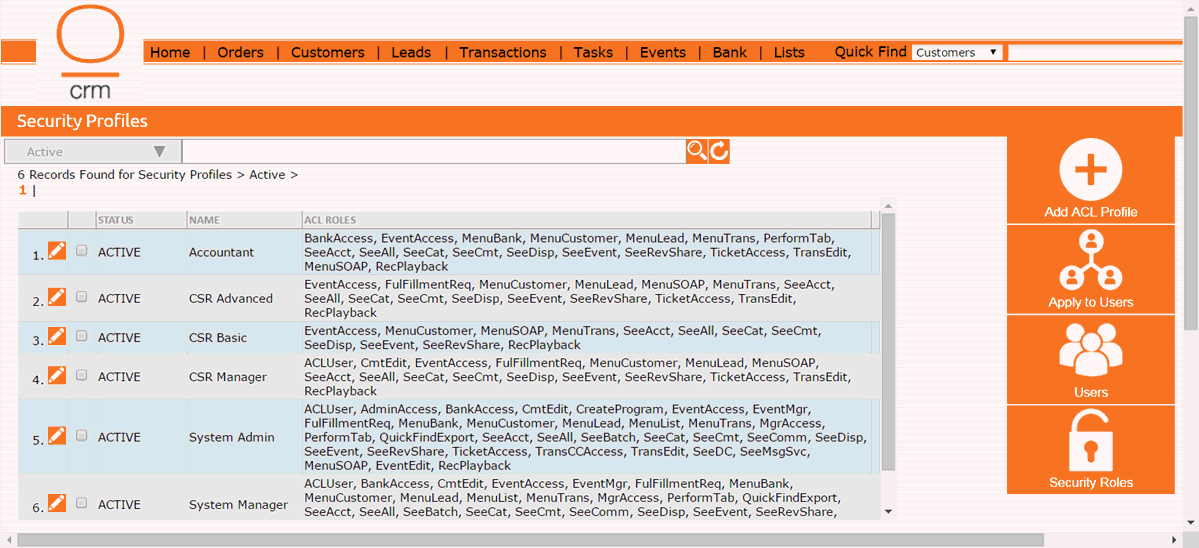
To edit an existing profile, click on the pencil icon beside it.
The ACL Profile record will open.
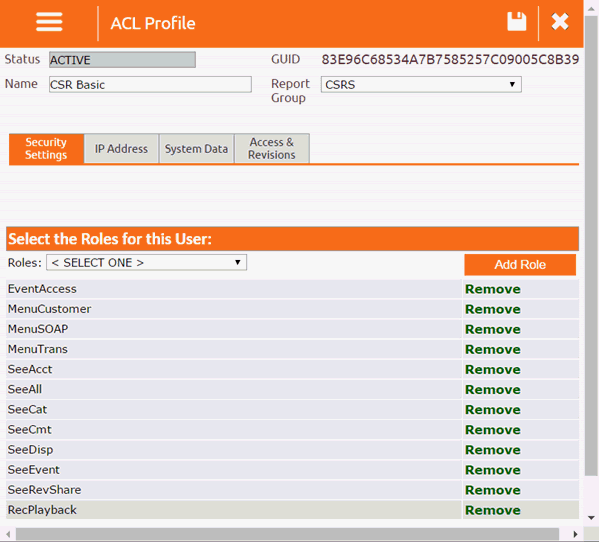
Adding a Role to a Security Profile
To add a Role to the Security Profile, use the drop down selector in the Security Settings tab to choose a Role. Then click the Add Role button.
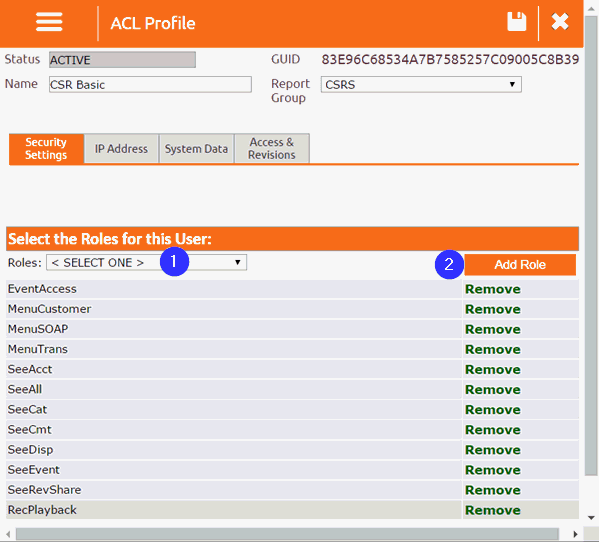
You should now see the added Role in the list displayed in the Security Settings tab.
Repeat the above steps for any additional Roles you wish to add to this Profile.
Click the Save button when you are done editing the ACL Profile.
 Edits made
to an existing Security Profile will NOT
be retroactive. This means users who were assigned to the profile prior
to the edit will NOT automatically
be updated with the changes. You must take an additional step to apply
the changes to all users with that Security Profile. For instructions,
please see the section below titled Applying
Profile Edits to Users.
Removing a Role from a Security Profile
To remove a Role from the Security Profile, click Remove beside the Role you want to eliminate.
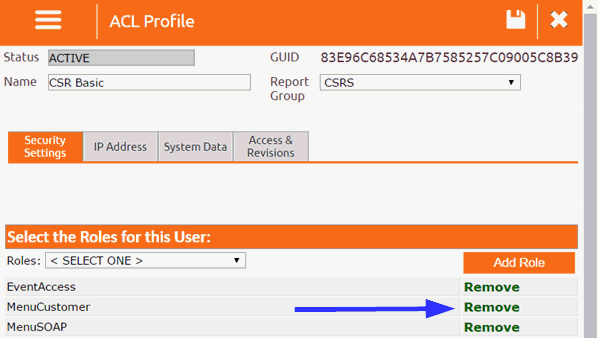
You should immediately see the Role removed from the list displayed in the Security Settings tab.
Click the Save button when you are done editing the ACL Profile.
 Edits made
to an existing Security Profile will NOT
be retroactive. This means users who were assigned to the profile prior
to the edit will NOT automatically
be updated with the changes. You must take an additional step to apply
the changes to all users with that Security Profile. For instructions,
please see the section below titled Applying
Profile Edits to Users.
Assigning or Changing the Report Group on a Security Profile
Report Groups are a way of grouping users into categories in reporting. Security Profiles with a Report Group assignment will auto-populate the Report Group field when the Security Profile is added to an ACL User record.
To assign a Report Group to a Security Profile or to change the Report Group assignment, use the Report Group drop down selector in the upper right corner of the ACL Profile record to choose the Report Group for this profile.
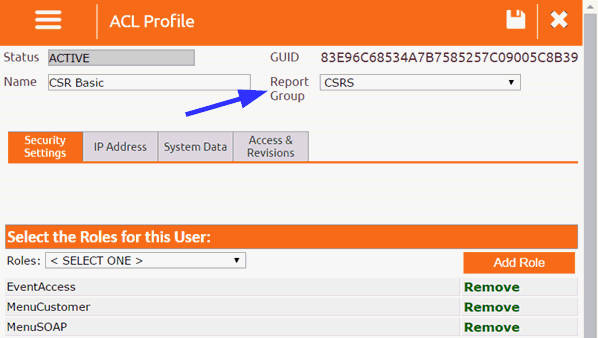
If you do not see an appropriate Report Group that applies to this profile, you can click on < Add New...> to create a new Report Group.
Click the Save button when you are done editing the ACL Profile.
 Edits made
to an existing Security Profile will NOT
be retroactive. This means users who were assigned to the profile prior
to the edit will NOT automatically
be updated with the changes. An additional step must be taken to apply
the changes to all users with that Security Profile. For instructions,
please see the section below titled Applying
Profile Edits to Users.
Applying Profile Edits to Users
When an existing Security Profile is edited, whether it be the addition or deletion of a Role or an adjustment to the Report Group assignment, an additional step must be taken to apply the changes to all users with that Security Profile.
To apply Security Profile edits to users, go to the Home menu and click on Security Profiles.

A list of all existing Security Profiles will be displayed. Click the check box next to each recently edited Security Profile and then click the Apply To Users button in the upper right corner.
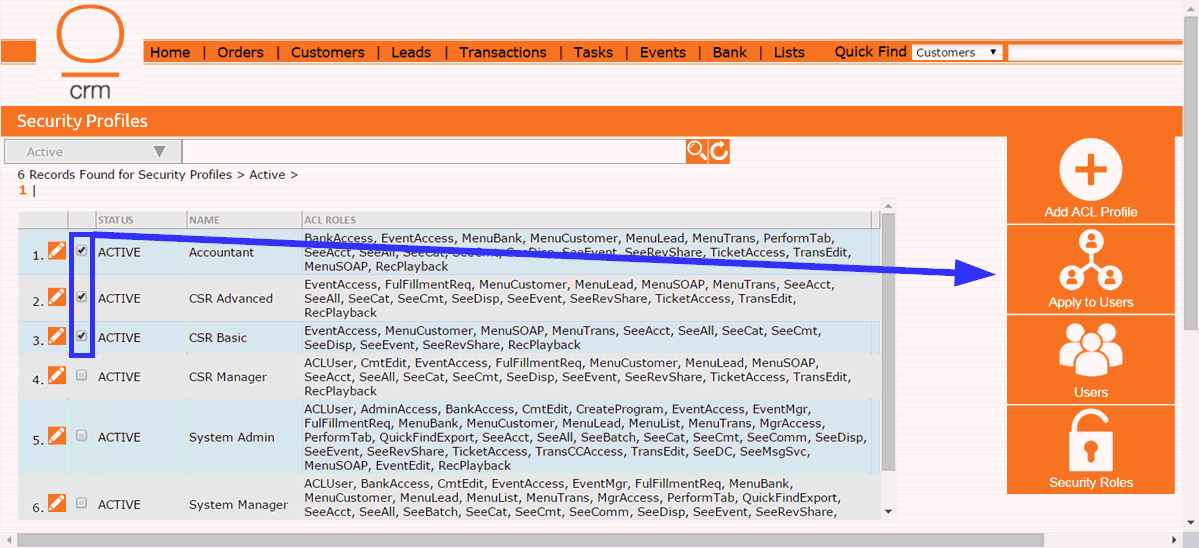
All users assigned to the selected Security Profiles will now be up to date with the latest profile edits.
Marking a Security Profile Active or Inactive
To mark a Security Profile Active or Inactive, open the ACL Profile record, go to the Actions menu and click on Mark Active or Mark Inactive.

Click the Save button when you are done editing the ACL Profile.
 When an ACL Profile is marked Inactive,
it is NOT automatically removed
from the Users who were assigned that Security Profile prior to deactivation.
To remove an Inactive profile from ACL Users, you must open each ACL User
record and either change the Inactive Profile to an Active Profile or
manually add/remove each Role individually. For further instructions,
please see the section on this page titled How
To Assign Roles to an ACL User.
Creating a New Security Profile
To create a new Security Profile, go to the Home menu and click on Security Profiles.

A list of all existing Security Profiles will be displayed. Click on the Add ACL Profile button in the upper right corner.
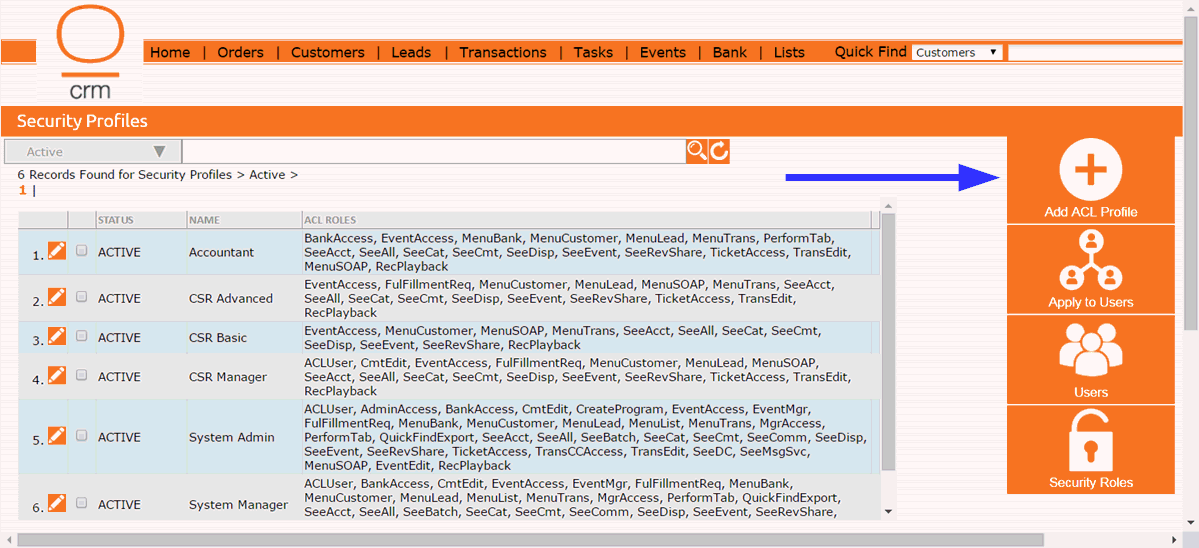
A new ACL Profile record will open.
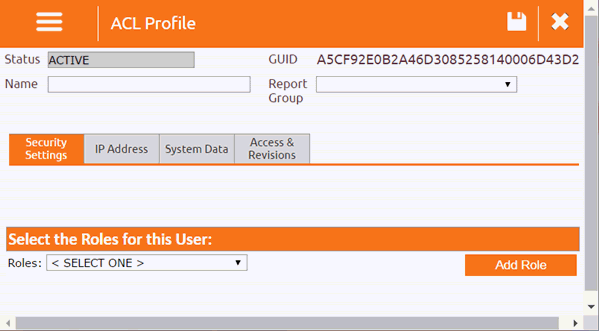
Name
Enter a descriptive name for this Security Profile.
Report Group (Optional)
Report Groups are a way of grouping users into categories in reporting (this is optional). Use the drop down selector to assign this profile to a Report Group. If you do not see an appropriate Report Group that applies to this profile, you can click on < Add New...> to create a new Report Group.
Roles
Use the Roles drop down selector to choose a Role and then click on the Add Role button. Repeat for each individual Role you want to assign to this profile. As you add each Role, you should see it appear in list form in the Security Settings tab, as shown below.

Click the Save button when you are done editing the ACL Profile.
To view a list of all existing ACL Users, go to the Home menu and click on User Security.
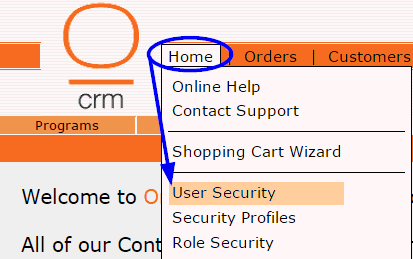
The ACL Users list will appear.
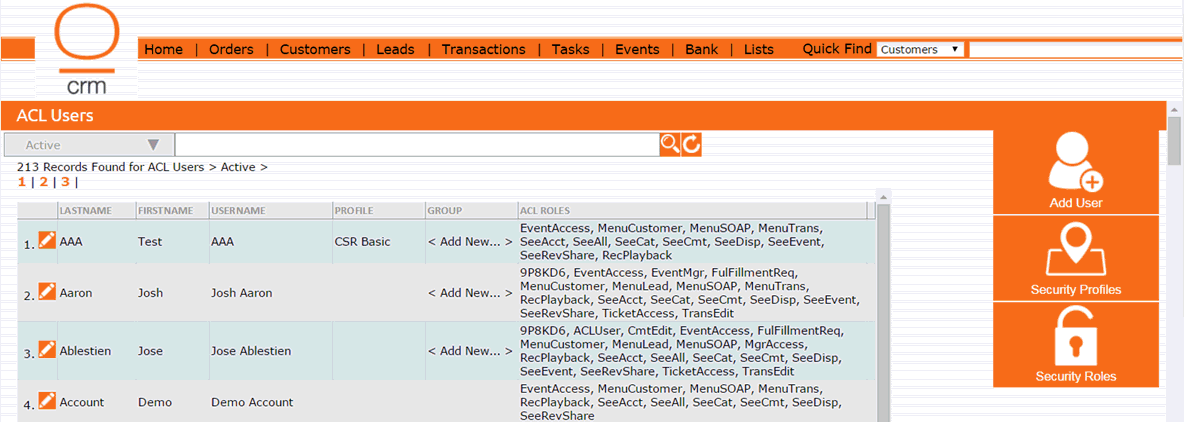
The default view is set to display ACL Users in Active status. However, you can use the drop down selector in the upper left corner to view ACL Users in Deleted, Duplicate or New status.
 Only users in Active status
will be able to login to OrangeCRM. ACL Users with no role assignments
will remain in New status until an ACL Role has been assigned to them,
at which point the status will automatically change to Active.
To open and view an ACL User record, click on the pencil icon beside it.
To create a new ACL User, go to the Home menu and click on User Security.

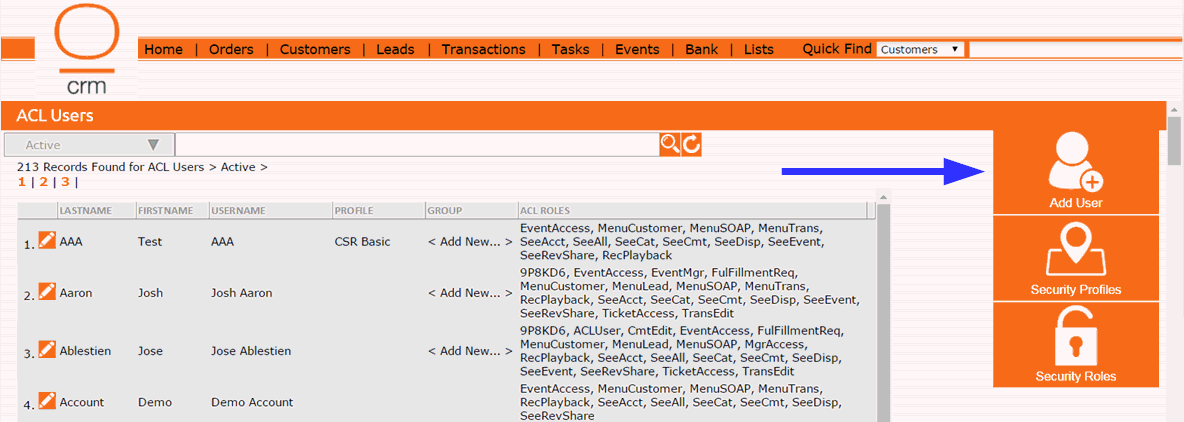
The ACL Users list will appear. Click on the Add User button in the upper right corner.
A new ACL User record will open.
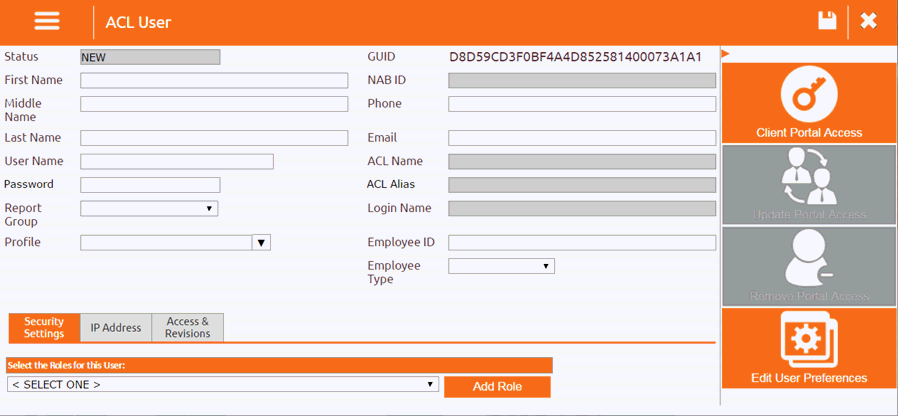
Fill in the user's Name and the User Name and Password you wish to assign to them.
The Phone, Email, Employee ID and Employee Type fields are optional and are for reference purposes only.
Report Group (Optional)
Report Groups are a way of grouping users into categories in reporting (this is optional). Use the drop down selector to assign this user to a Report Group. If you do not see an appropriate Report Group that applies to this user, you can click on < Add New...> to create a new Report Group.
Assigning Roles
For instructions on how to assign Roles to an ACL User, please see the next section on this page titled How To Assign Roles to an ACL User.
IP Address Tab
The IP Address tab allows you to create an IP Whitelist for the ACL User. If enabled, this will restrict the IP addresses the user will be able to access OrangeCRM from. This feature can be used to prevent users from accessing OrangeCRM from unauthorized locations, such as from their home.

IP Whitelist
If you want to create an IP Whitelist for this user, use the drop down selector to choose Enable.
 The OrangeCRM IP address white list uses IP addresses the browser can
see, which are usually internal addresses and not internet route-able
addresses. To see the IP address a browser is using open a command prompt
and type IPCONFIG.
IP Address
To add an IP Address Range, enter a different IP Address into each of the two IP Address boxes. Then click the Add Range button. Repeat these steps for each IP Address Range. Once you have added an IP Address Range, you will see it appear in the IP Address Ranges field.
IP Address Ranges
To add a single IP Address, click in the IP Address Ranges field and enter the IP Address (one IP Address/IP Address Range per line).
Click the Save button when you are done editing the ACL User record.
There are two ways in which you may assign Roles to an ACL User. Both options are covered in this section.
Using Security Profiles To Assign Roles
Security Profiles allow you to quickly assign a predefined set of ACL Roles to a User. For instructions on how to configure Security Profiles, please see the section on this page titled How To Create and Manage Security Profiles.
To use Security Profiles to assign roles to an ACL User, open the ACL User record and click on the eyeglasses icon beside the Profile field to view a list of existing Security Profiles from which you may choose.
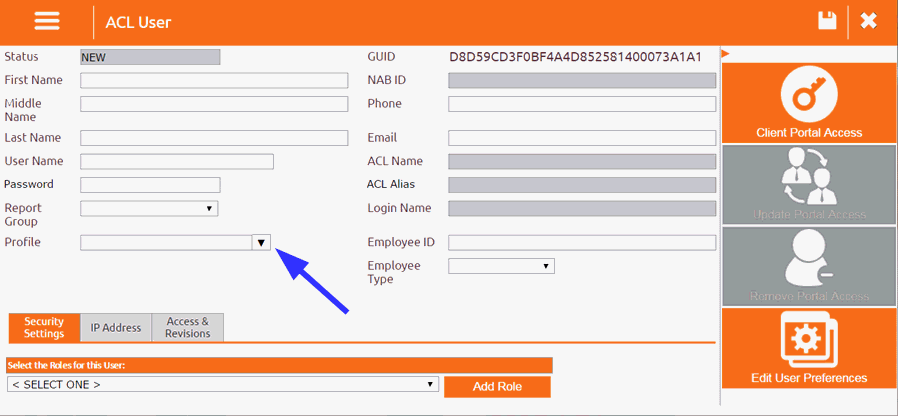
A list of all existing Security Profiles will pop up. Double click the Security Profile you want to assign to this user.

The Profile field in the ACL User record should now be populated with the name of the Security Profile you selected.
Click the Save button when you are done editing the ACL User record.
 If you do not wish to use a Security Profile, then you must assign
ACL Roles to the user individually. For instructions, please see the next
section on this page.
Assigning Roles Individually
To assign roles to an ACL User individually, open the ACL User record and use the Roles drop down selector in the Security Settings tab to choose a Role. Then click the Add Role button.
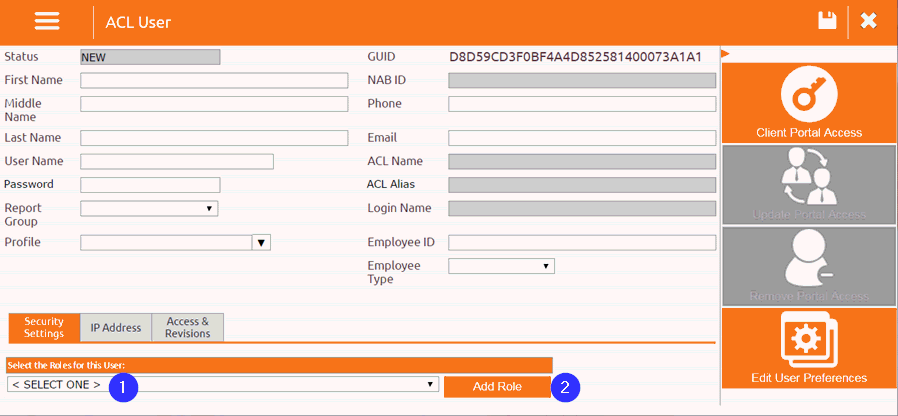
Repeat the above steps for each individual Role you want to assign to this User. As you add each Role, you should see it appear in list form in the Security Settings tab.
Click the Save button when you are done editing the ACL User record.
Wondering which Roles should be assigned to a User? Protecting your company data is extremely important! So we recommend granting your ACL Users ONLY the level of access that their work function requires. To assist you in that regard, OrangeCRM comes pre-installed with the following 6 recommended Security Profiles:
Accountant
CSR Advanced
CSR Basic
CSR Manager
System Admin
System Manager
Each of the six pre-installed Security Profiles are assigned their own set of ACL Roles. These are our recommended Security Role settings. For instructions on how to use Security Profiles to assign Roles to a User, please see the section on this page titled How to Assign Roles to an ACL User.
If you are assigning Roles to a User individually and want to know which Roles we recommend for each type of User, please refer to the chart below:
Accountant
|
CSR Advanced
|
CSR Basic
|
CSR Manager
|
System Admin
|
System Manager
|
 Please keep in mind that individual Program Roles
must also be added to ACL Users, in addition to the recommended roles
in the chart above. For instructions, please see the section titled How to Activate a Program's Security Role
in the Programs
topic.
Role Descriptions
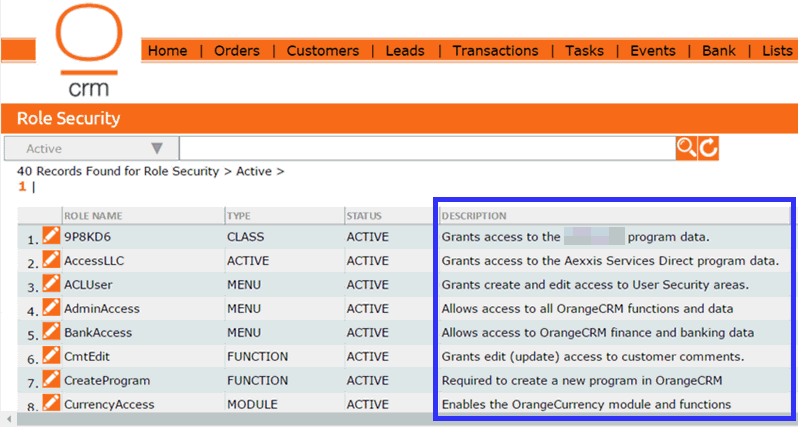
To view a description of each Role, go to the Home menu and click on Role Security.

The Role Security list will appear, along with a description of what each Role grants access to in the CRM.
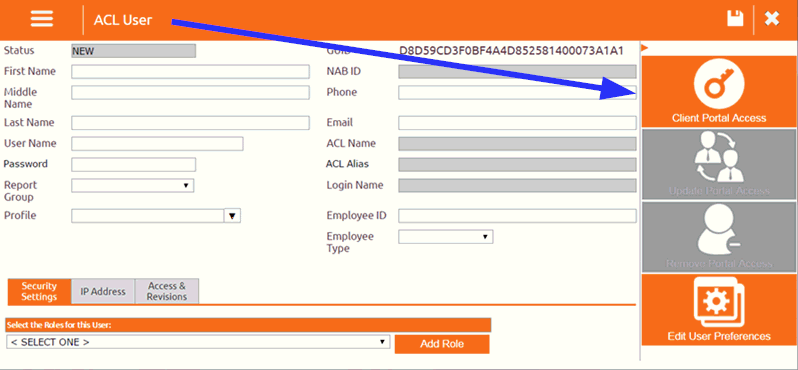
For instructions on how to manage user access to the client portal and how to use the various features within the portal, please click the following link to visit the official Client Portal Help Guide.
OrangeCRM comes with two user interface options, touch and classic. If a user prefers one user interface over the other, their preferred UI can be set on the ACL User record. They will still be able to easily switch back and forth between the interfaces as needed. However, their preferred interface will be the default upon login.
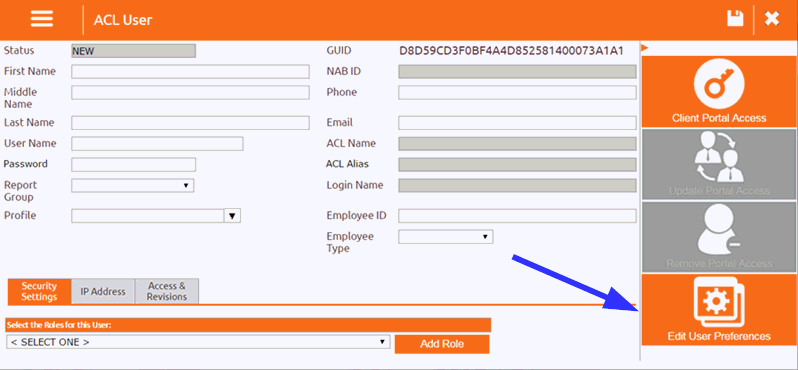
Open the ACL User record and click the Edit User Preferences button located in the far right panel.
When the User Preferences window pops up, use the Navigation Style drop down menu to select either Tiles for the touch UI or Classic.
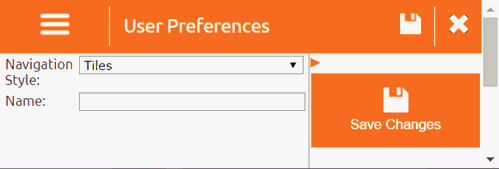
If you wish to assign a custom name to this preference setting, you may do so in the Name field, but it isn't required.
When you are finished, click the Save Changes button.
 Once an ACL
User has been removed, it can NOT
be reactivated at a later time. If a Deleted User needs access to OrangeCRM
at some point in the future, a new ACL User record will have to be created
at that time.
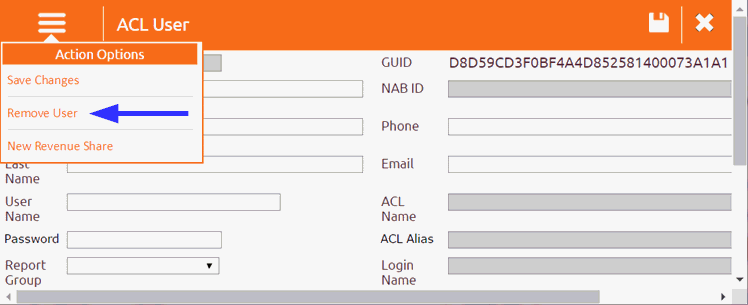
To remove an ACL User so that they no longer have access to OrangeCRM, open the ACL User record, go to the Actions menu and click on Remove User.
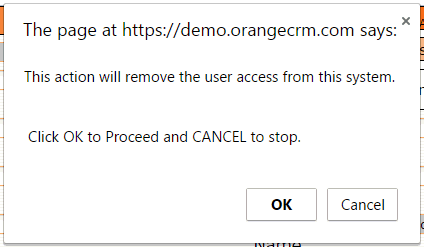
A confirmation box will pop up. Click OK to proceed.
The User will now be in Deleted status and will no longer be able to access OrangeCRM.
To confirm that the User's access has been successfully removed, go to the Home menu and click on User Security.

The ACL Users list will appear. The default view is set to display the Users in Active Status. Use the Status drop down selector in the upper left corner to choose Deleted.
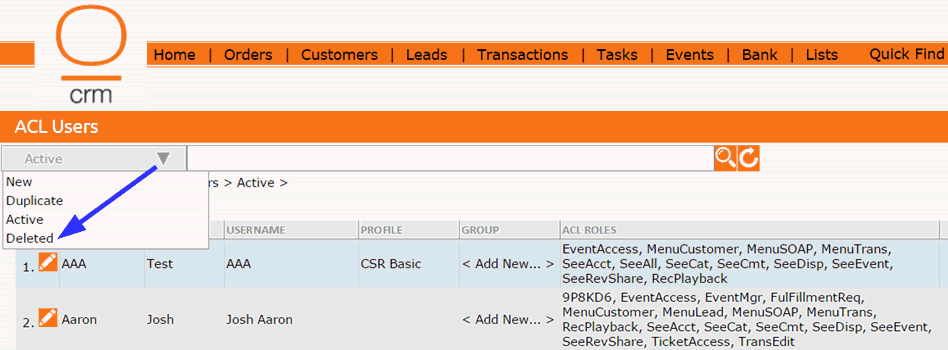
You should now see the Deleted User in this list.
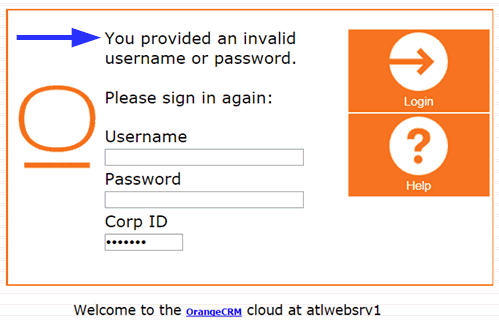
All users in Deleted Status will not be able to access OrangeCRM. If they try to login, they will receive the error message pictured below. If a Deleted User needs access to OrangeCRM at some point in the future, a new ACL User record will have to be created at that time.
